Picot Blanket Crochet Pattern
The Picot Blanket is full of beautiful texture because of the ribbed like stitches and picot stitches! This blanket can be made any size and also in any color combination that you’d like! The modern and fun look is perfect for any home and room, and it also makes for a great gift! This crochet blanket pattern uses a simple 6 row repeat that is best suited for an advanced beginner or higher.
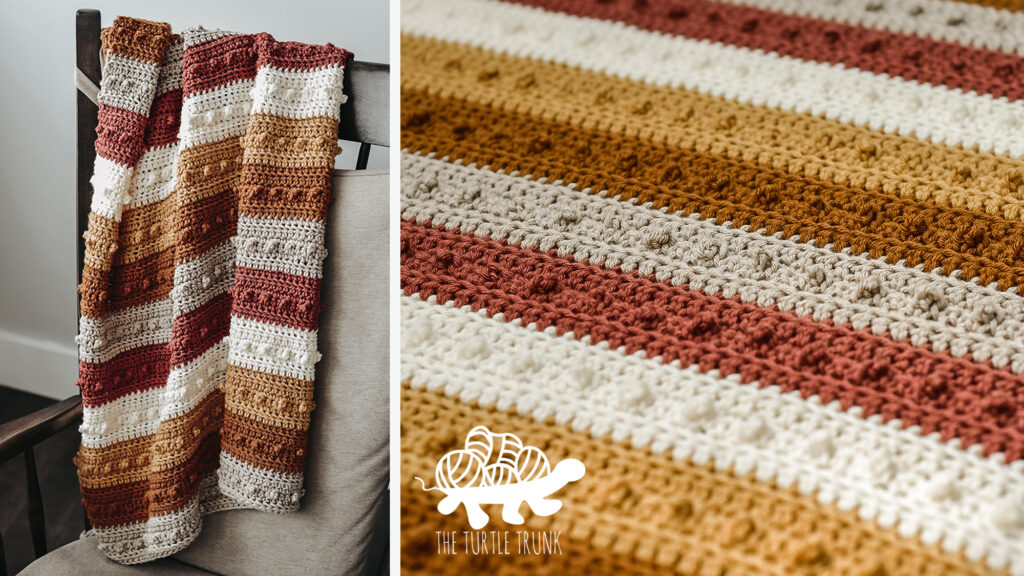
I am so excited to share the Picot Blanket crochet pattern with you all because I had so much fun making it and think you’re going to love it too! If you’re familiar with my designs, then you know how much I love the picot single crochet stitch! It is so fun, adds so much beautiful texture, all while being easy to create! So I just knew I had to use it for a blanket!
The Picot Blanket crochet pattern includes instructions for 7 different sizes but you can easily adjust the size too! This blanket would make for a great gift, such as for a baby shower, wedding, or any holiday! You can use as many or few colors as you’d like, so it can perfectly match your home and style!
I hope you enjoy making the Picot Blanket! Continue reading below to hear my inspiration for this pattern and to learn more about the yarn I used, then scroll down for the written pattern!
You can find the ad-free and printable pdf version of this pattern on Etsy and also Ravelry!
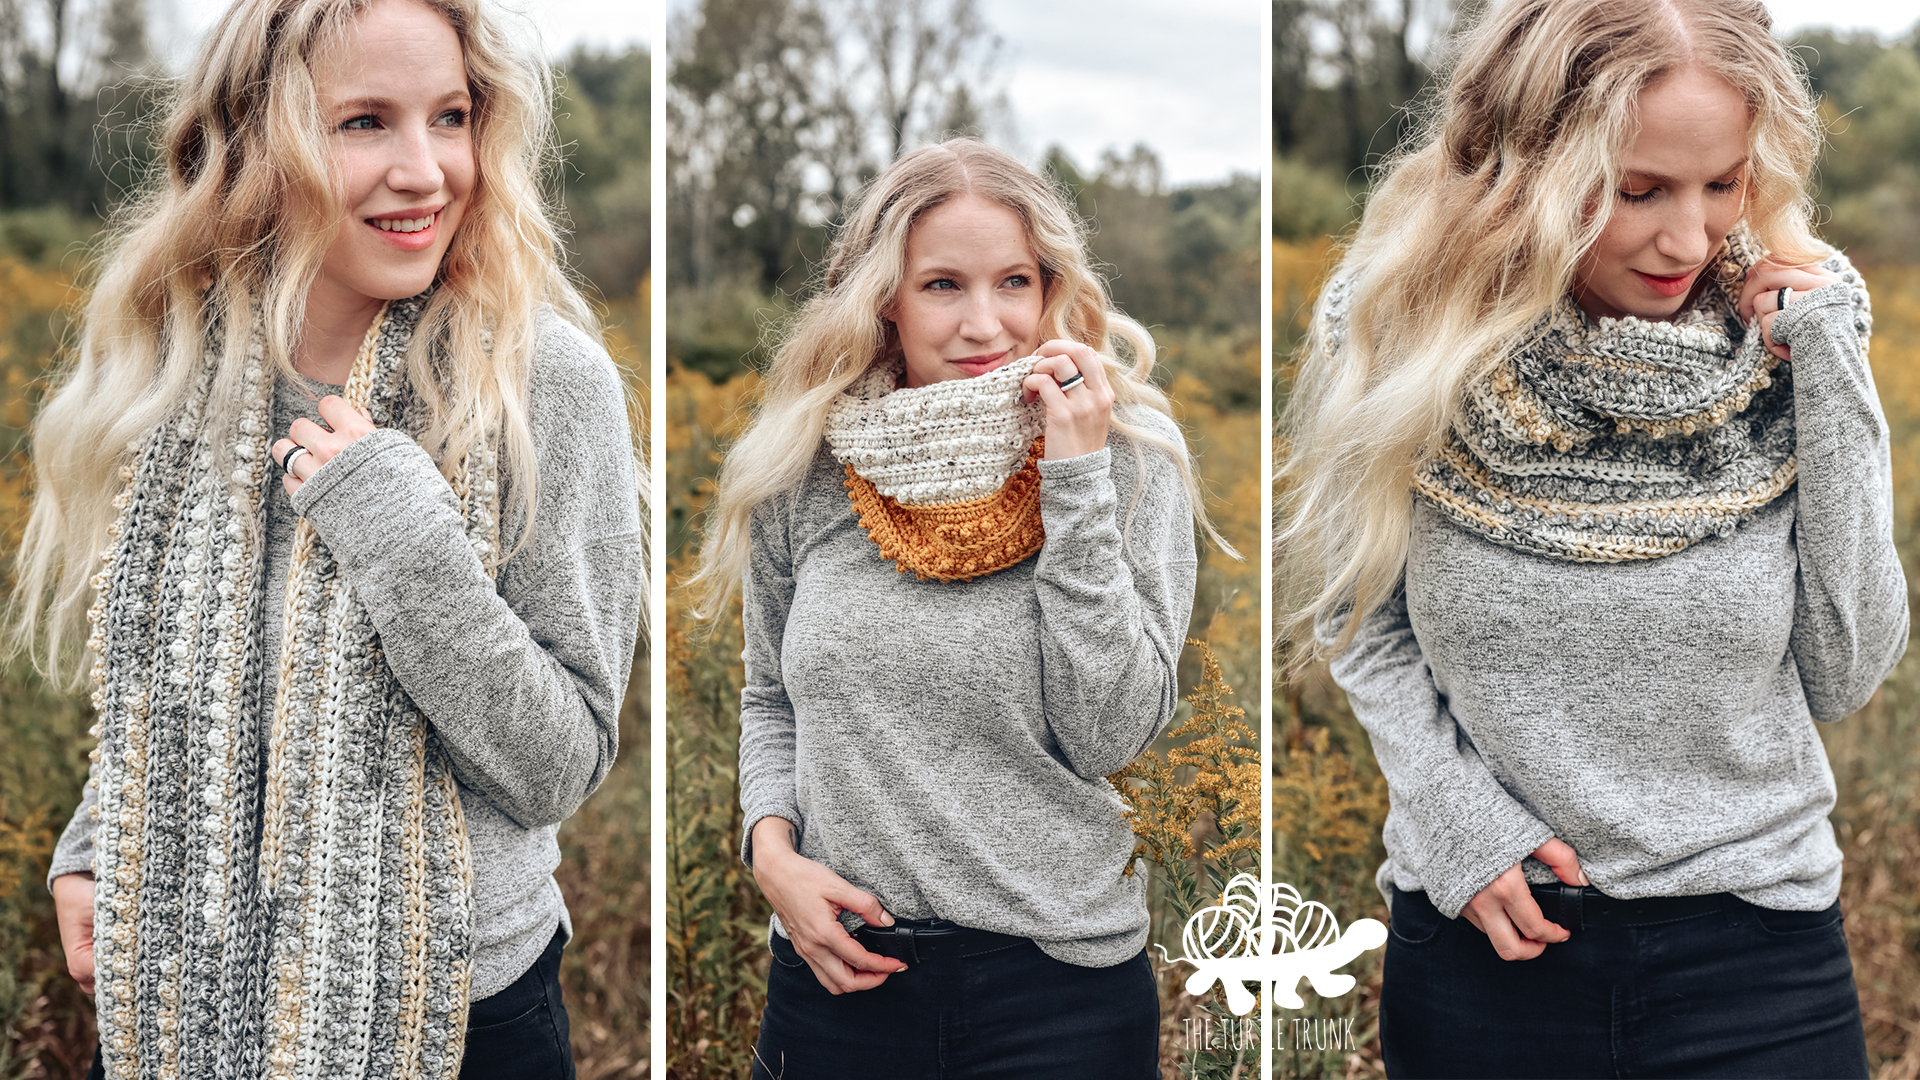
Check out these other Picot Patterns: Picot Headband, Skinny Picot Headband, Picot Beanie, Picot Scarf & Cowl, and more!
If you’d like more crochet blanket patterns, then check out my Bebe Baby Blanket, Bonfire Blanket, and American Flag Blanket.

Inspiration
I love the picot single crochet stitch, so my goal is to use it on as many designs as possible! It adds such a fun and unique texture, but is also simple enough to create. Over the past year I’ve come to love designing blankets, even though I actually used to not enjoy making blankets at all! I always thought of them as too time consuming and a bit boring, but I found with the right stitches and color changes, they can actually be fun and interesting! My goal with the Picot Blanket pattern was for it to be easy enough to mindlessly work on and not have to check back at the pattern whole way through, but interesting enough that you’re not going to get bored halfway through and never finish.
So the pattern uses a 6 rows repeat, that I’m sure you’re going to know off by heart after working a few times, has the option for many color changes if wanted, and can also be made any size depending on who and what you’re making it for! Therefore it can really be made easier if you want to keep it small and one color, but can made more challenging with lots of colors and made big! The options for this blanket are endless so I can’t wait to see your unique take on it!
Check out my other patterns that use the picot single crochet: Picot Headband, Picot Tree Ornament, Picot Pumpkin, Picot Pillow, Picot Beverage Holder, Picot Ice Cream Pint Holder, Dotty Dishcloth, and Dotty Dish Towel & Hanging Towel.

Yarn
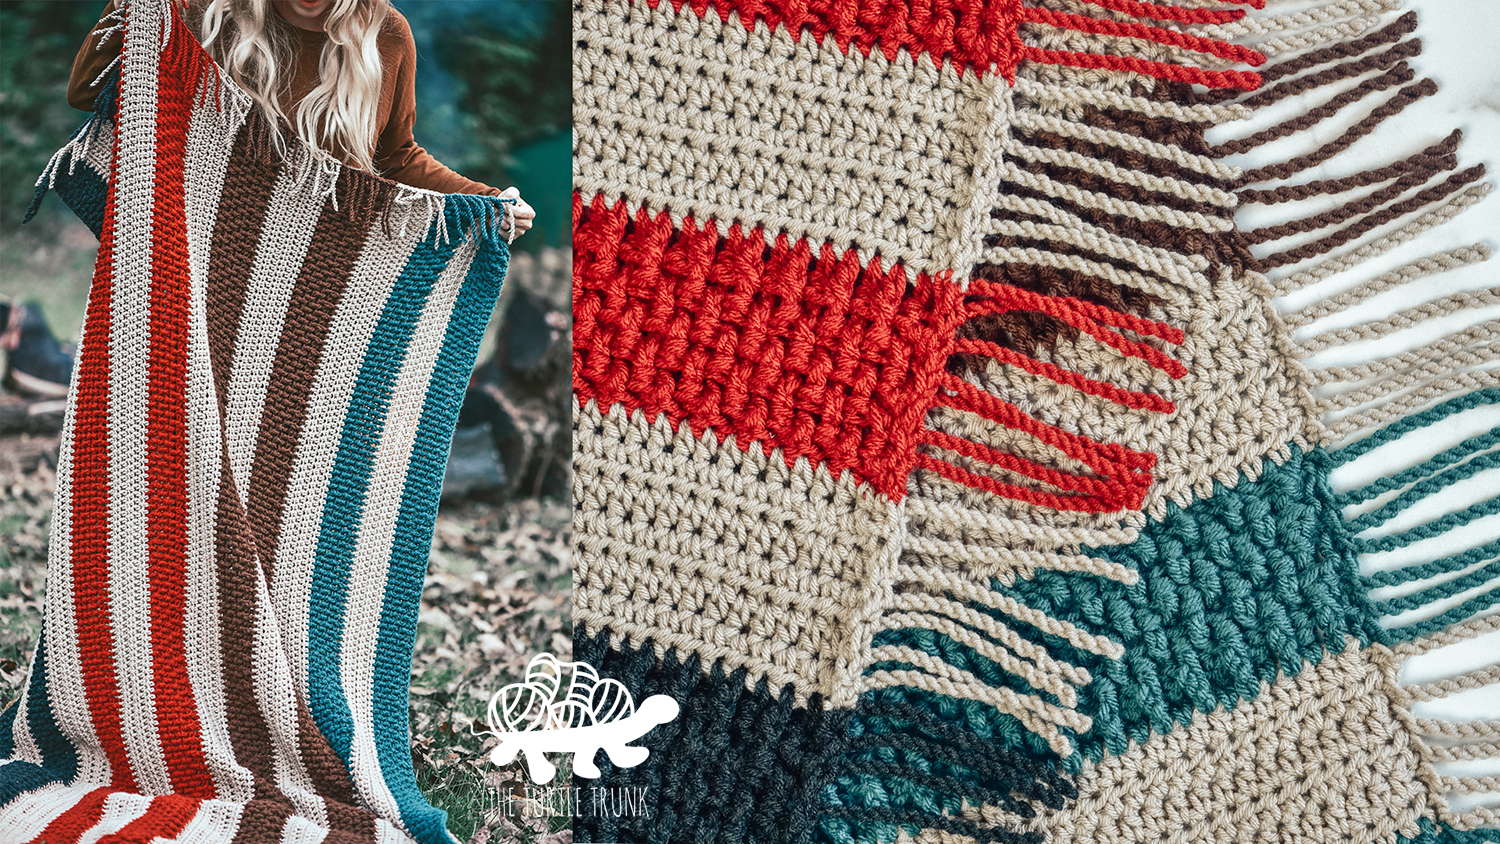
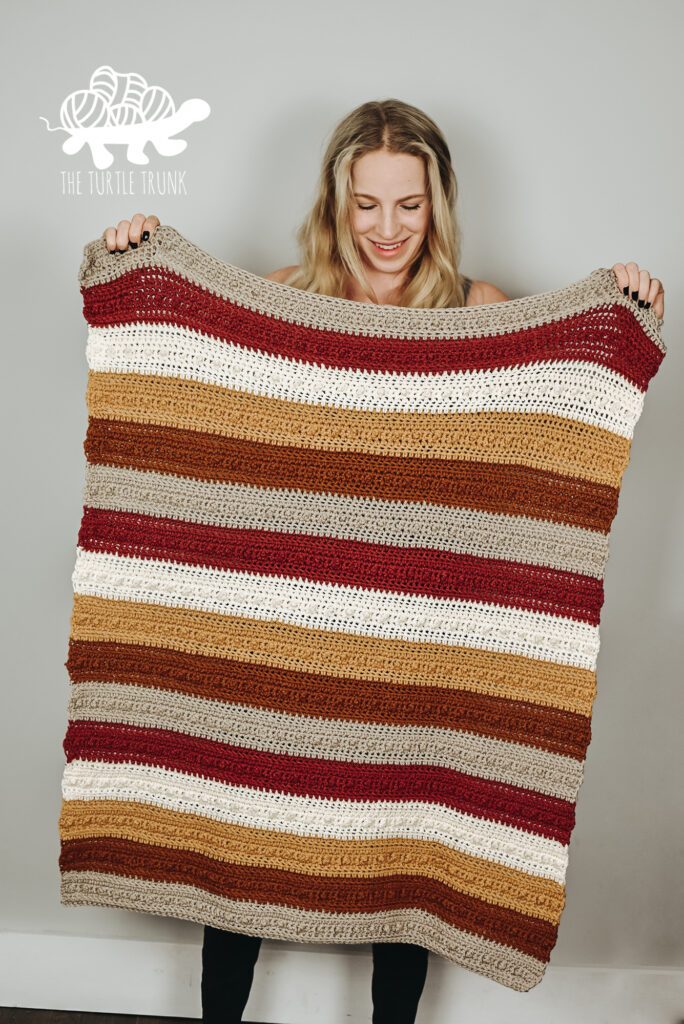
For yarn I used Yarn Bee Soft & Sleek in the colors: Linen, Tobacco, Mustard, Ivory, and also Spice. My blanket had 16 stripes so I used 4 of the colors 3 times and 1 color 4 times. I like Yarn Bee Soft & Sleek because it is soft, durable, and it comes in so many beautiful colors. You can use any medium (4) weight yarn that you’d like though! This blanket would also be a great project to use up scrap yarn since each stripe can use a different yarn/color.
Some other yarn suggestions I think would work great are: Lion Brand Yarn Color Theory, Lion Brand Yarn Basic Stitch, and Red Heart Yarn With Love.
Although I used lots of colors for my Picot Blanket, feel free to use as many or as few colors as you’d like. It would be a good idea to check how many stripes your size has then plan out how many colors you’d like to use and what order to put them in. Use the yardage in the size chart down below to figure out how many yards of yarn you need per size, then take the first yardage number and multiply it by how many stripes you want per color to figure out how many yard per color you will need. This blanket would also look great in just one solid color! The 2nd yardage number in the chart is the total yardage needed for a whole blanket, so if you just want to use just one color you can follow that.
The color combination possibilities are endless, but if you need some inspiration or ideas, I’ve made this Pinterest board to help you out!
Not ready to make just yet?! PIN this pattern for later!

Follow along with the video tutorial for the Picot Blanket on YouTube!
Sizes
This pattern uses a 6 row repeat to create stripes that can be repeated as many times to get your desired length, although there is a size chart down below if you want to follow that! The size chart gives you 7 sizes ranging from baby stroller size to king size, but you can also make it a customize size! Also, be sure to check your gauge with a swatch to ensure proper sizing before you start.
| Size (W X L in Inches) | Stitches (Width) | Stripes (Length) | Yardage (per stripe / total) |
| Baby Stroller (30 x 35) | 90 | 14 stripes (84 total rows) | 54 yards / 756 yards |
| Baby Receiving (40 x 40) | 120 | 16 stripes (96 total rows) | 62 yards / 992 yards |
| Lap (36 x 45) | 108 | 18 stripes (108 total rows) | 58 yards / 1,044 yards |
| Throw (48 x 60) | 144 | 24 stripes (144 total rows) | 78 yards / 1,872 yards |
| Twin (70 x 90) | 210 | 36 stripes (216 total rows) | 94 yards / 3,384 yards |
| Queen (90 x 90) | 270 | 36 stripes (216 total rows) | 118 yards / 4,248 yards |
| King (110 x 110) | 330 | 44 stripes (264 total rows) | 142 yards / 6,248 yards |
For Row 1 you will work the amount of stitches that are listed above for your size, then repeat the 6 row repeat until you reach the number of rows/stripes your size calls for.
To customize the size
Width: For Row 1 work a multiple of 3 stitches. There are 3 stitches per inch so multiply the width measurement that you desire by 3 to get the total number of stitches to work across. For example, If you want your blanket to be 35” in width: 35 x 3 = 105 stitches.
Length: Each stripe (the Row 1-6 repeat) is 2.5” tall, so you will divide your desired length measurement by 2.5” to see how many stripes need to be worked to get your desired length. For example, If you want your blanket to be 50” in length, 50 ÷ 2.5 = 20 stripes (120 rows total).
Make a gauge swatch to ensure proper sizing.
Difficulty
Easy / Advanced Beginner
Gauge
15 STs x 12 Rows = 5” x 5”
Follow the pattern instructions for Rows 1-12, working 15 STs across.
Notes
- Your stitch count will always be the same from Row 1 on. Check the size chart to see how many stitches across you need to work for your size.
- Beginning chains do not count as stitches throughout the whole pattern. At the end of each row, chain 1 and turn, then work the first stitch into the last stitch from the previous row.
- Stitches between ** are to be repeated until the end of the row.
- The right side of your work will show the texture from the PSC and BLO stitches and the wrong side will be flat.
Supplies
- Medium (4) Weight Yarn (I used Yarn Bee Soft & Sleek)
- 5.50mm (I) Hook
- Yarn Needle
- Scissors
Abbreviations (US Terms)
ST(s) – Stitch(es)
CH – Chain
FHDC – Foundation Half Double Crochet
SC – Single Crochet
SC BLO – Single Crochet Back Loop Only
HDC – Half Double Crochet
PSC – Picot Single Crochet
Special Stitches
Check out the video tutorial if extra assistance is needed for the special stitches.
FHDC – Foundation Half Double Crochet
A FHDC is working your foundation chain and first row of HDC’s together in one.
CH 2, then yarn over and insert hook into 2nd CH from hook. Yarn over, pull up a loop, yarn over and pull through the 1st loop on the hook (that is the CH you will work into for the next stitch), yarn over and pull through all 3 loops on your hook. That is the first FHDC. Now working into the CH you created at the bottom of the ST, work your next FHDC. *Yarn over, insert hook into the bottom CH, pull up a loop, yarn over and pull through 1st loop on the hook, yarn over and pull through all 3 loops on your hook.* Repeat ** until you reach the specified length.
If needed, try using a stitch marker to mark where your first stich was made and/or where you created the CH so you know to work your next stitch.
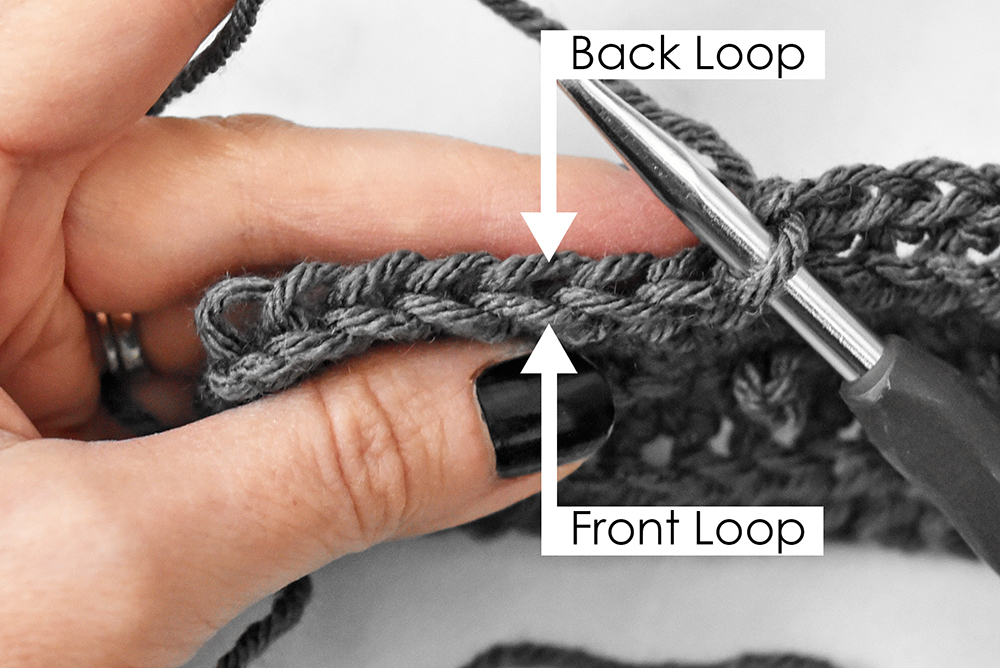
SC BLO – Single Crochet Back Loop Only
When looking at the top of a stitch you will see 2 loops. The one closest to you is the front loop and the one furthest away from you is the back loop. For a SC BLO, work a single crochet as normal but only work in the back loop of the stitch.
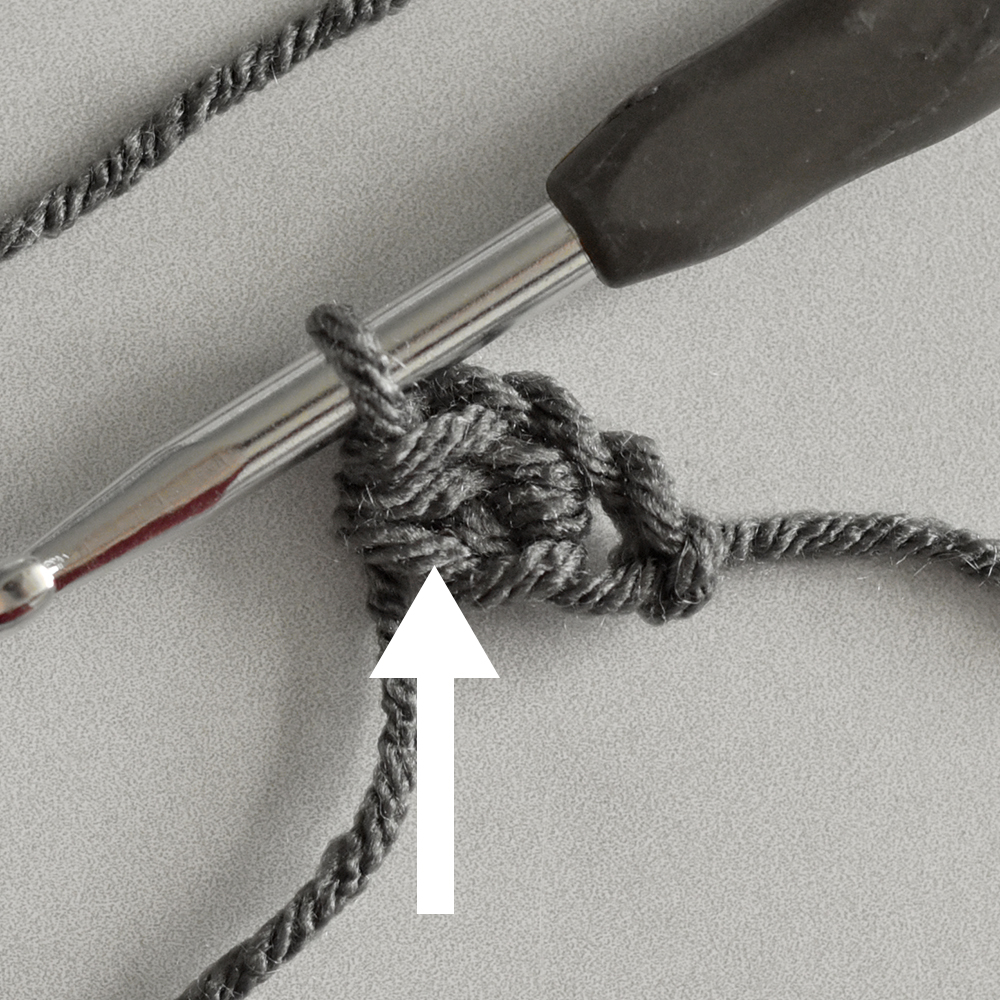
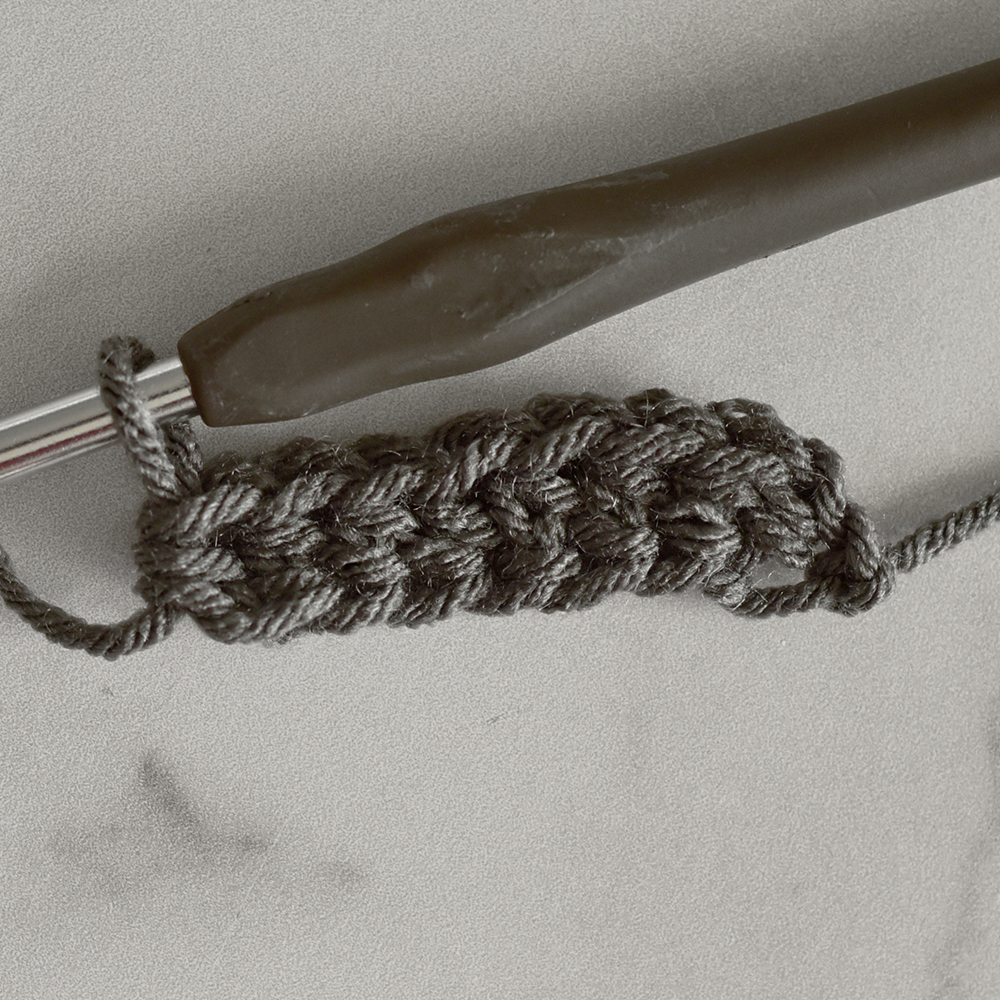
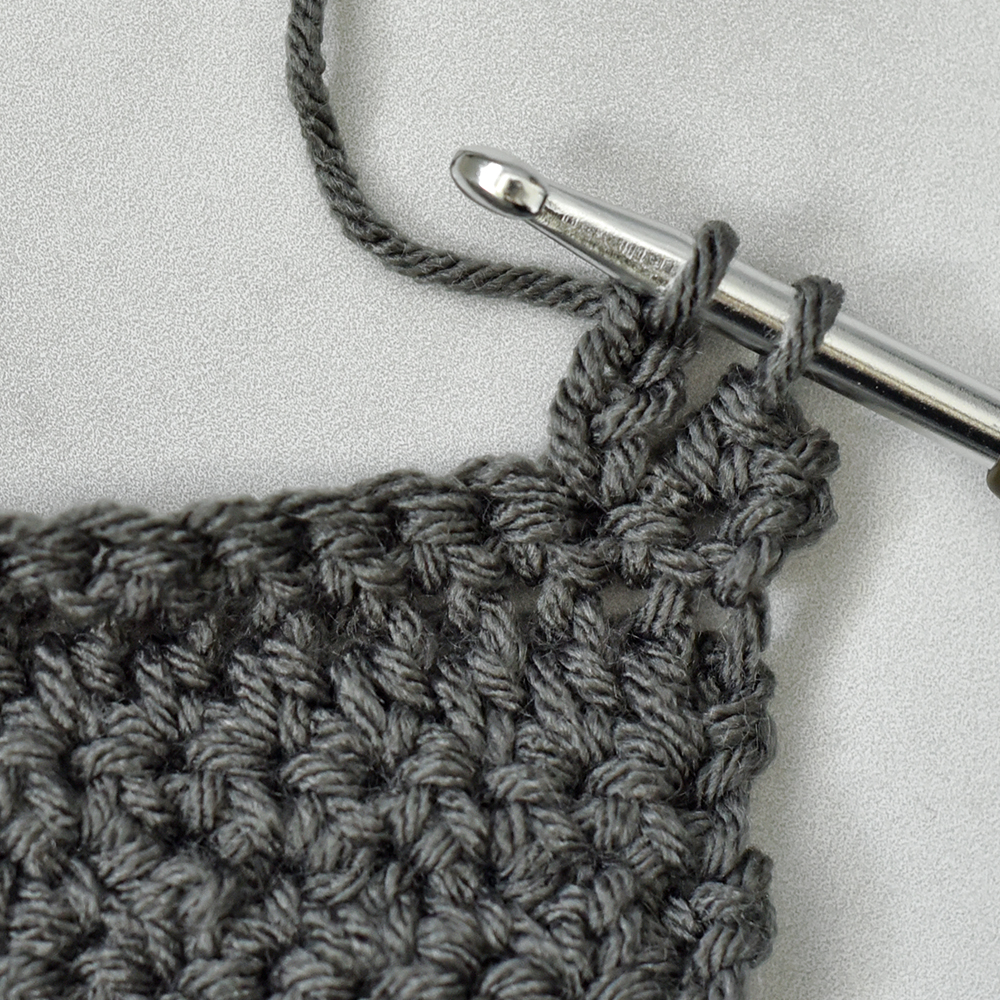
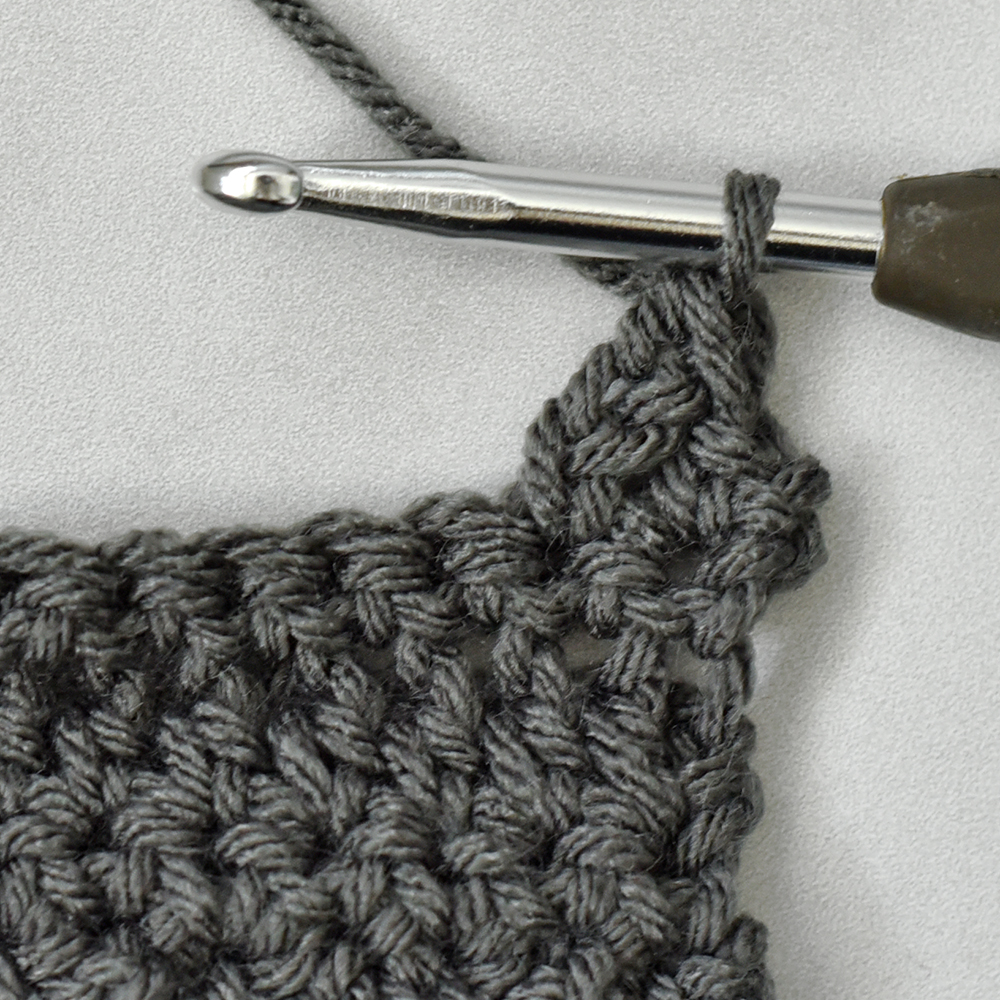
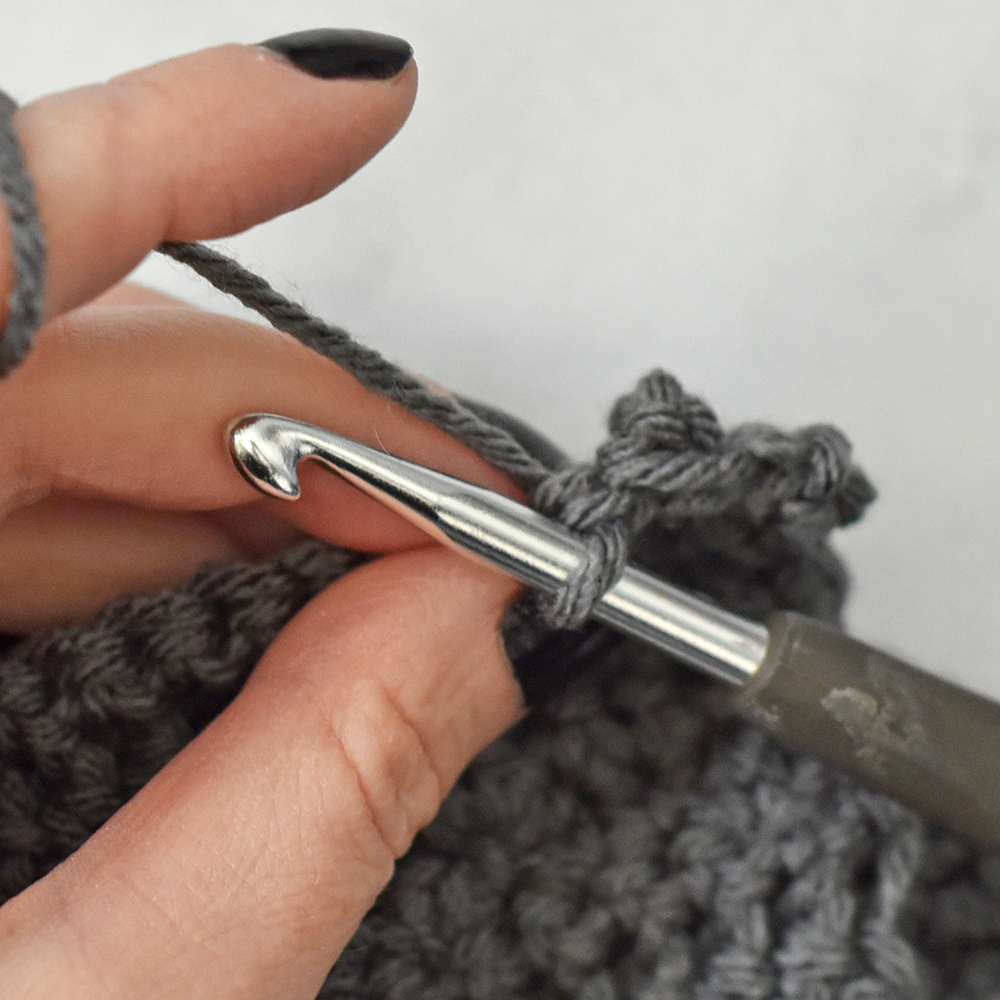
PSC – Picot Single Crochet
Insert your hook into the designated stitch. Pull up a loop, yarn over, and then pull through the 1st loop on your hook. Yarn over and pull through the 1st loop again, then yarn over and pull through the 1st loop once more. Lastly, yarn over and pull through both loops on your hook. Push the CH 3 you just created behind so that it bumps out on the right side of your work and work the next ST.
Picot Blanket Pattern
Row 1: FHDC as many stitches your size calls for then CH 1 & turn.
Row 2: SC BLO in each ST across. CH 1 & turn.
Row 3: *SC, PSC, SC* repeat ** across. CH 1 & turn.
Row 4: SC in each ST across. CH 1 & turn.
Row 5: HDC in each ST across. CH 1 & turn.
Row 6: SC BLO in each ST across. CH 1 & turn.
This completes the first stripe. Change colors if desired.
Row 7: HDC in each ST across. CH 1 & turn.
Row 8: SC BLO in each ST across. CH 1 & turn.
Row 9: *SC, PSC, SC* repeat ** across. CH 1 & turn.
Row 10: SC in each ST across. CH 1 & turn.
Row 11: HDC in each ST across. CH 1 & turn.
Row 12: SC BLO in each ST across. CH 1 & turn.
This completes the 2nd stripe. Change colors if desired.
Repeat Rows 7-12 for as many rows/stripes as your size calls for or until you reach your desired length.
Tie off yarn and then weave in ends. Feel free to add a border if you desire.
And you’re all done!
I hope you enjoyed this pattern for the Picot Blanket! I’d love to see your finished Turtle Trunk creation so be sure to tag me, @theturtletrunk on Instagram so I can see your photos!
If you enjoyed the Picot Blanket be sure to check out these other Picot Patterns: Picot Beanie, Picot Headband, and Picot Scarf & Cowl.
You are free to sell the items you make with this pattern, and I’d love if you could please link back to this page. You do not have permission to republish or distribute this pattern in any way or claim it as your own. Do not use my photos in your sale listings or for any other purposes. Thank you.
This page includes affiliate links. If you make a purchase from these links, I may make a small commission at no cost to you! Thank you for your support!