
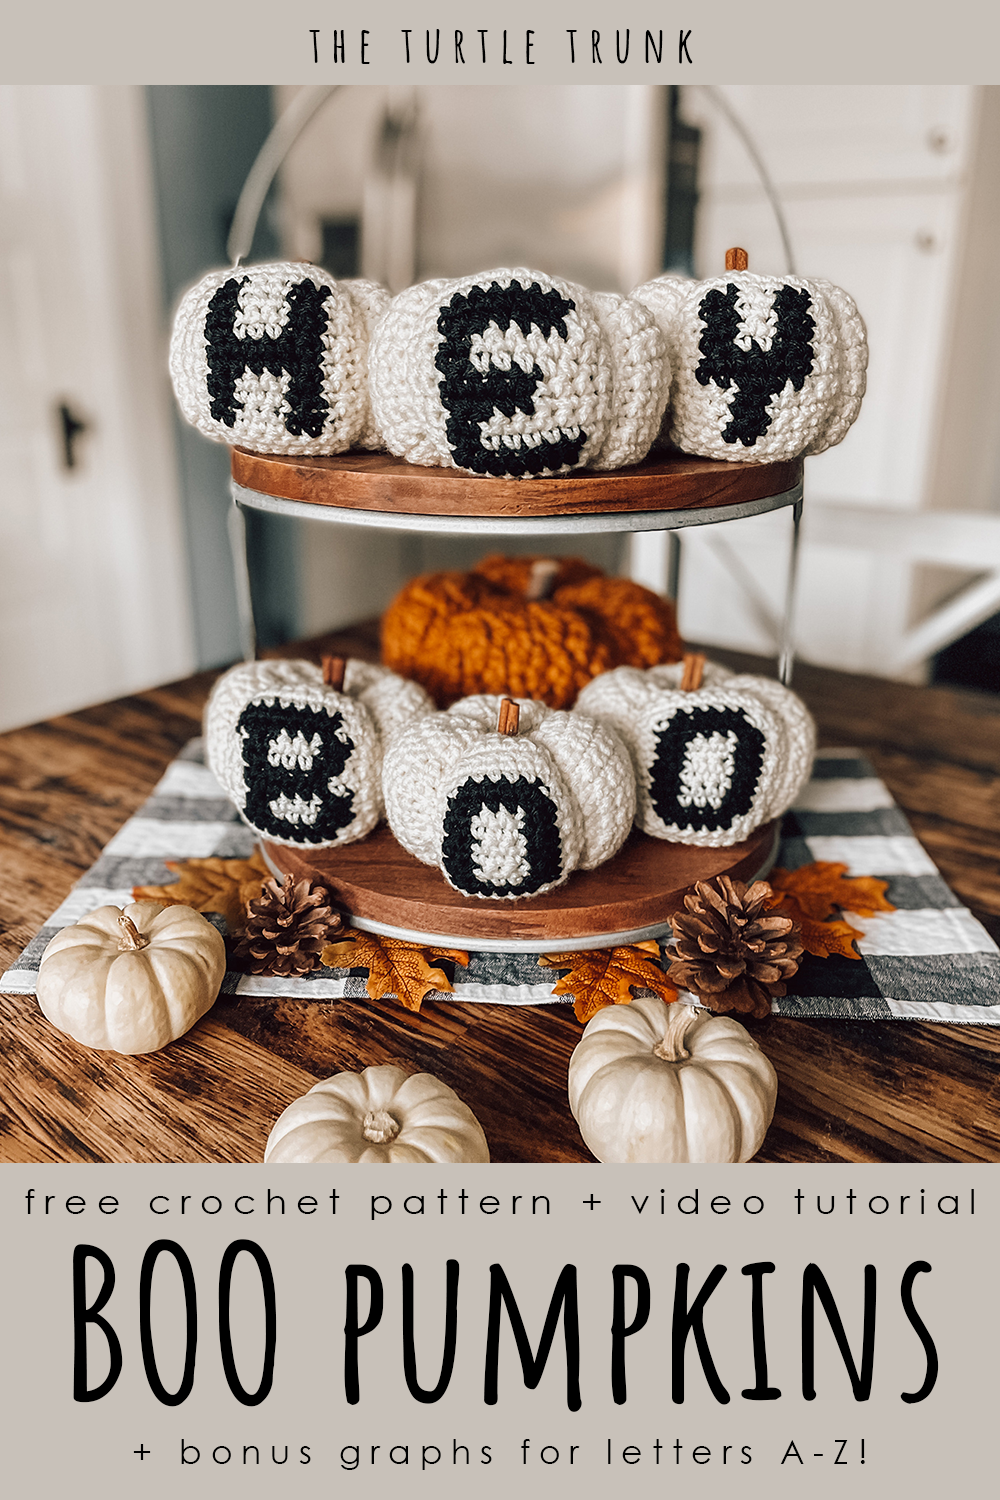
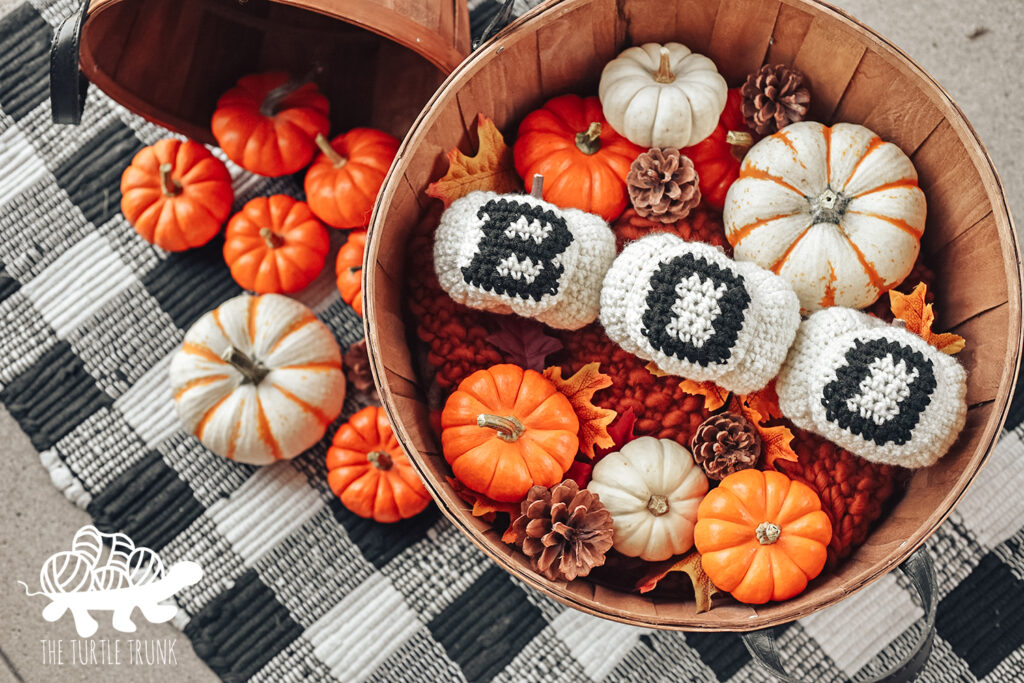
BOO Pumpkins Crochet Pattern
BOO Pumpkins are so fun for Fall and Halloween decor! This crochet pumpkin pattern features graphs for letters A-Z so you can spell any word, name, or initials you want! These alphabet pumpkins are worked in rows and use the intarsia crochet technique.
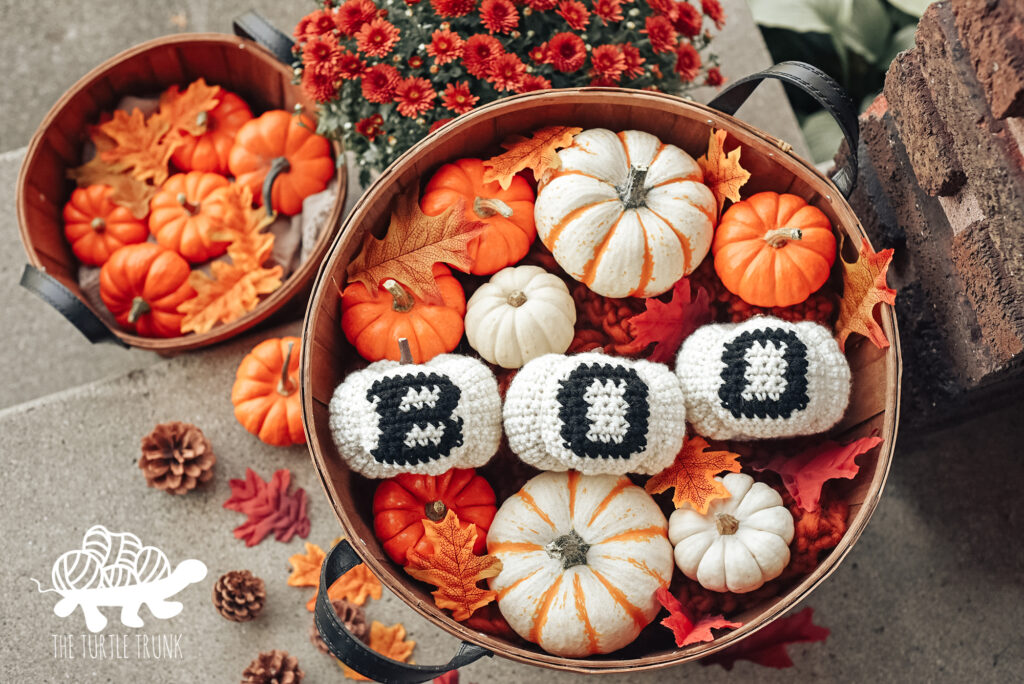
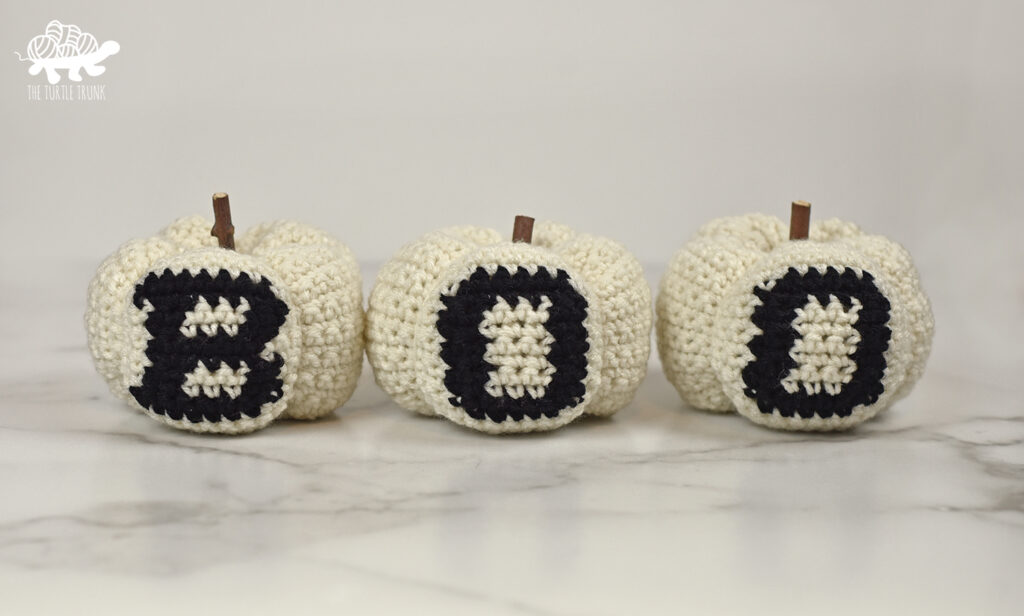
The BOO Pumpkins crochet pattern is a fun and unique decor piece for Fall and Halloween! The original pattern only included written and graph instructions for the letters B and O, but I have since added graphs for all the letters of the alphabet so you can spell any word or name!
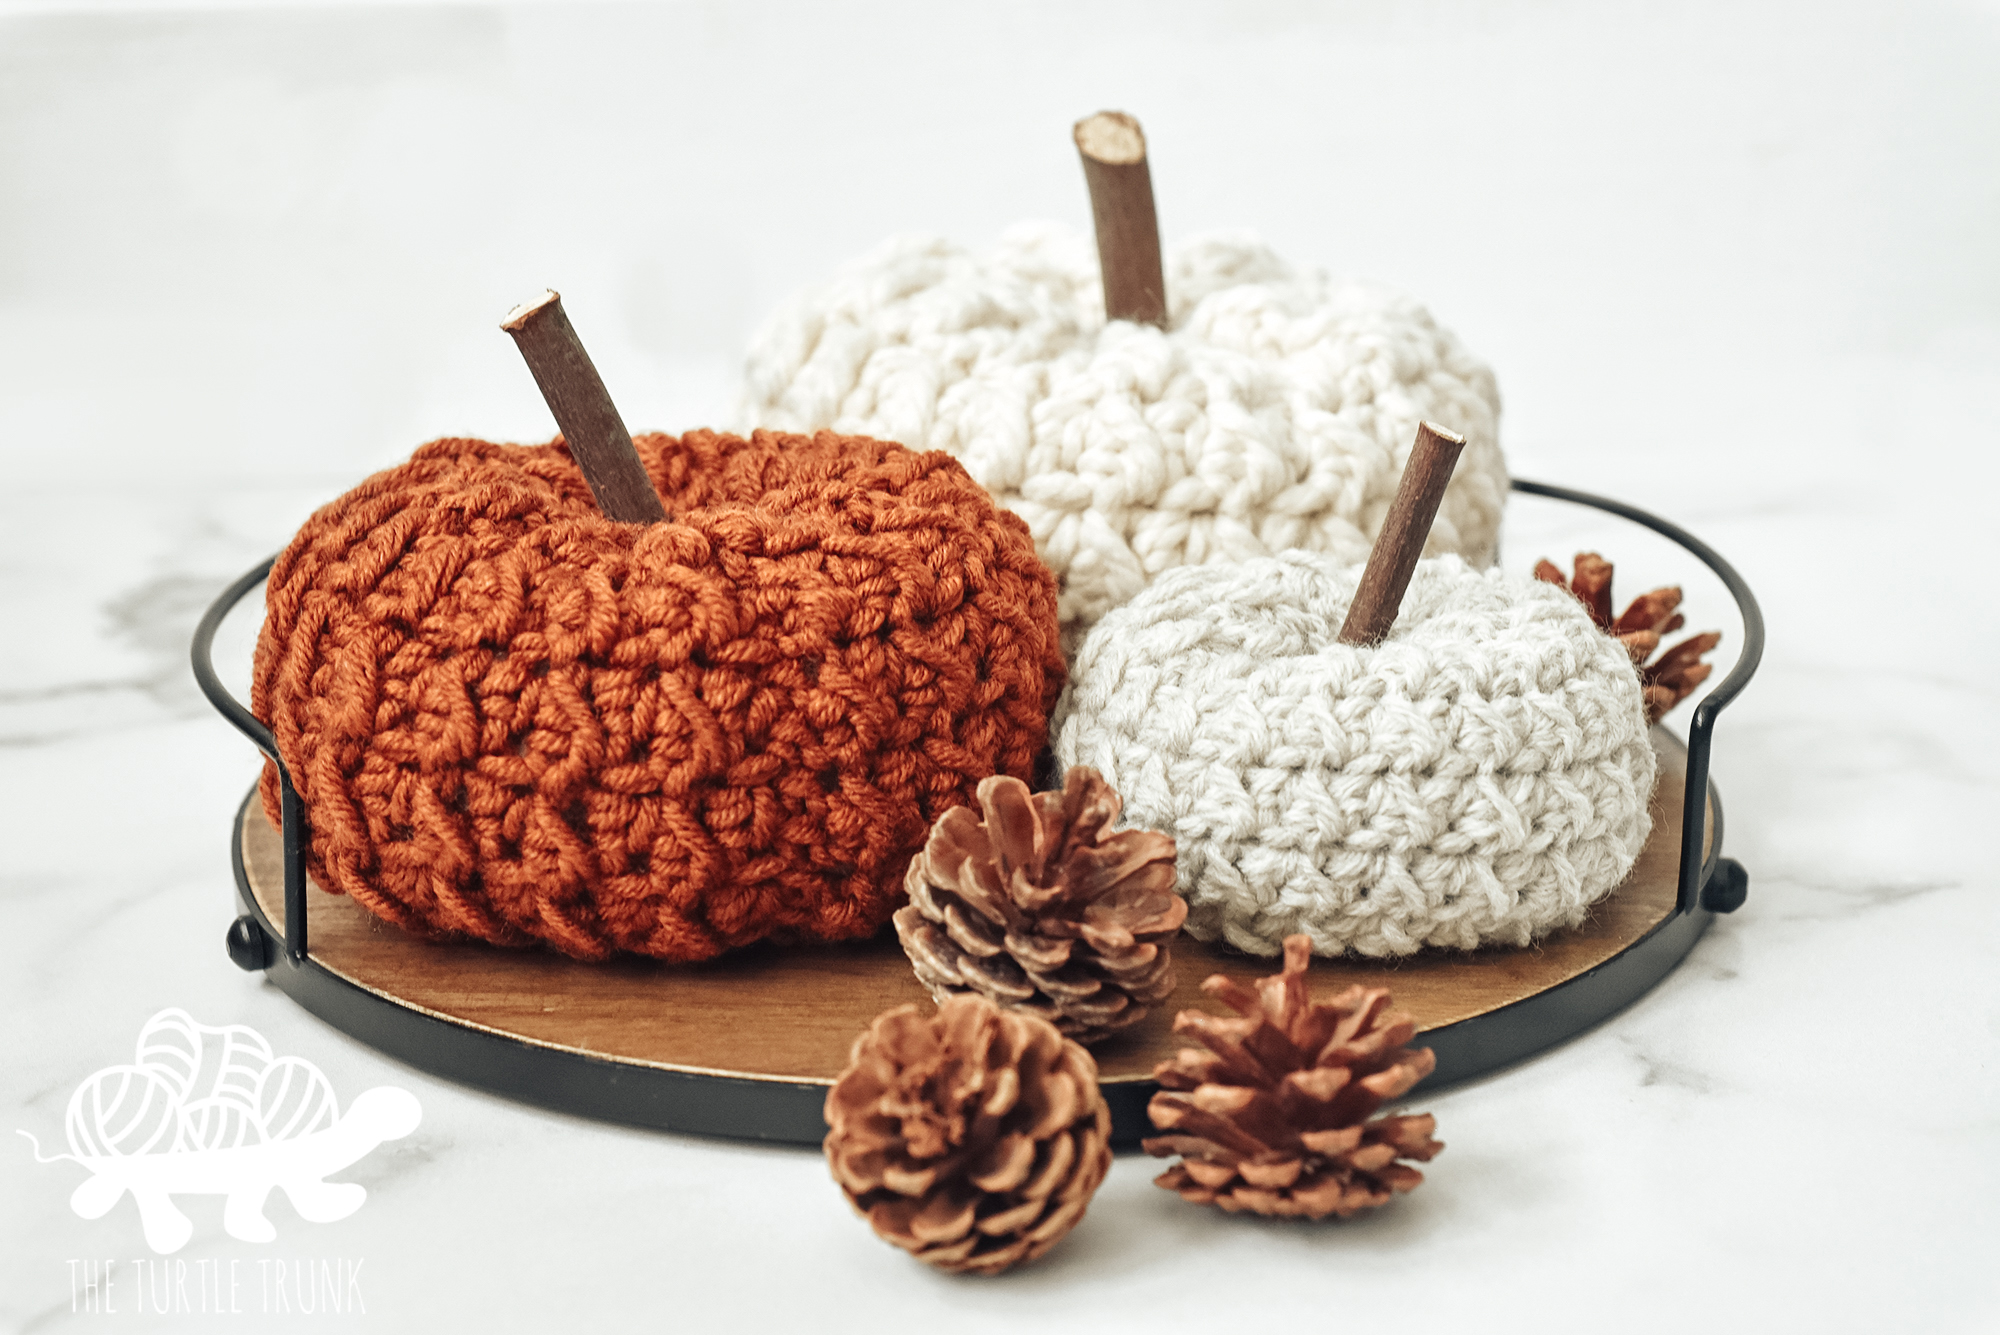
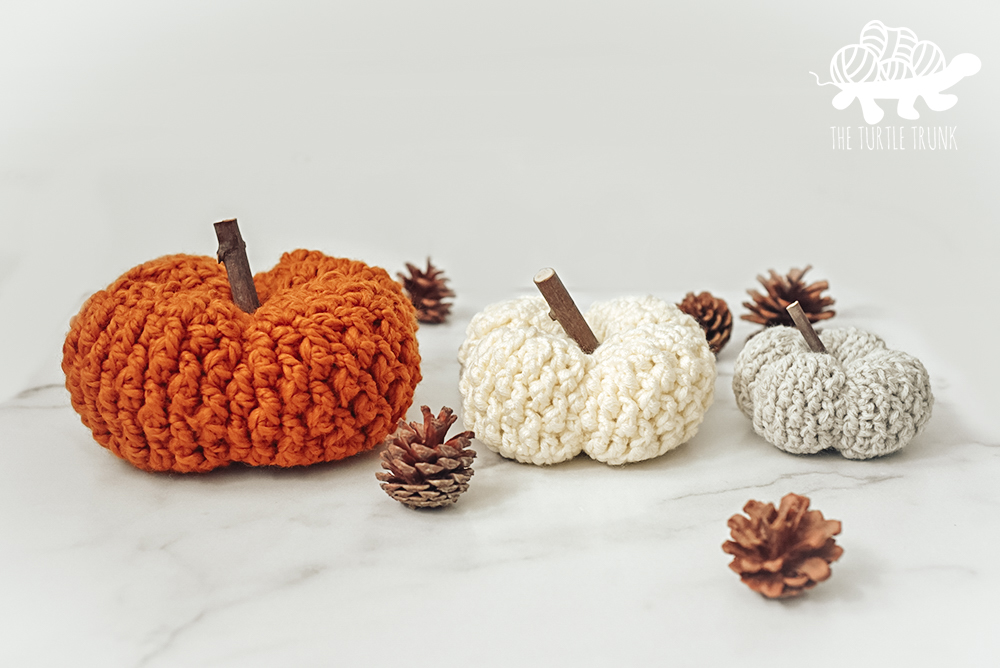
I have many crochet pumpkin patterns (see them all below), and each has it’s own unique style and texture. The BOO Pumpkins use only one basic crochet stitch and color changes to create this fun pumpkin. Follow along with the written directions for letters B and O or use the graphs to create any letters you want!
These letter pumpkins would look amazing sitting on the mantel or even outside on the porch! Add some fake cobwebs and spiders around them to really make them spooky! These are so fun and can be made with any color combinations!
Continue reading below to hear my inspiration for this pattern and to learn about the intarsia crochet technique, then scroll down for the free written crochet pattern!
FOLLOW ALONG WITH THE AD-FREE AND PRINTABLE PDF FROM ETSY AND RAVELRY!
If you’re looking for more crochet pumpkin patterns, then check out the Basic Pumpkin, Farm Fresh Pumpkin, Picot Pumpkin, and Country Cottage Pumpkins!

NOT READY TO MAKE JUST YET?! PIN THIS PATTERN FOR LATER!
Follow along with the video tutorial on YouTube!
Inspiration
One of my favorite things about the pumpkin patterns I’ve designed is that each of them is made with different techniques and stitches. When searching for inspiration for my other crochet pumpkin patterns, I simply used my favorite crochet stitches! But when it came to designing a new pumpkin, I wanted something that I had never seen before!
Inspiration hit when I thought about putting words or letters on a pumpkin. Since the pumpkins are quite small and I wanted them easy to read, putting one letter on a pumpkin and making multiple seemed like the best way to do it. BOO jumped out at me as the perfect word for Halloween so that’s where the original design started.
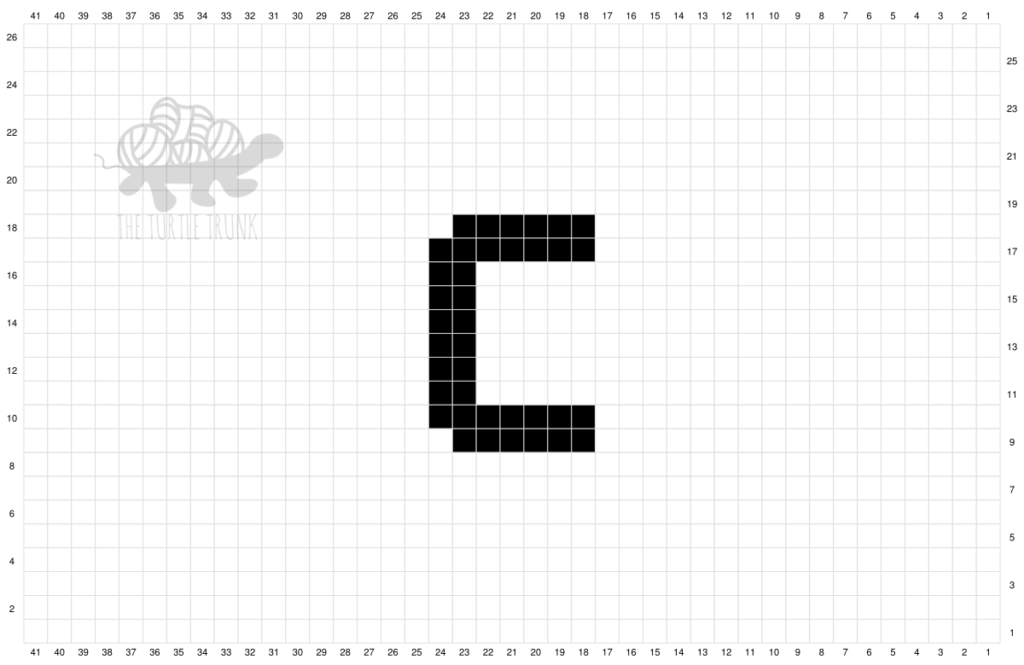
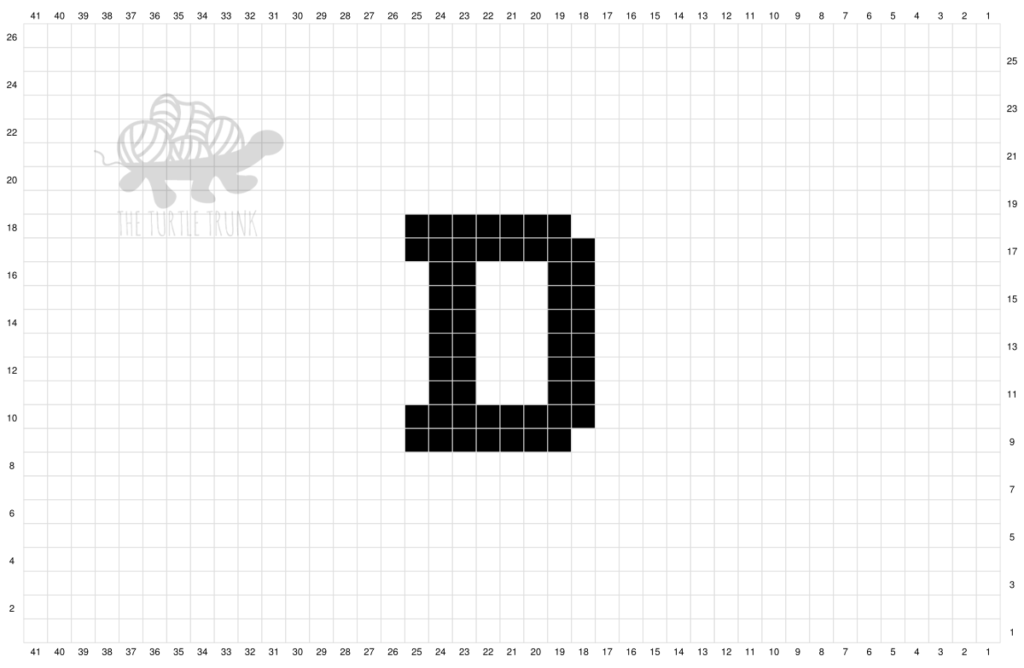
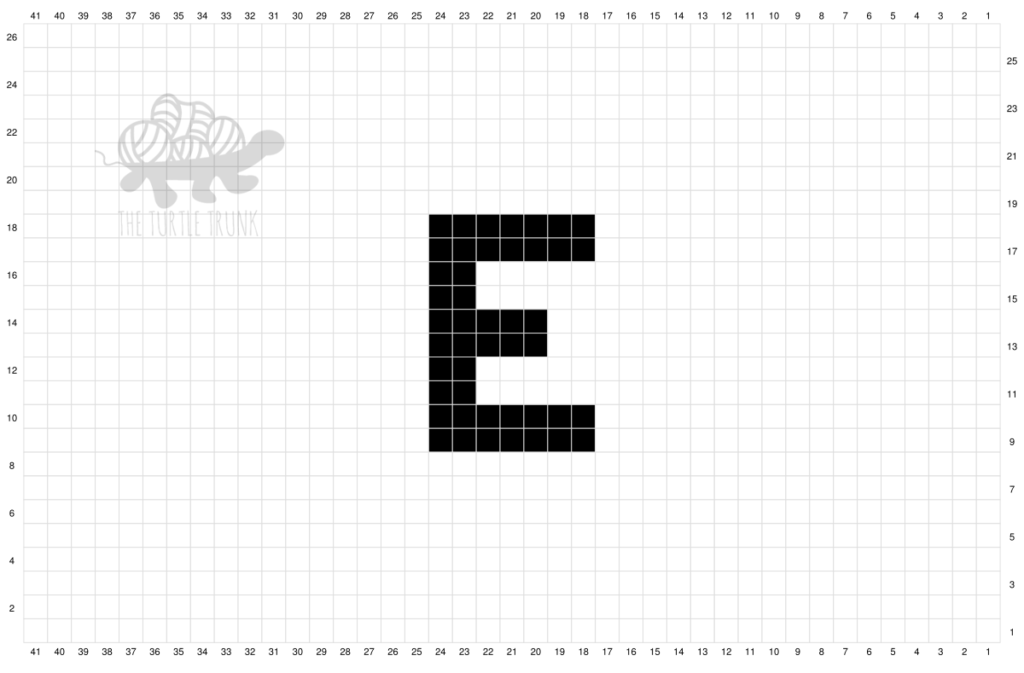
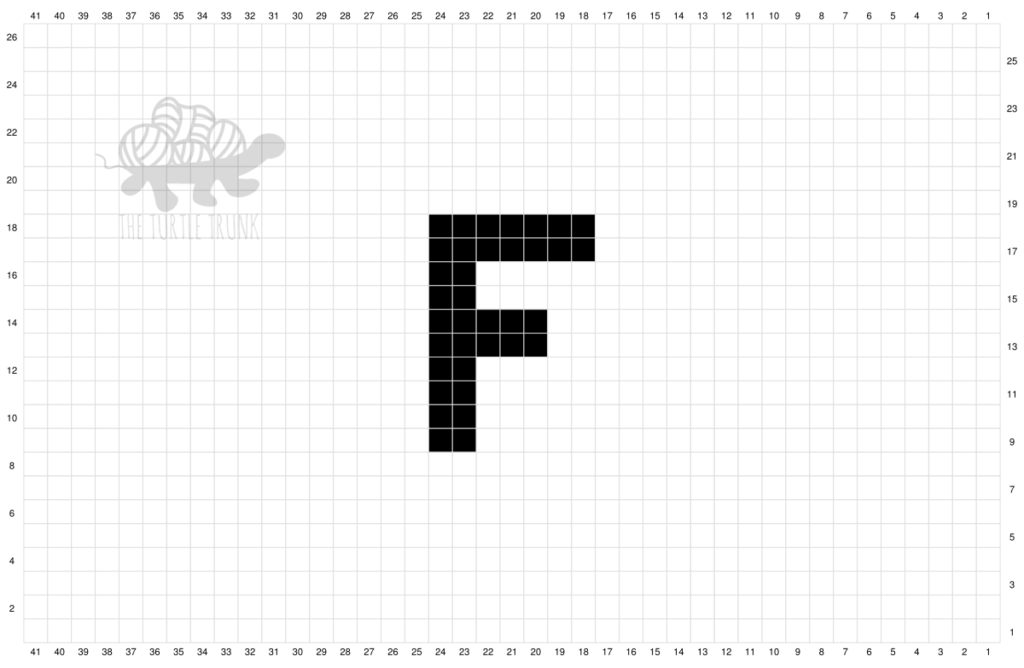
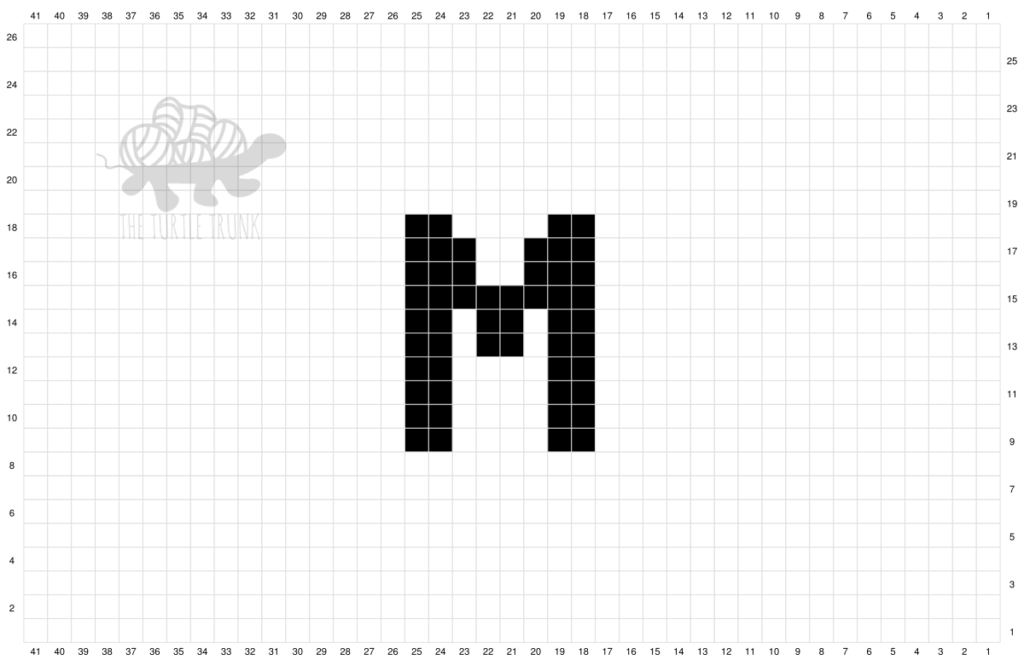
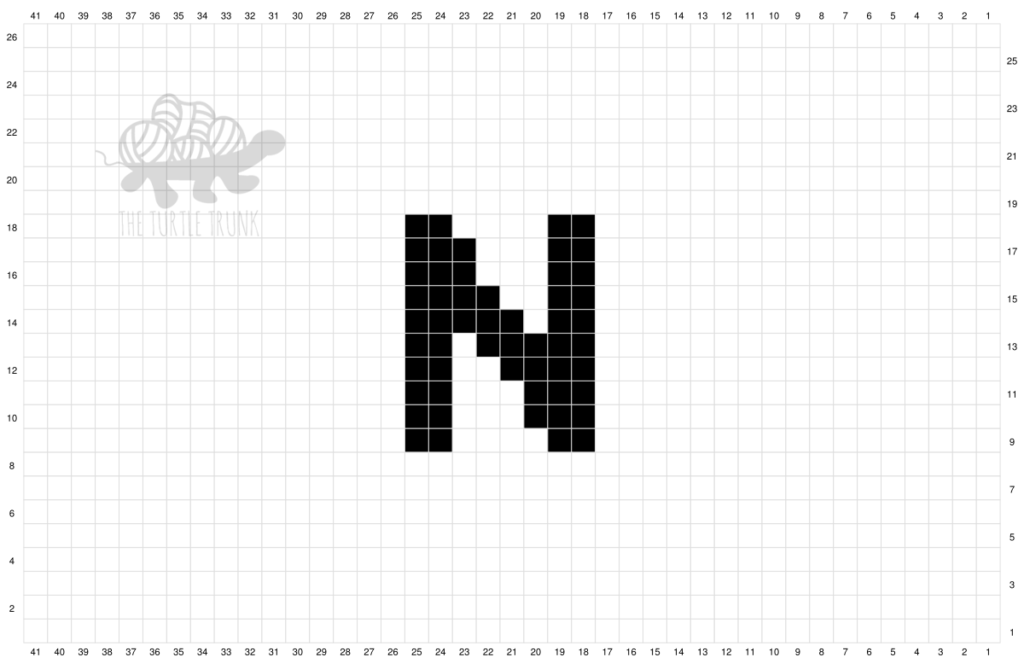
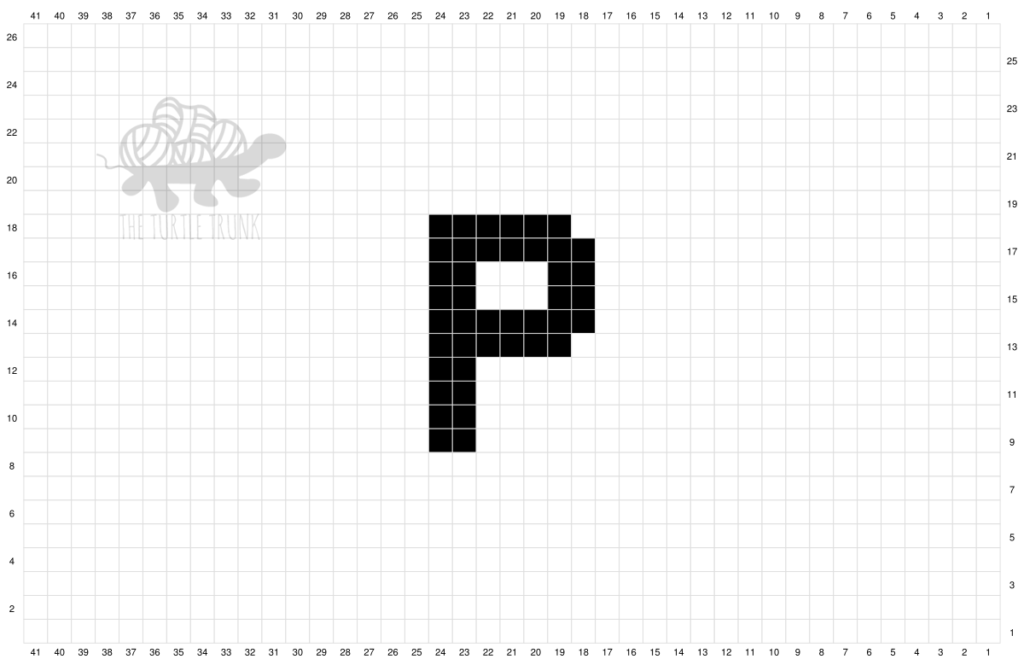
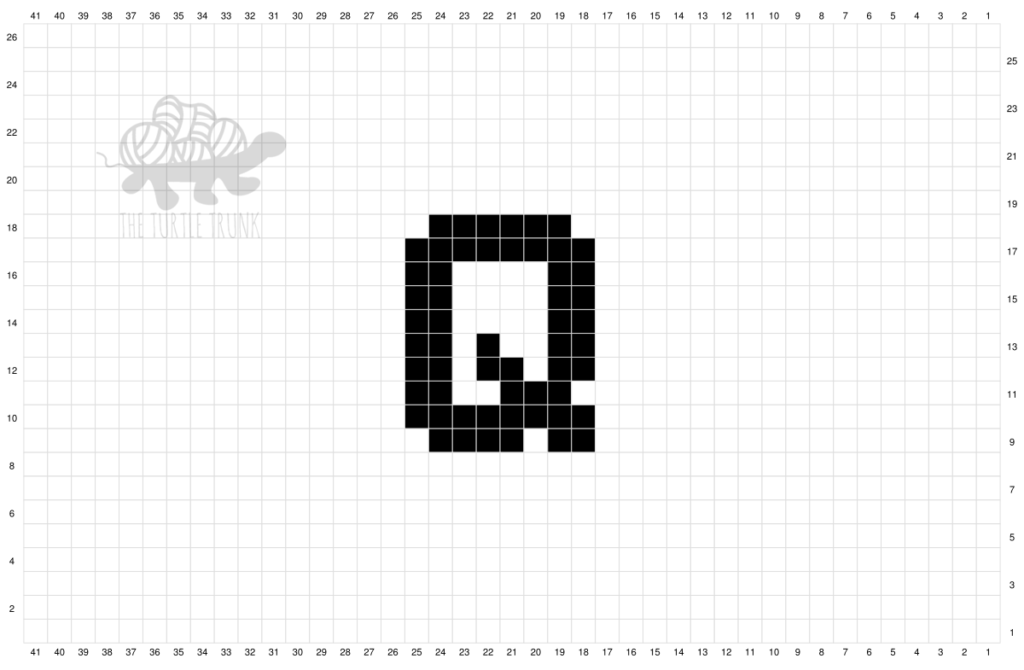
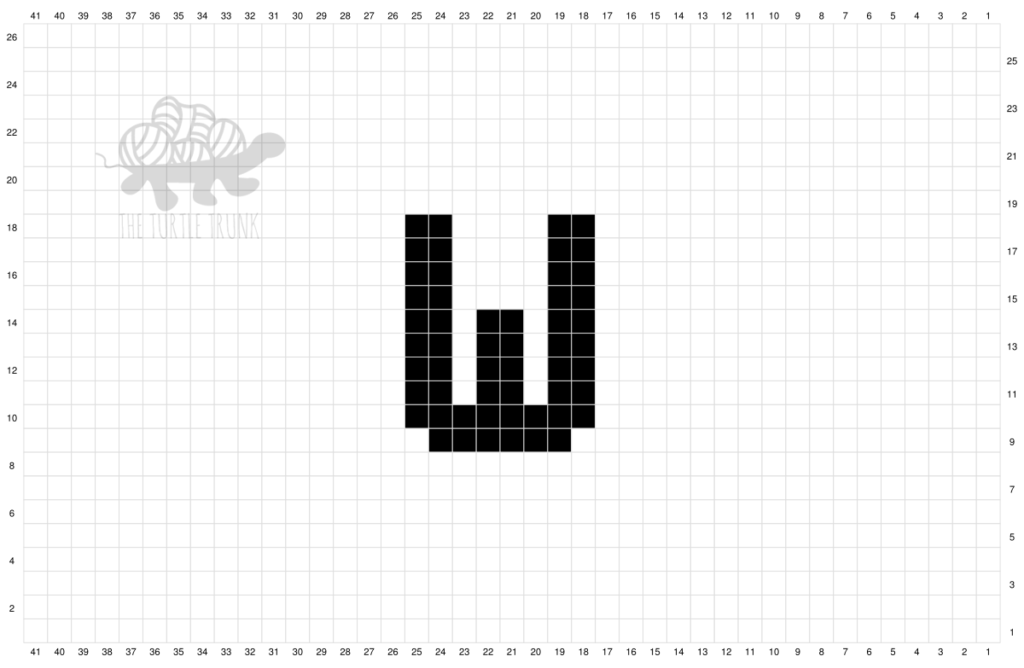
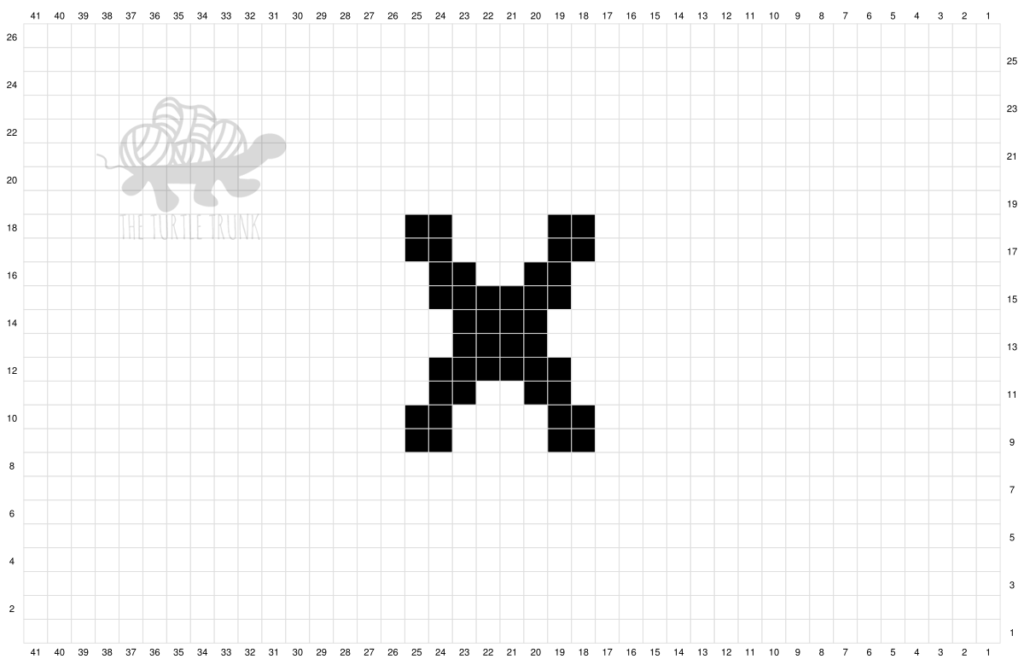
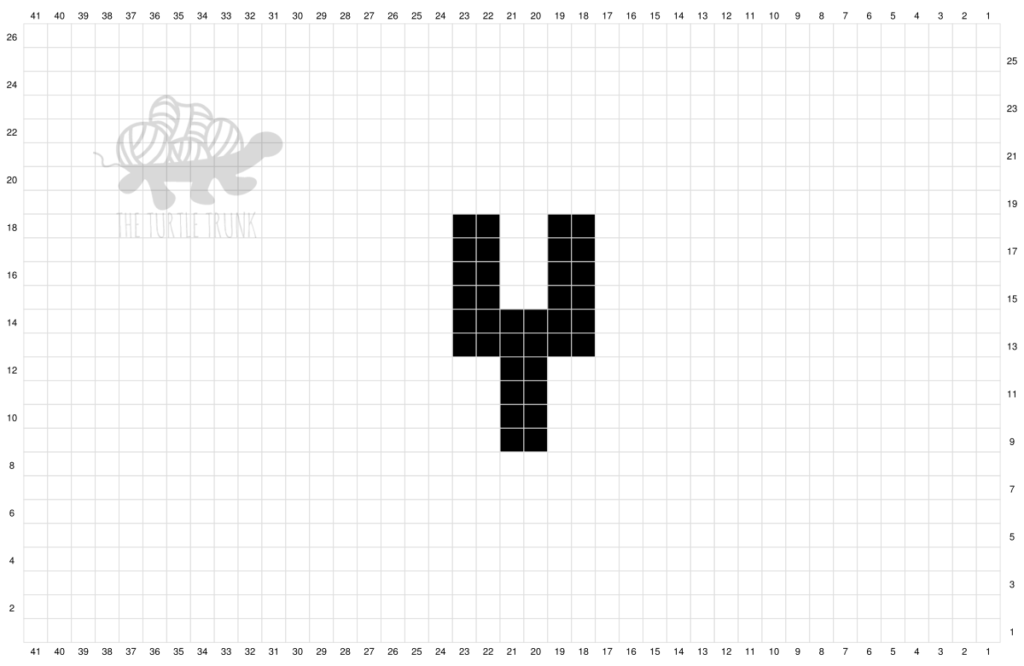
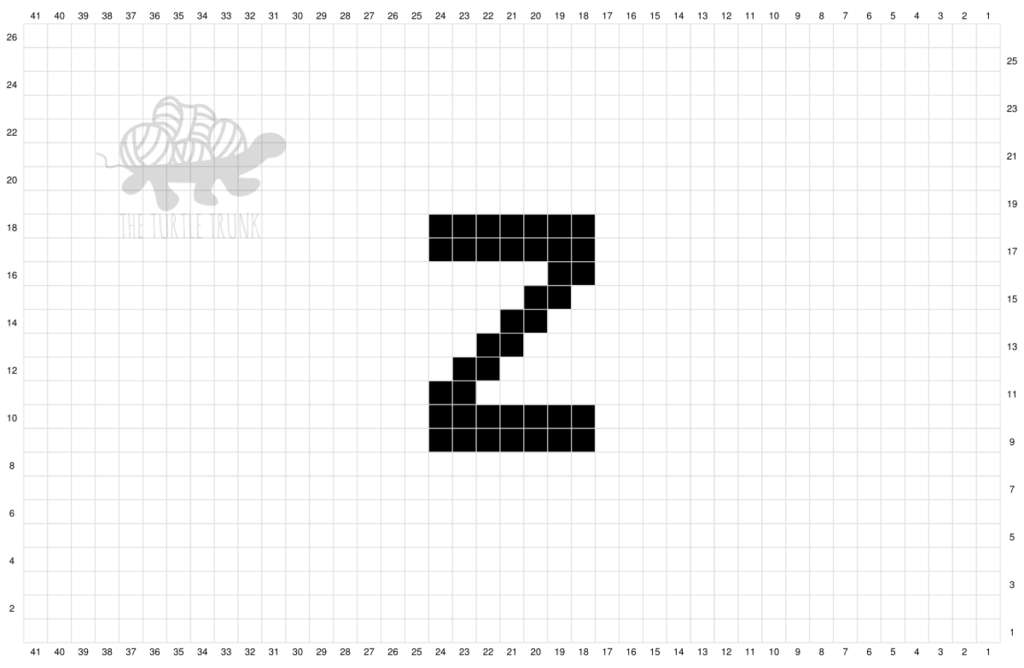
After releasing the BOO Pumpkins pattern in 2020, I had someone reach out to me asking for more letters as they wanted to make these pumpkins but with their last name on it! I thought that was such a fun idea so I added graphs for the rest of the alphabet so that you could spell any word or name with pumpkins!
Not sure what words you want to create? Here’s some fun ideas: BOO, HEY BOO, [last name, initials, or nickname], FALL, HAPPY FALL, HELLO.
Yarn
This pattern uses medium (4) weight yarn in 2 contrasting colors. I used Red Heart Super Saver in white and black. You can use any color combination you’d like though! Keep in mind that you want contrasting colors, one dark and one light. This will ensure that your letters clearly stand out against the background. Some other fun combinations are: orange/black, orange/white, purple/white, green/black. You can also invert the colors by using the darker yarn as the background and the lighter yarn for the letter. The possibilities for this pattern are endless!
Some other yarn options I think would work great for this pattern are Lion Brand Yarn Wool Ease, Color Theory, or Basic Stitch.
Intarsia Crochet
For the BOO Pumpkin pattern, we’ll be using a technique called Intarsia Crochet and it’ll be worked flat in horizontal rows!
Intarsia Crochet is a method of working blocks of color throughout your piece. Bobbins (multiple balls of yarn) are used and dropped to create a multiple colored piece of work that has no yarn carried over or through. This technique will create a clean piece on both sides and you will not be able to see any of the opposing color(s) within your stitches. This is not to be confused with Fair Isle Crochet, which carries the non working yarn behind your piece, or Tapestry Crochet, which carries the non working yarn through your piece.
This pattern can be followed along with the video tutorial above, the written pattern below, or the letter graphs. You can find the graphs below with the written instructions, but you can get the full sized, easy to print graphs alongside the pdf, ad-free version of this pattern found on Etsy and Ravelry.
Here are somethings to know about this pattern:
- At the end of each row you will chain 1 and turn. Beginning chains do not count as stitches throughout the whole pattern.
- Rows 1 and on will always have a final stitch count of 41.
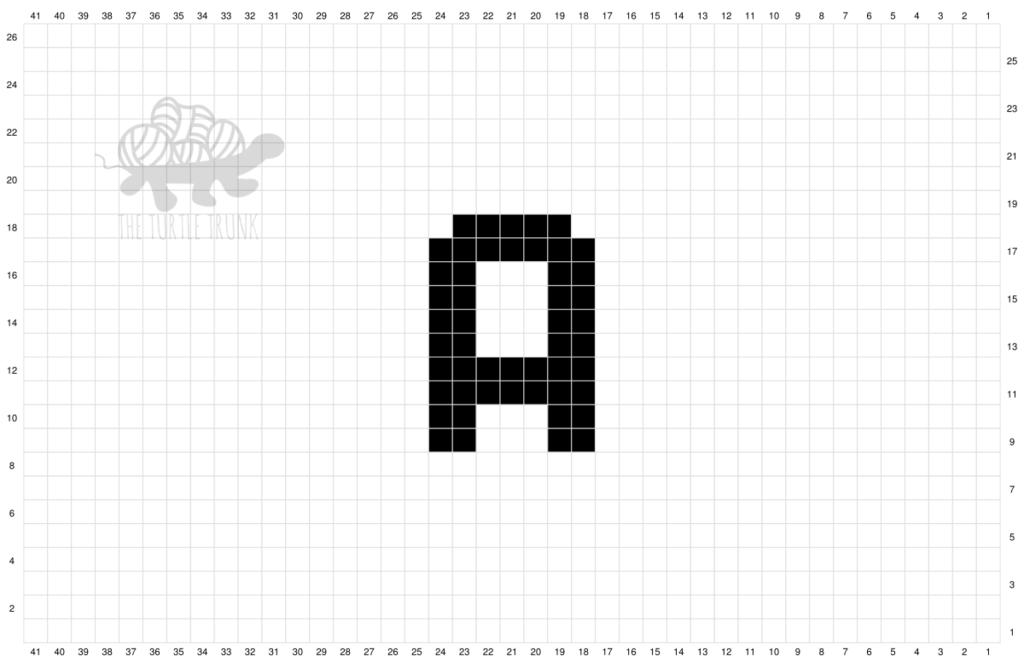
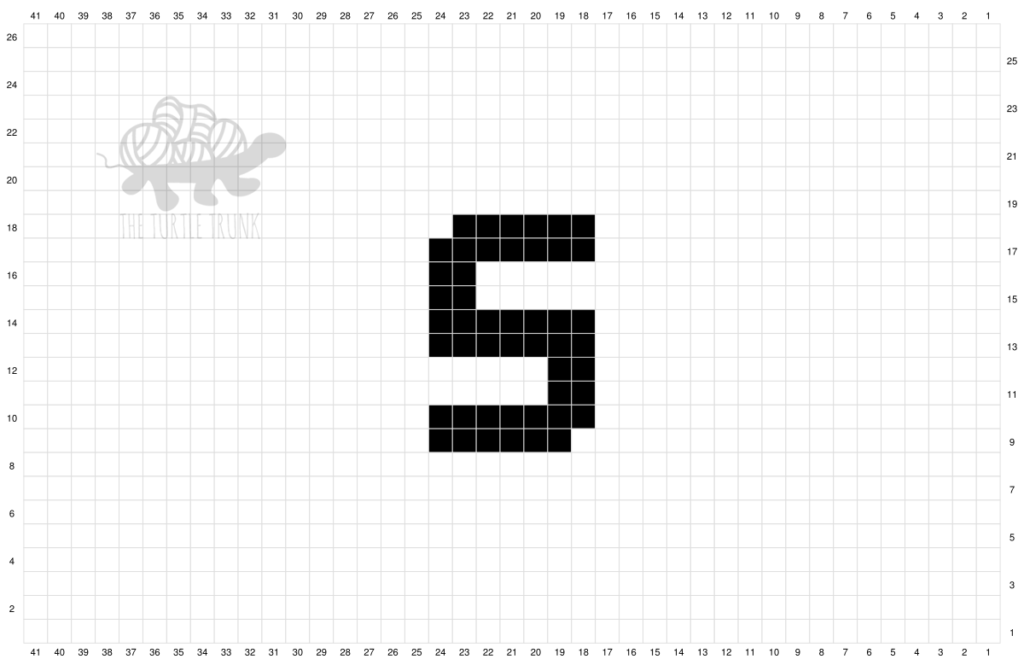
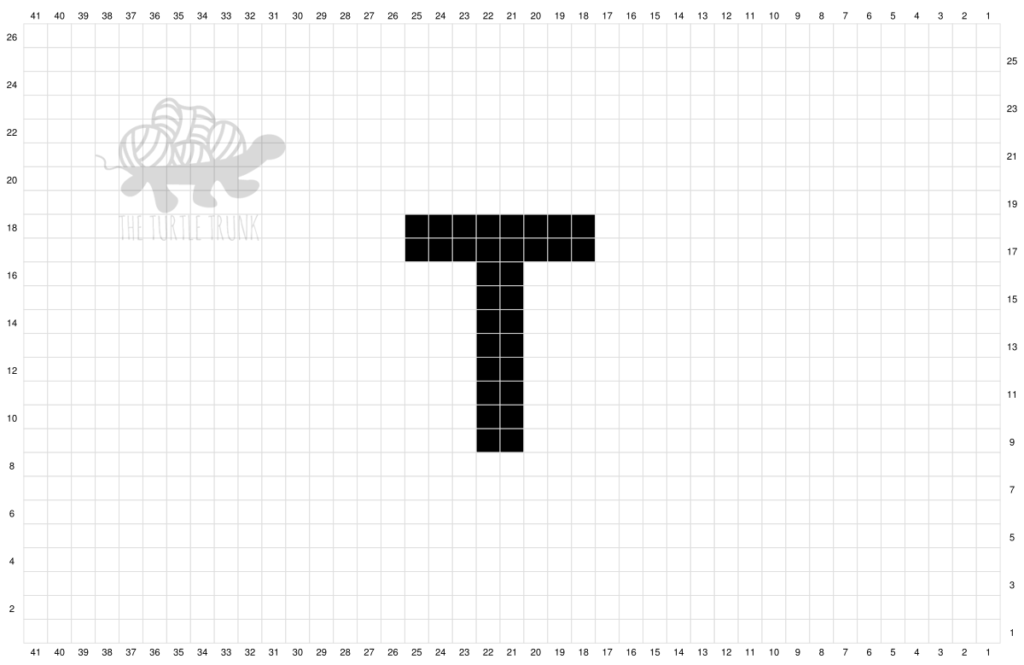
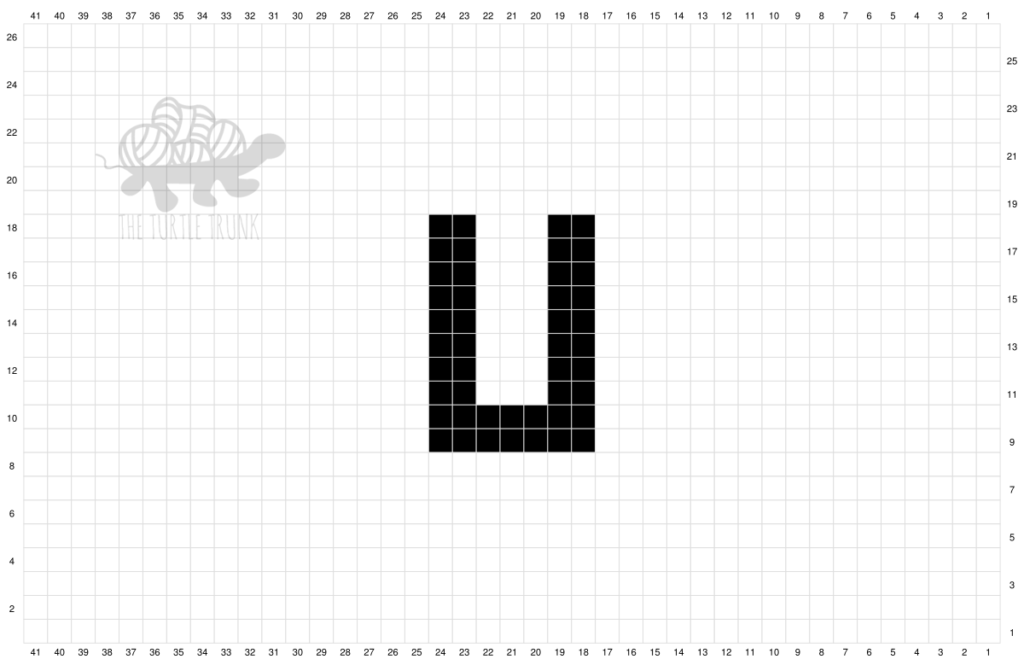
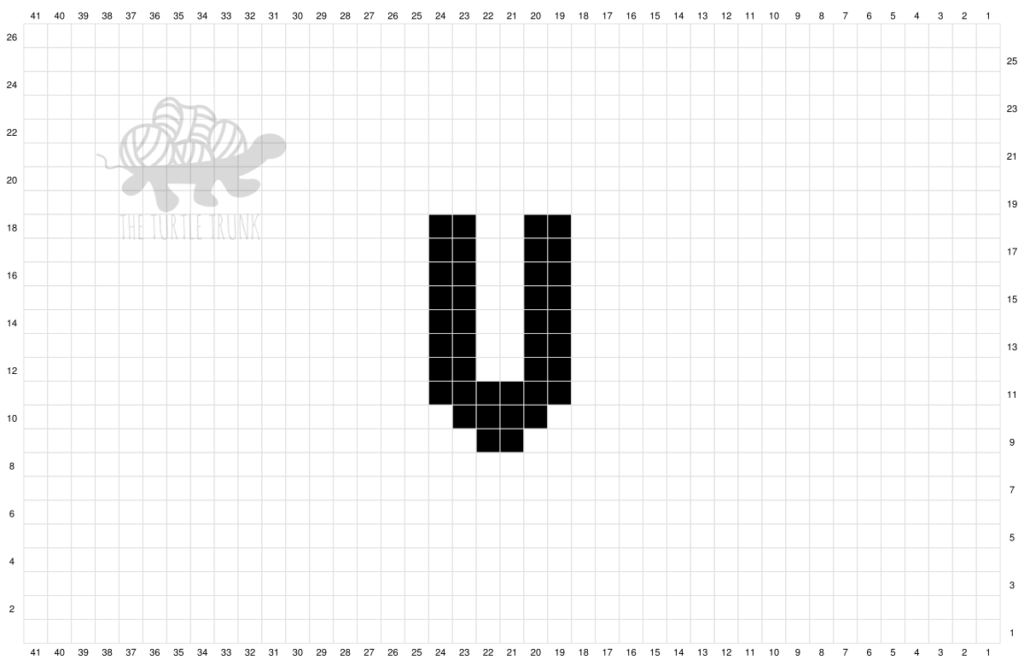
- Each square on the graph represents one single crochet
- Odd numbered rows are always worked on the “right side” and will be read on the graph from right to left. Even numbered rows are worked on the “wrong side” and are read from left to right on the graph.
- Be sure to always keep your tail ends on the “wrong side” of your work.
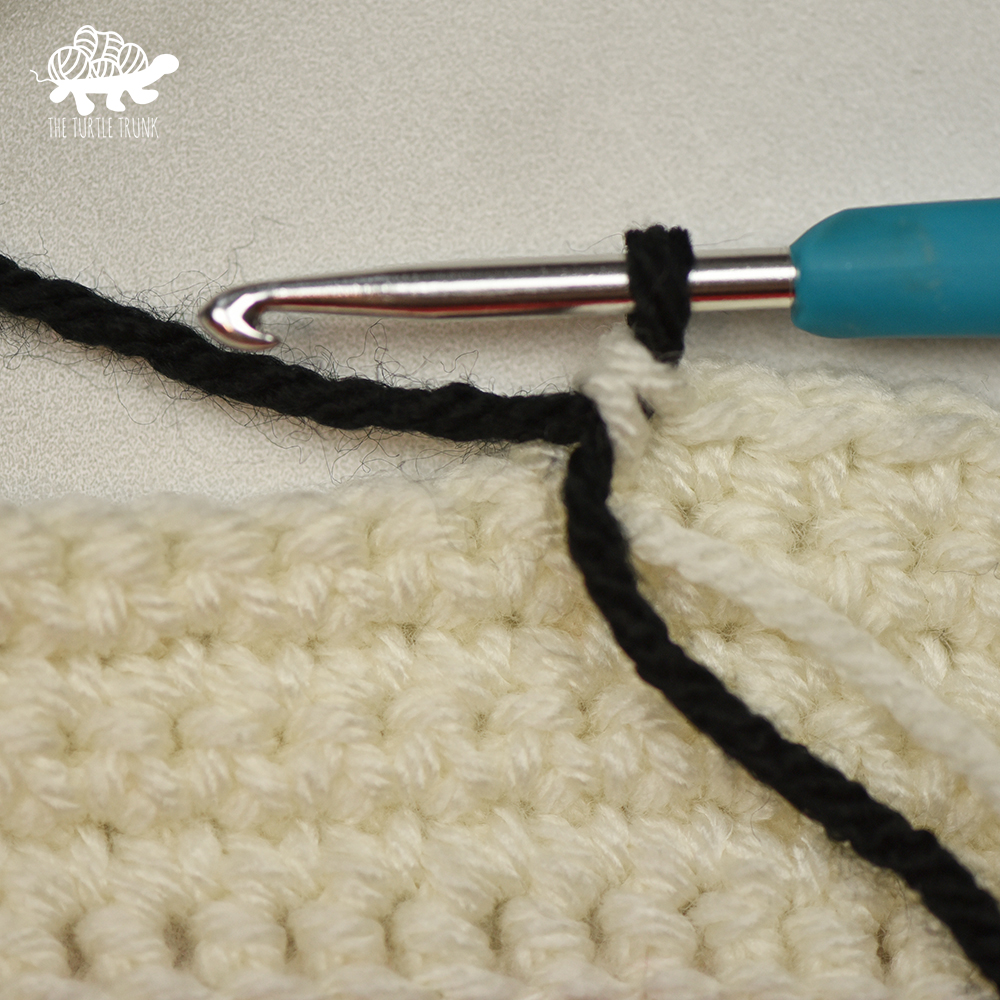
Changing Color
Start a SC as usual, before the final pull through you will drop your current color and pick up the new color. Finish the stitch by pulling through the 2 loops on your hook with the new color. The next SC you work will be the first of the new color. Be sure your tail ends are all on the ‘wrong side’ of your project and continue on with the new color until the next color change.

Difficulty
Easy
Finished Sizes
Approximately 5” wide x 3” tall
Gauge
15 STs x 16 Rows = 4 x 4 in single crochet
Supplies
- Medium (4) Weight Yarn in 2 contrasting colors
- Color A – 180 yards split into 2 – 90 yard bobbins
- Color B – 30 yards split into 2 – 15 yard bobbins
- 4.00mm (G)
- Fiber Fill
- Yarn Needle
- Scissors
- 2-3” Pumpkin Stem (stick from fallen tree branch, cinnamon stick, scrap leather or satin lace, ect.)
Abbreviations (US Terms)
ST(s) – Stitch(es)
CH – Chain
SL ST – Slip Stitch
FSC – Foundation Single Crochet
SC – Single Crochet
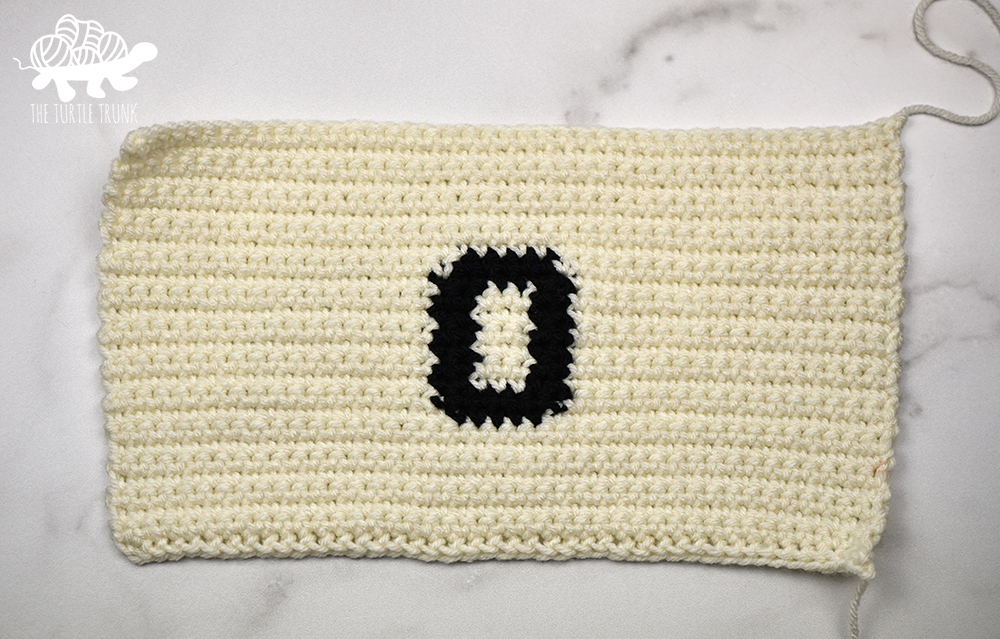
BOO Pumpkins Pattern
B (make one)
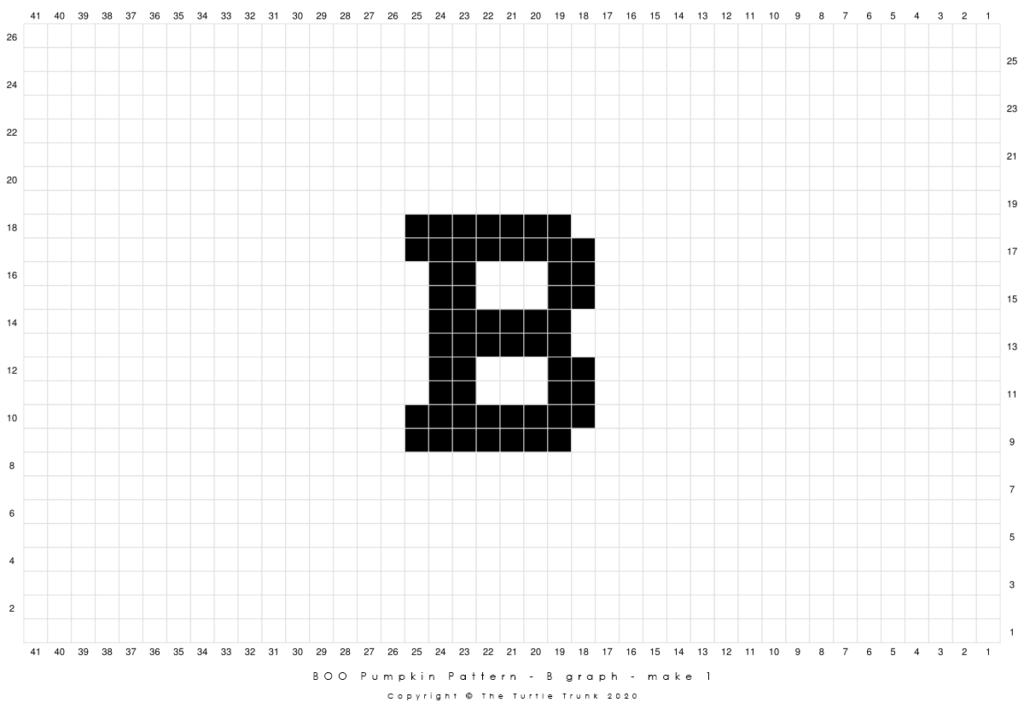
Row 1: FSC 41(A)
Rows 2-8: 41(A)
Row 9: 18(A), 7(B), 16(A)
Row 10: 16(A), 8(B), 17(A)
Row 11: 17(A), 2(B), 3(A), 2(B), 17(A)
Row 12: 17(A), 2(B), 3(A), 2(B), 17(A)
Row 13: 18(A), 6(B), 17(A)
Row 14: 17(A), 6(B), 18(A)
Row 15: 17(A), 2(B), 3(A), 2(B), 17(A)
Row 16: 17(A), 2(B), 3(A), 2(B), 17(A)
Row 17: 17(A), 8(B), 16(A)
Row 18: 16(A), 7(B), 18(A)
Cut off the bobbins that are not in use.
Rows 19-26: 41(A)

Move onto Closing & Finishing
O (make two)
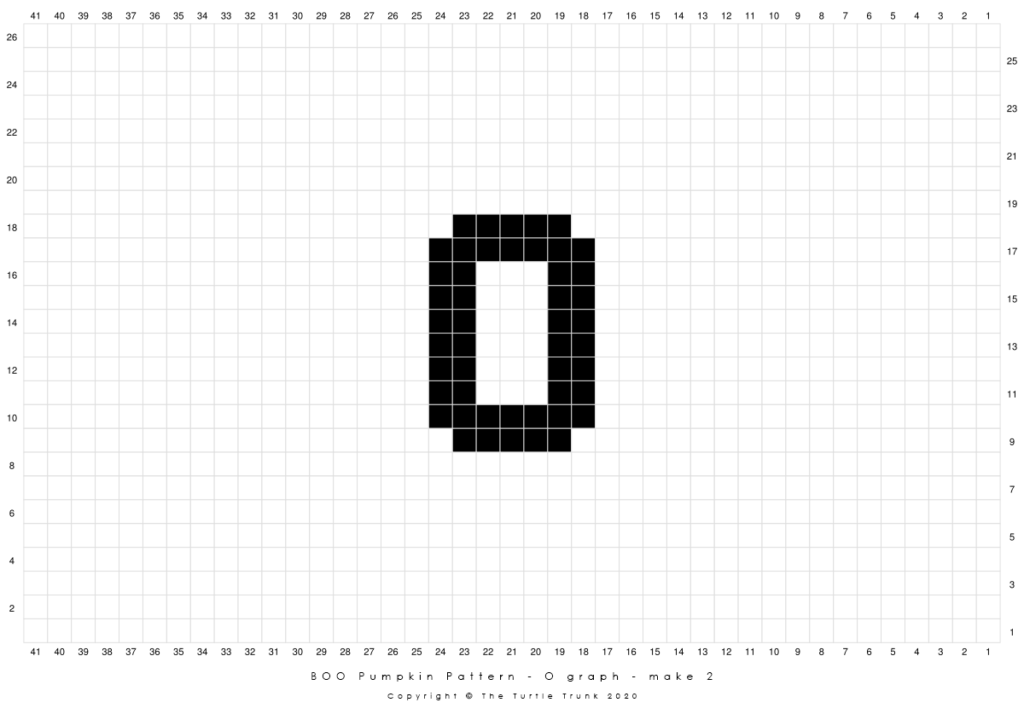
Row 1: FSC 41(A)
Rows 2-8: 41(A)
Row 9: 18(A), 5(B), 18(A)
Row 10: 17(A), 7(B), 17(A)
Rows 11-16: 17(A), 2(B), 3(A), 2(B), 17(A)
Row 17: 17(A), 7(B), 17(A)
Row 18: 18(A), 5(B), 18(A)
Cut off the bobbins that are not in use.
Rows 19-26: 41(A)
Move onto Closing & Finishing
Closing & Finishing
Tie off yarn leaving a 24” tail. Fold piece in half, bringing the short ends together. With the “wrong side” facing out, whip stitch the ends together.
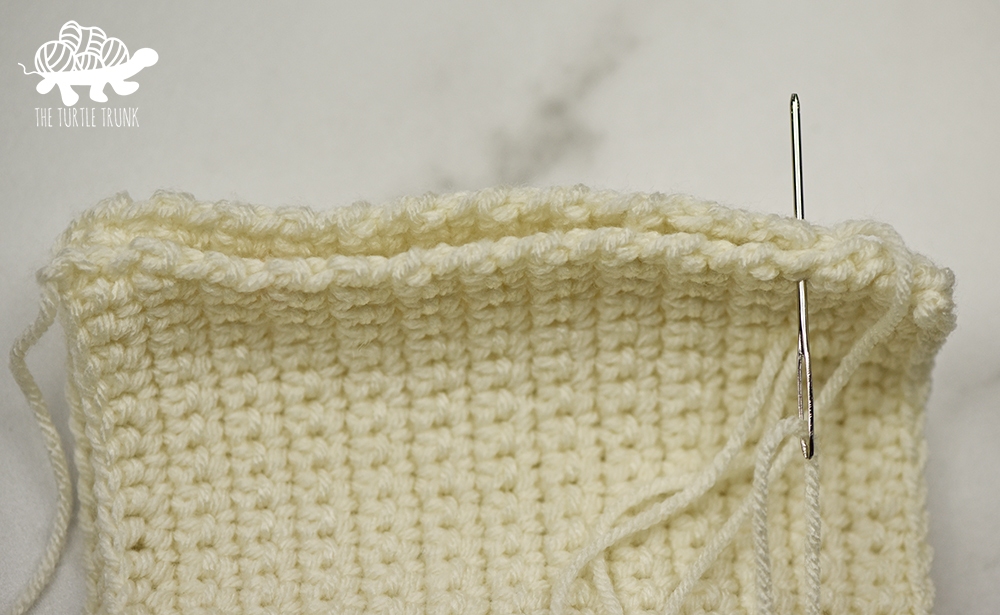
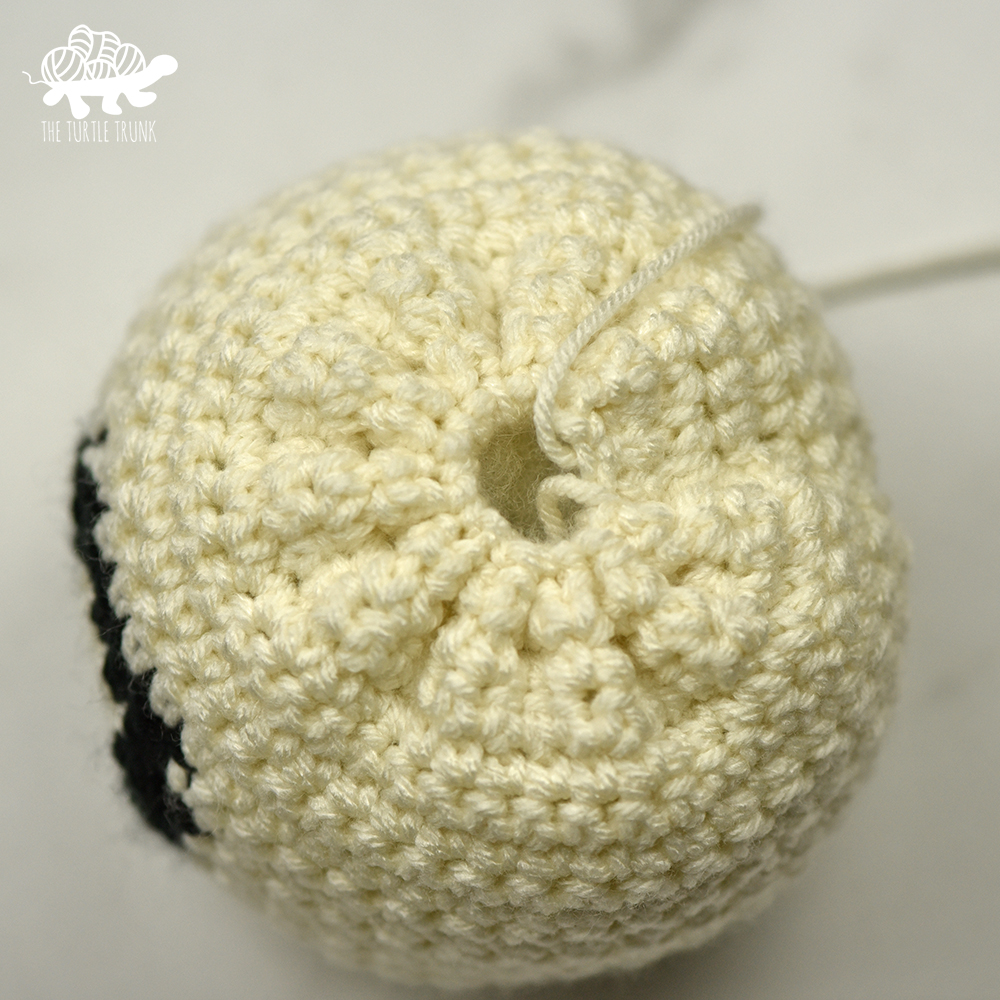
Weave the tail end through the stitches on the bottom of the pumpkin, working in every second stitch, pull tight to cinch bottom closed. Secure with a few knots and tie off yarn.
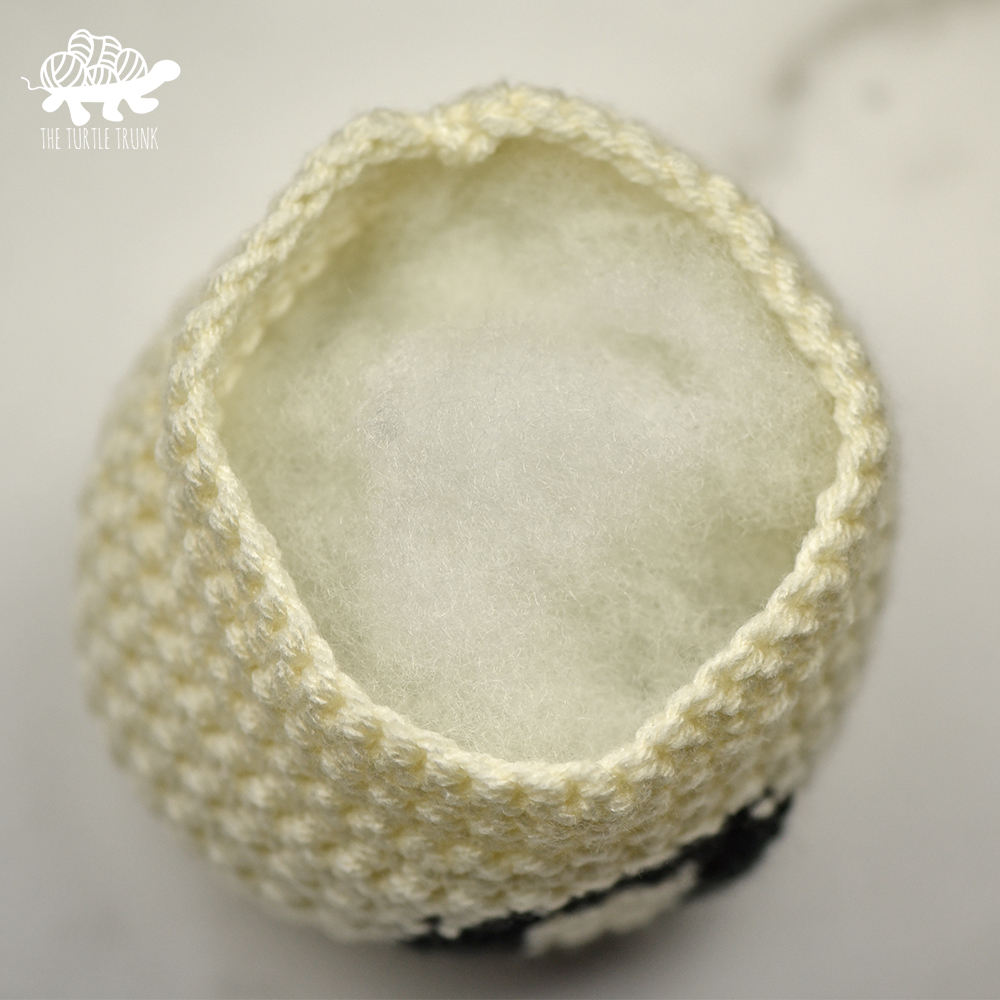
Flip pumpkin “right side” out and stuff with Fiber Fill. Attach a 24” long tail to the top and weave tail end through the top stitches, working in every second stitch. Pull tight to cinch close, making sure you leave a hole large enough for your stem to fit through.
To create the segments, wrap the tail end around the outside of the pumpkin, bringing it up through the bottom hole and to the top. Repeat around until you reach your desired amount of segments. Be sure not to cover up the letters. When you’re done, secure with a few knots and hide tail end inside the pumpkin.

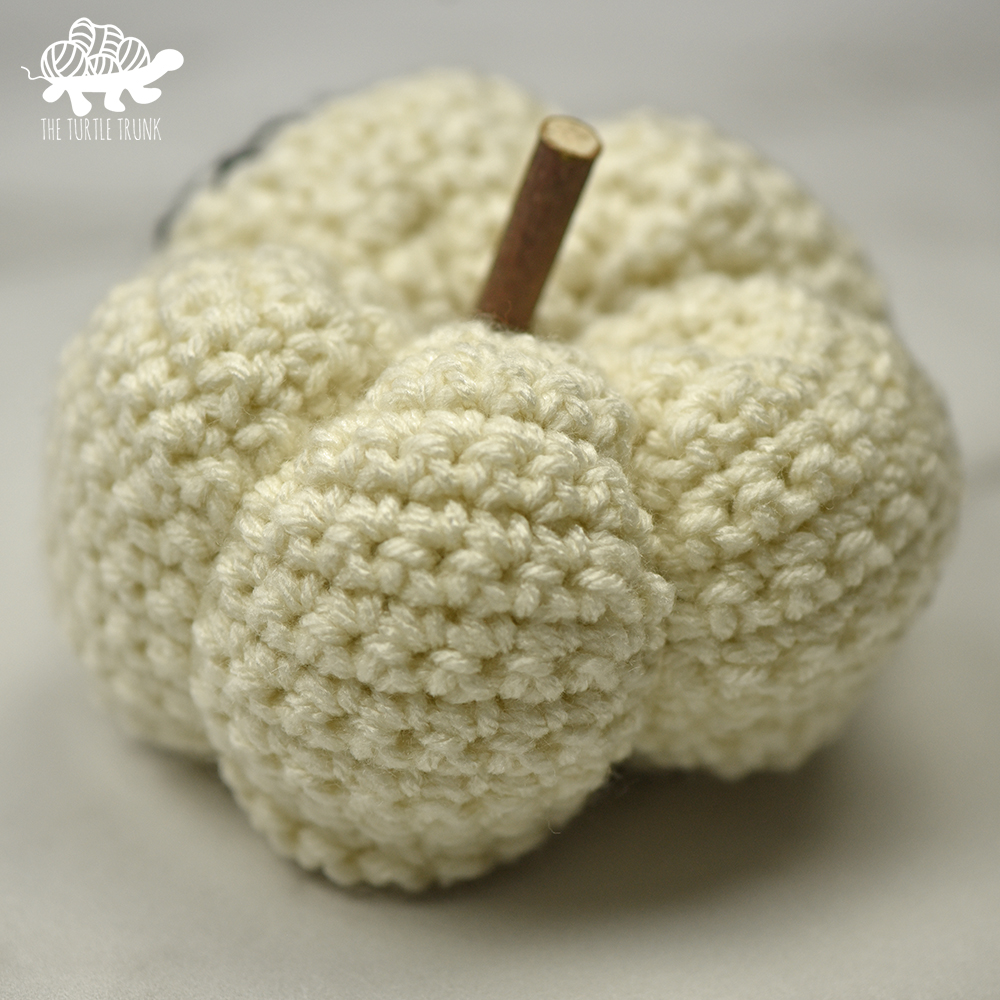
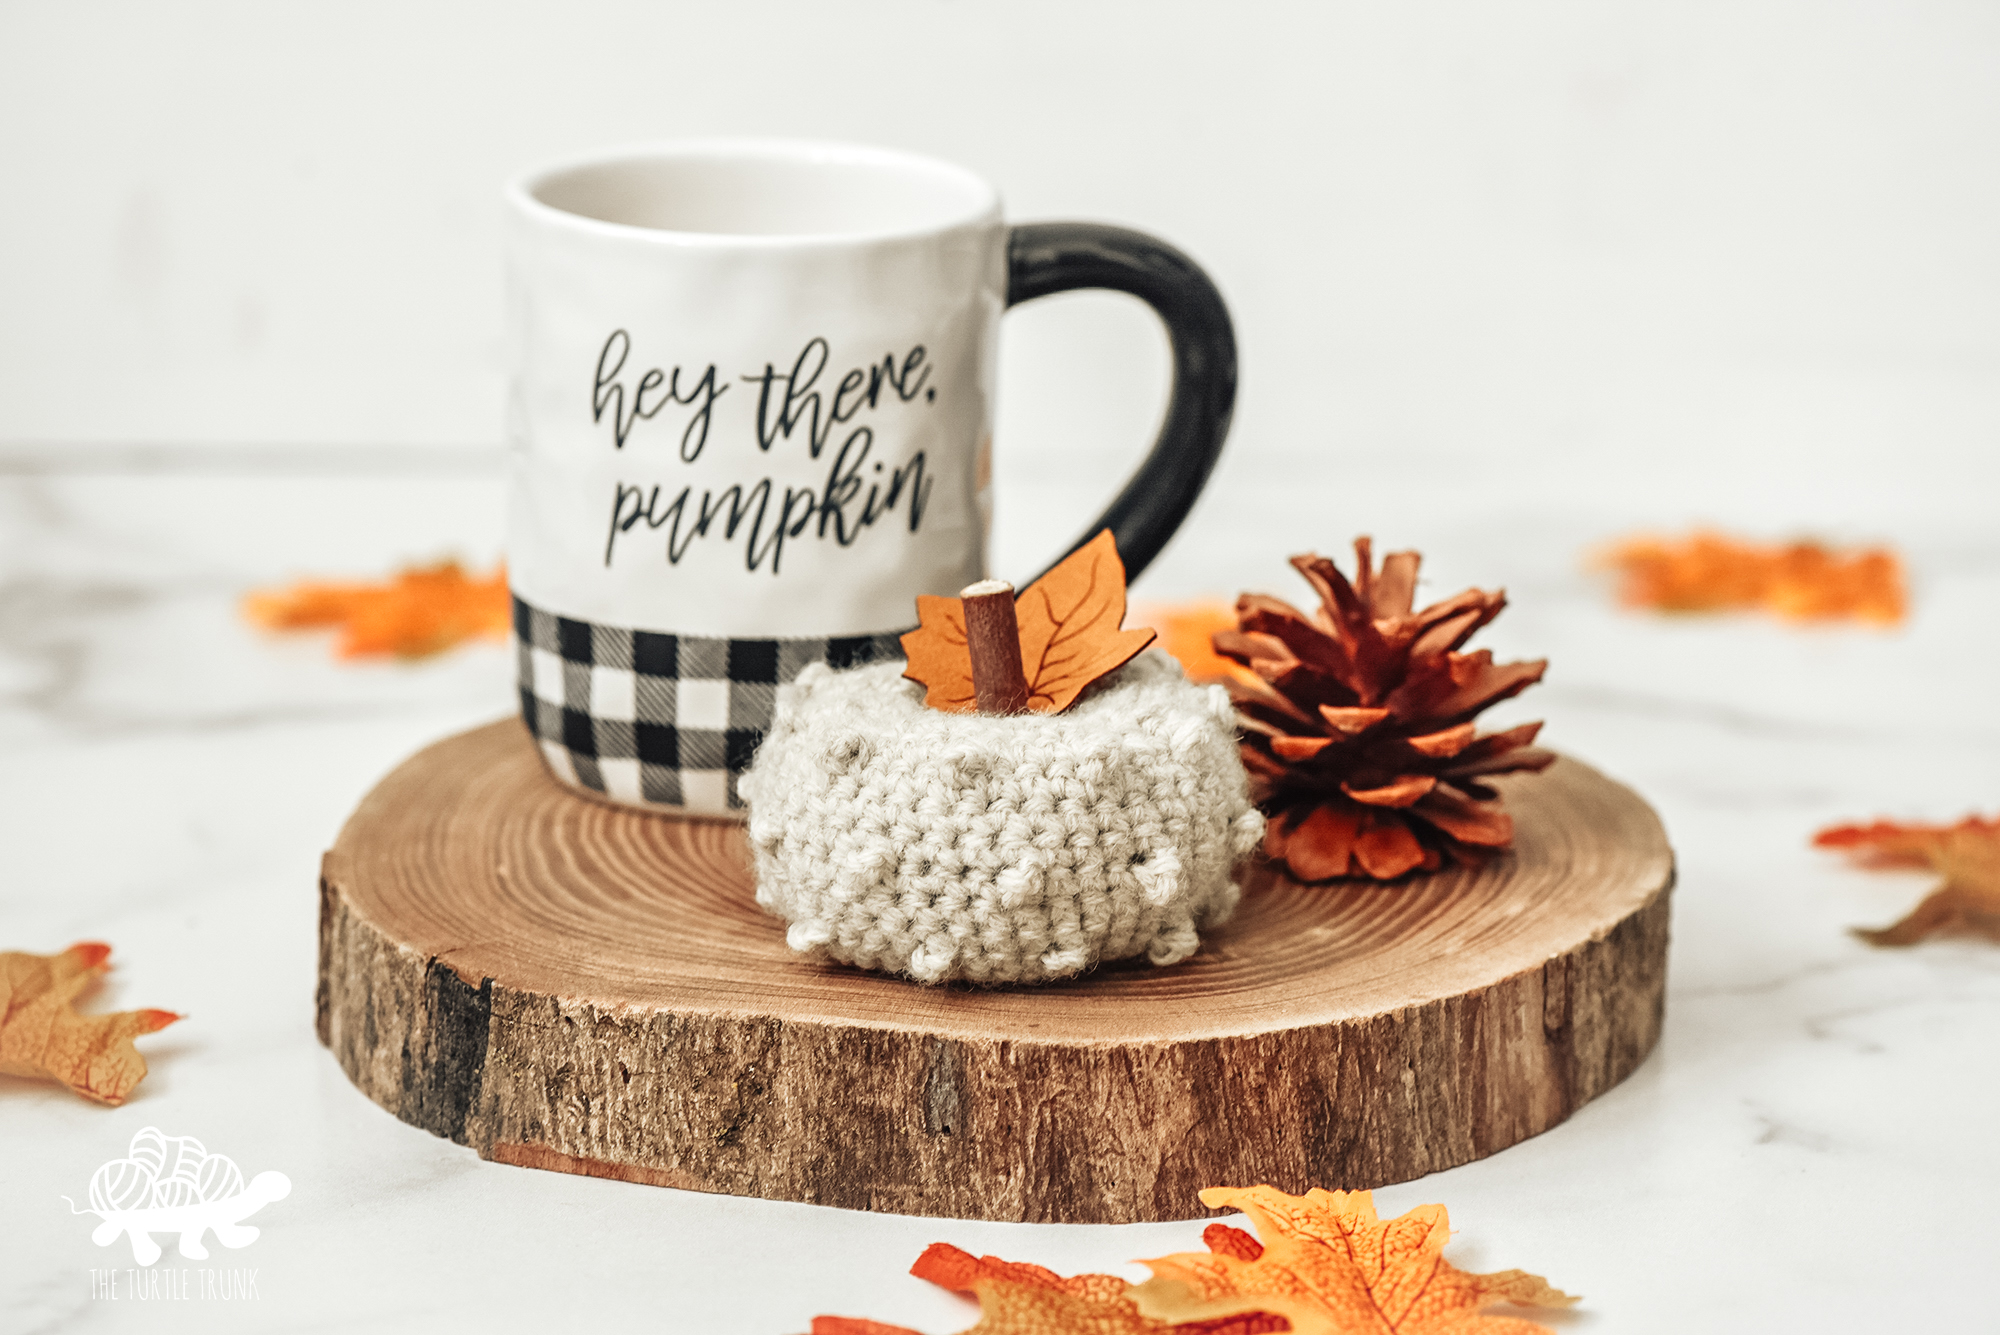
Finish your pumpkin off with a stem. There are endless possibilities for pumpkin stems: twigs and sticks from fallen branches in your yard, cinnamon sticks from your local market, or satin lace from the craft store! Simply stick stem through the center hole and voila! You can even use a dab of hot glue or fabric glue to keep the stem extra secure.
And you’re all done!
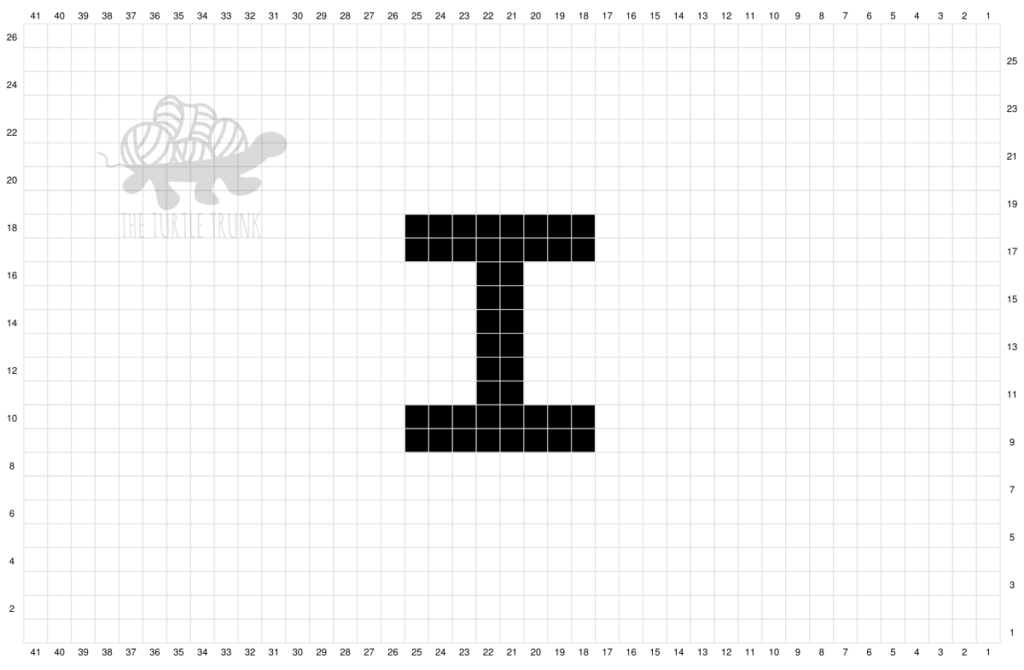
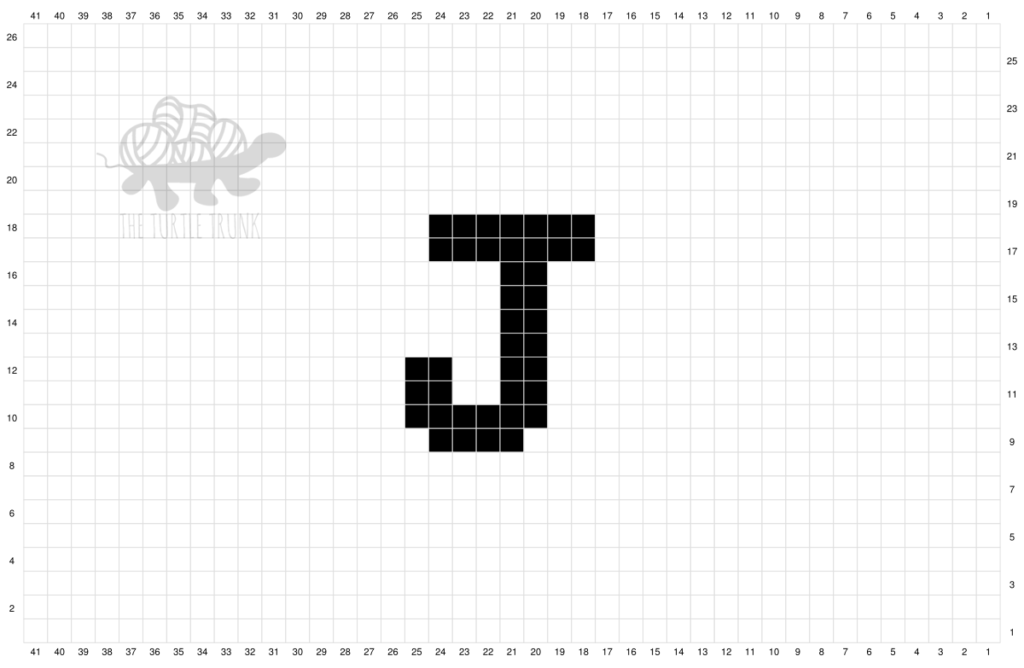
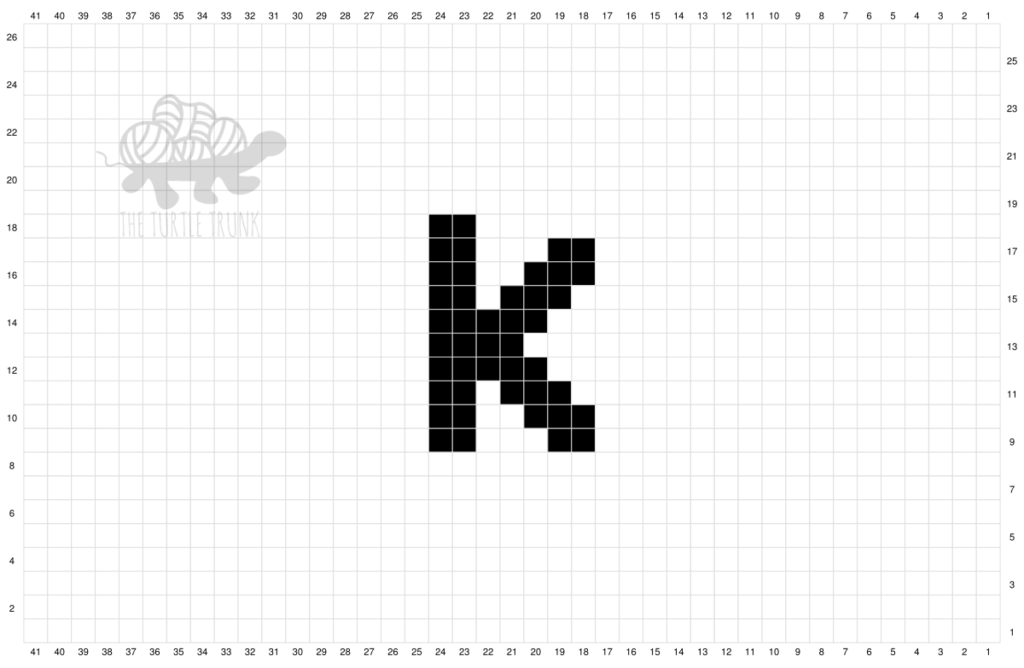
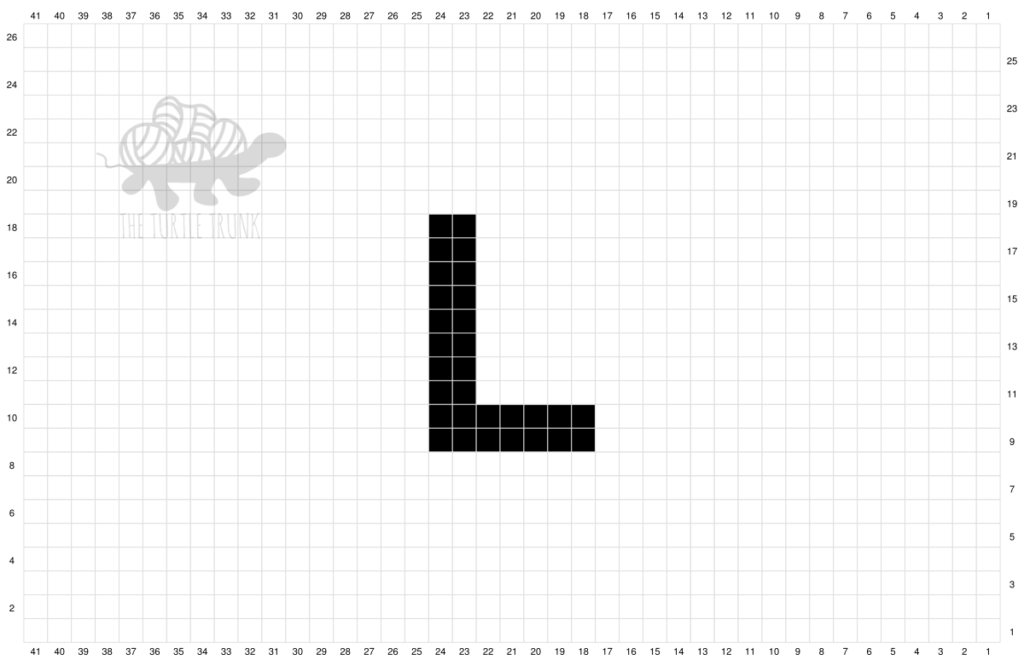
Check out these bonus graphs to make the rest of the alphabet!


I hope you enjoyed the BOO Pumpkins pattern! I can’t wait to see your finished pumpkins, so be sure to tag @theturtletrunk on Instagram!
You are free to sell the items you make with this crochet pattern, and I’d love if you could please credit The Turtle Trunk as the pattern designer. You do not have permission to republish or distribute this pattern in any way or claim it as your own. Do not use my photos in your sale listings or for any other purposes. Thank you.
This page includes affiliate links. If you make a purchase from these links, I may make a small commission at no cost to you! Thank you for your support!

I just finished the BOO pumpkins and they are so cute! The tutorial was very easy to follow! Thank you for the pattern!
So happy you enjoyed the tutorial Colleen! Thank you!