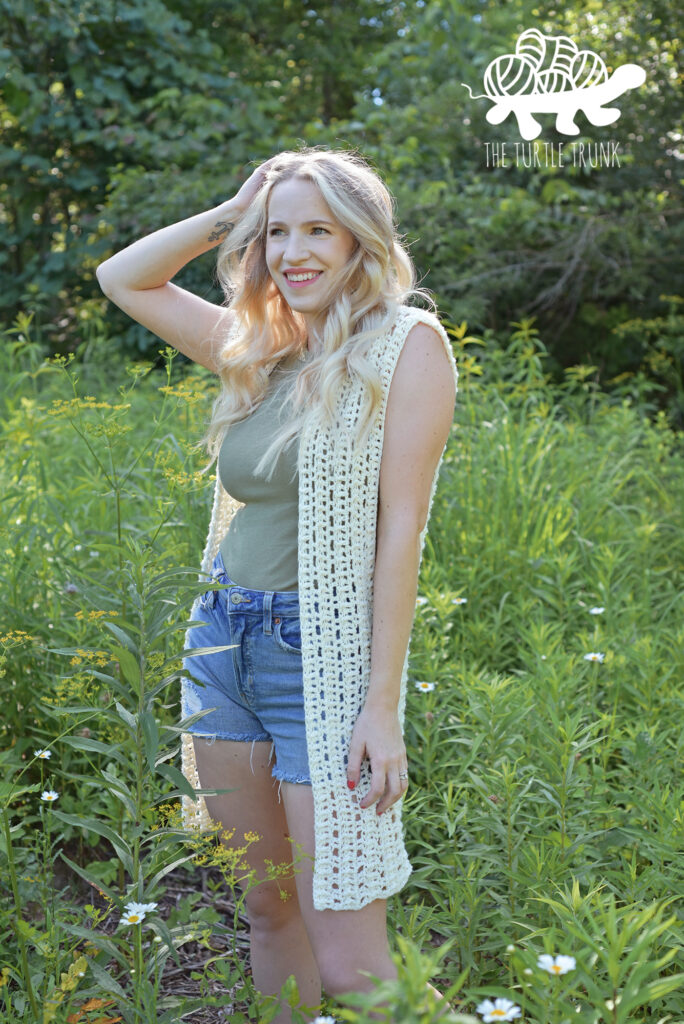
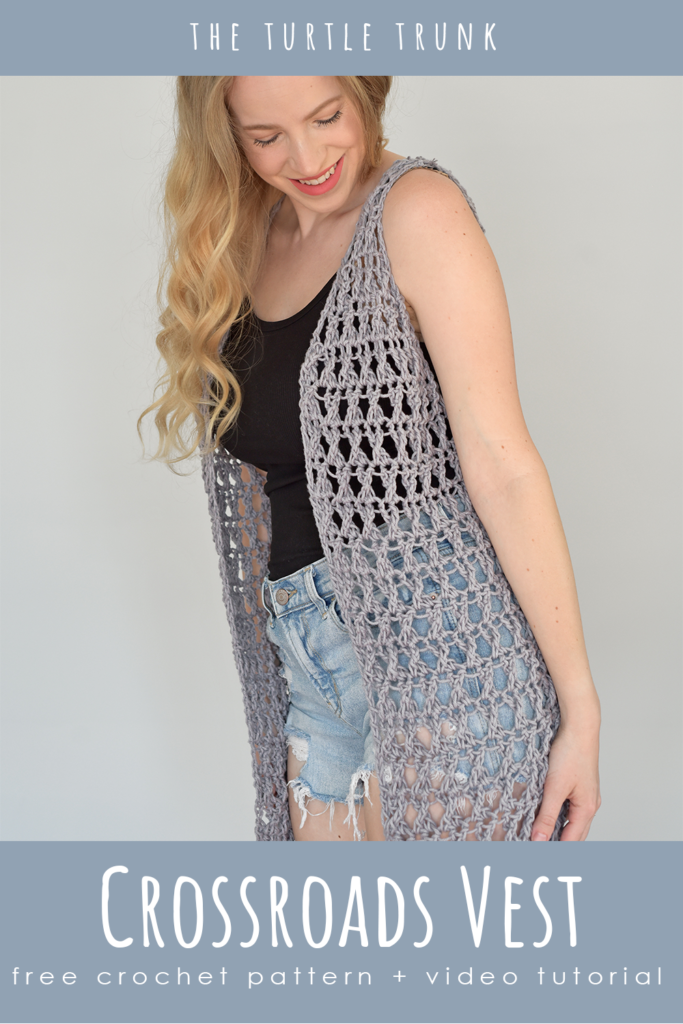
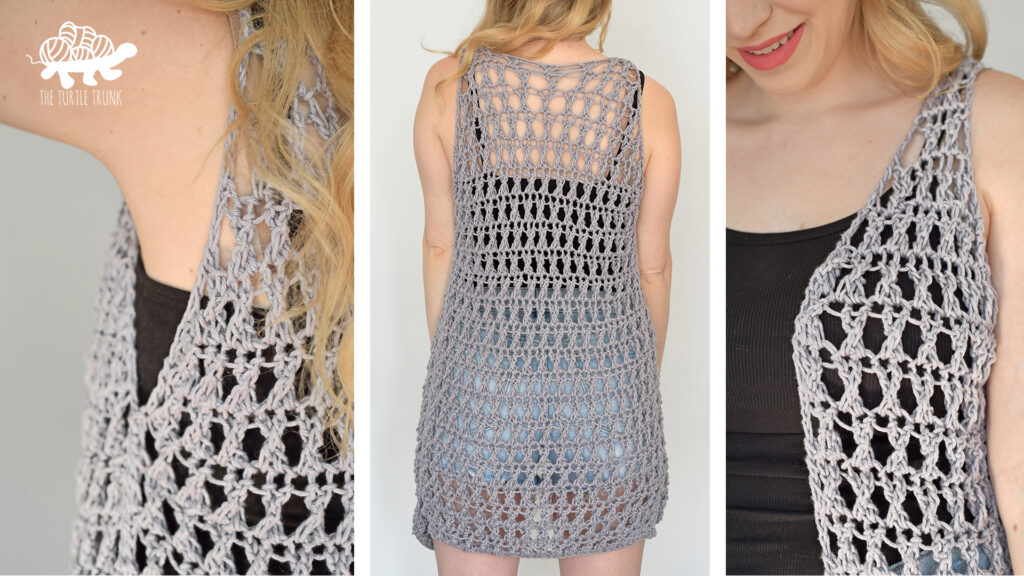
Crossroads Vest Crochet Pattern
The Crossroads Vest is a quick and easy crochet vest that’s perfect for Spring & Summer! It features a beautifully textured and lacy fabric and can be made any length you’d like!
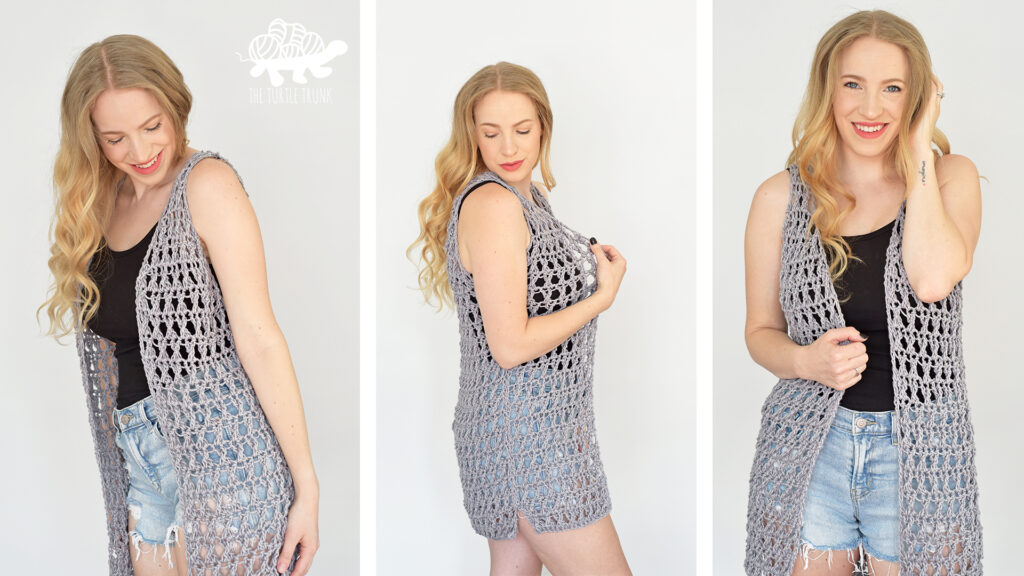
This light, and airy crochet vest is perfect for summer! The Crossroads Vest features a mesh fabric, that works up quick and easy! This pattern includes instructions for 9 sizes and the length is customizable!
Continue reading below to hear my inspiration for this pattern and to learn more about the yarn I used, then scroll down for the written pattern!
FOLLOW THE AD-FREE &
PRINTABLE PDF FROM
ETSY AND ALSO RAVELRY!
Want more summery crochet patterns?
Check out my Summer Daze Cardigan, Sweet Tea Tank, and Beach Daze Coverup patterns!
Not ready to make just yet?!
PIN this pattern for later!
Follow along with the video tutorial on YouTube!
Yarn
For my Crossroads Vest, I used Circulo Natural Cotton MAXCOLOR, but you can use any medium (4) weight yarn! I love using cotton for summer makes, as it’s durable, easy to wash, and drapes nicely, but feel free to use any fiber!
We’ll also be using a 9.00mm hook so this pattern works up FAST! The large hook and tall stitches, helping this pattern work up quickly and also create a nice mesh fabric, that’s light and airy, and perfect for laying in warmer weather!
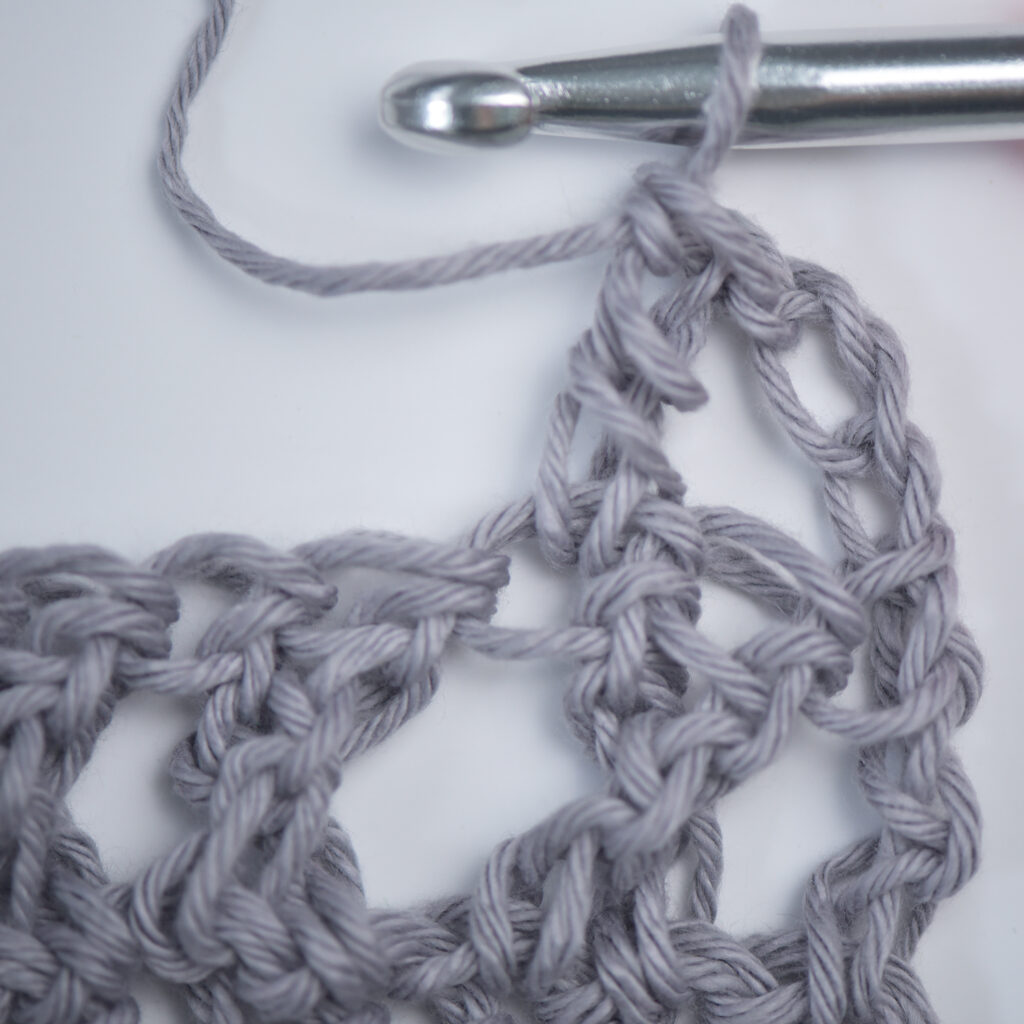
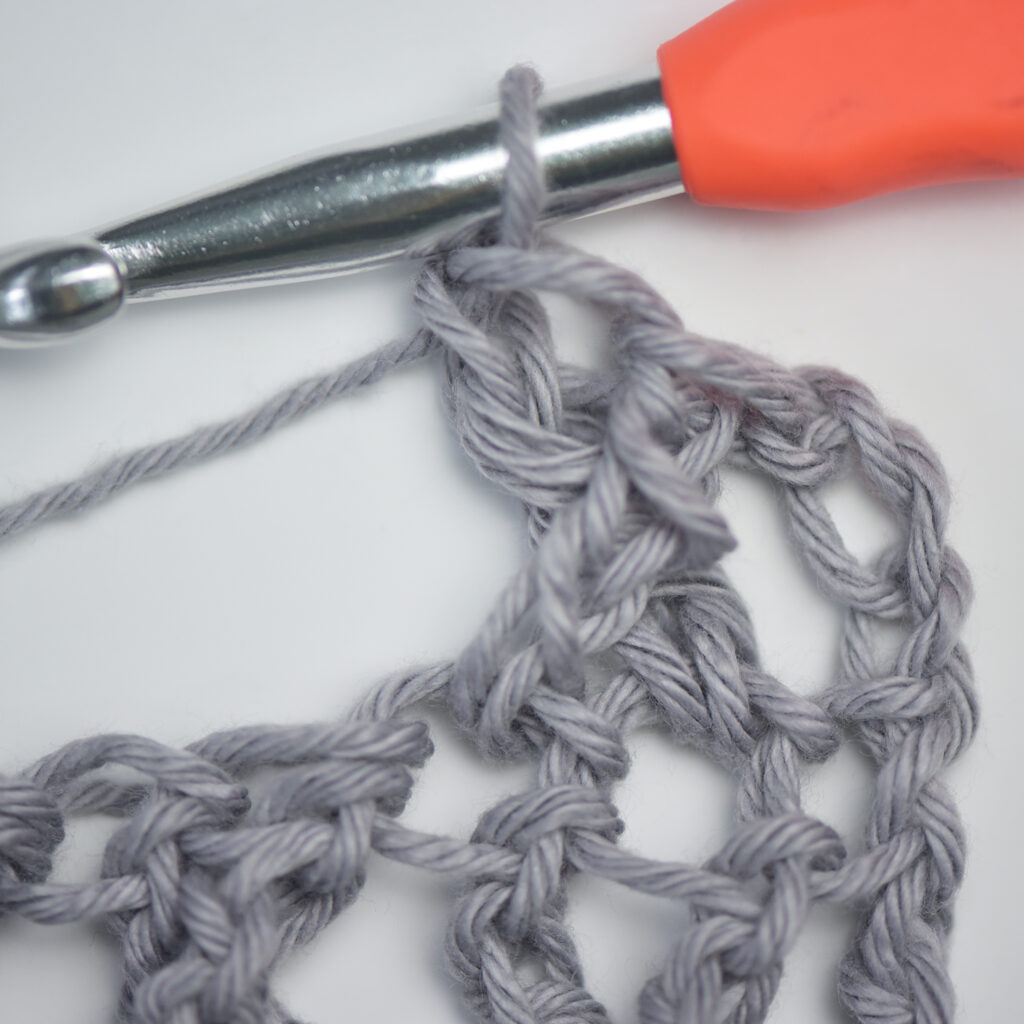
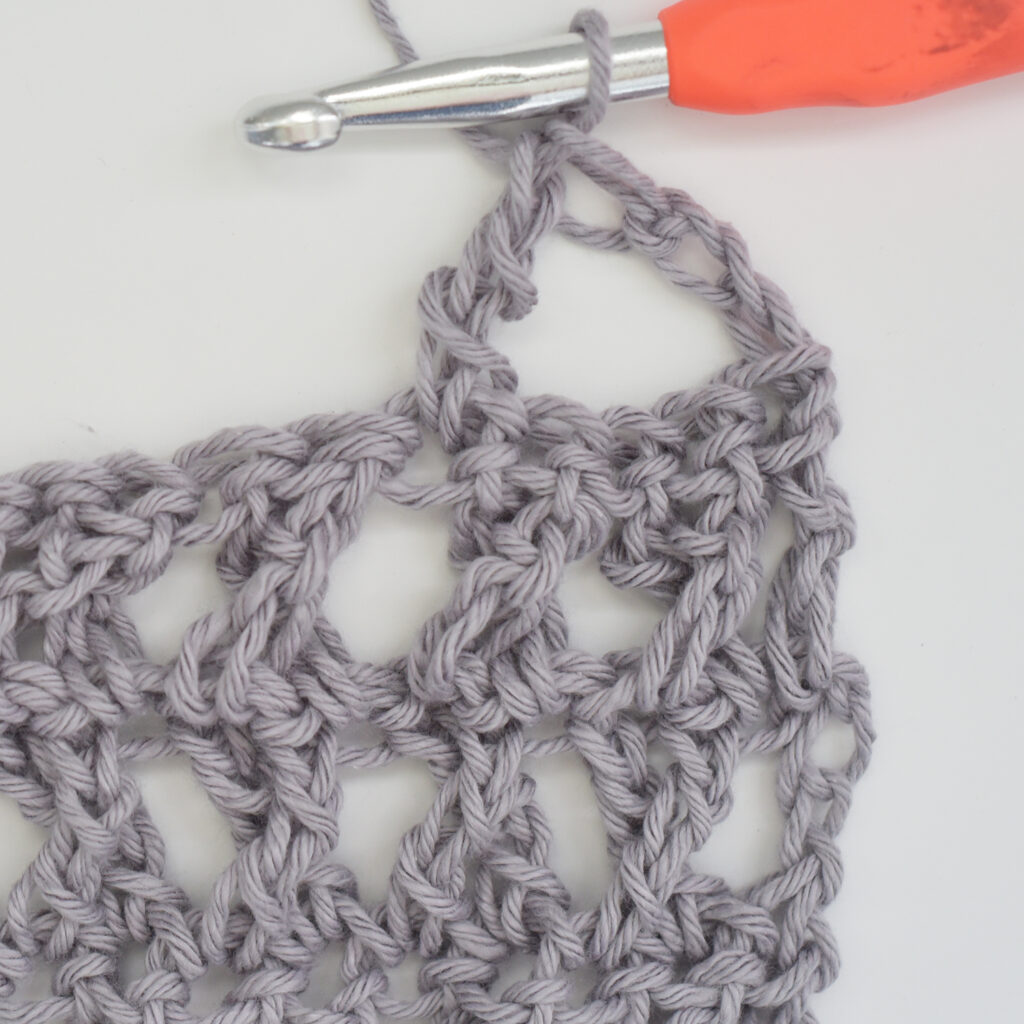
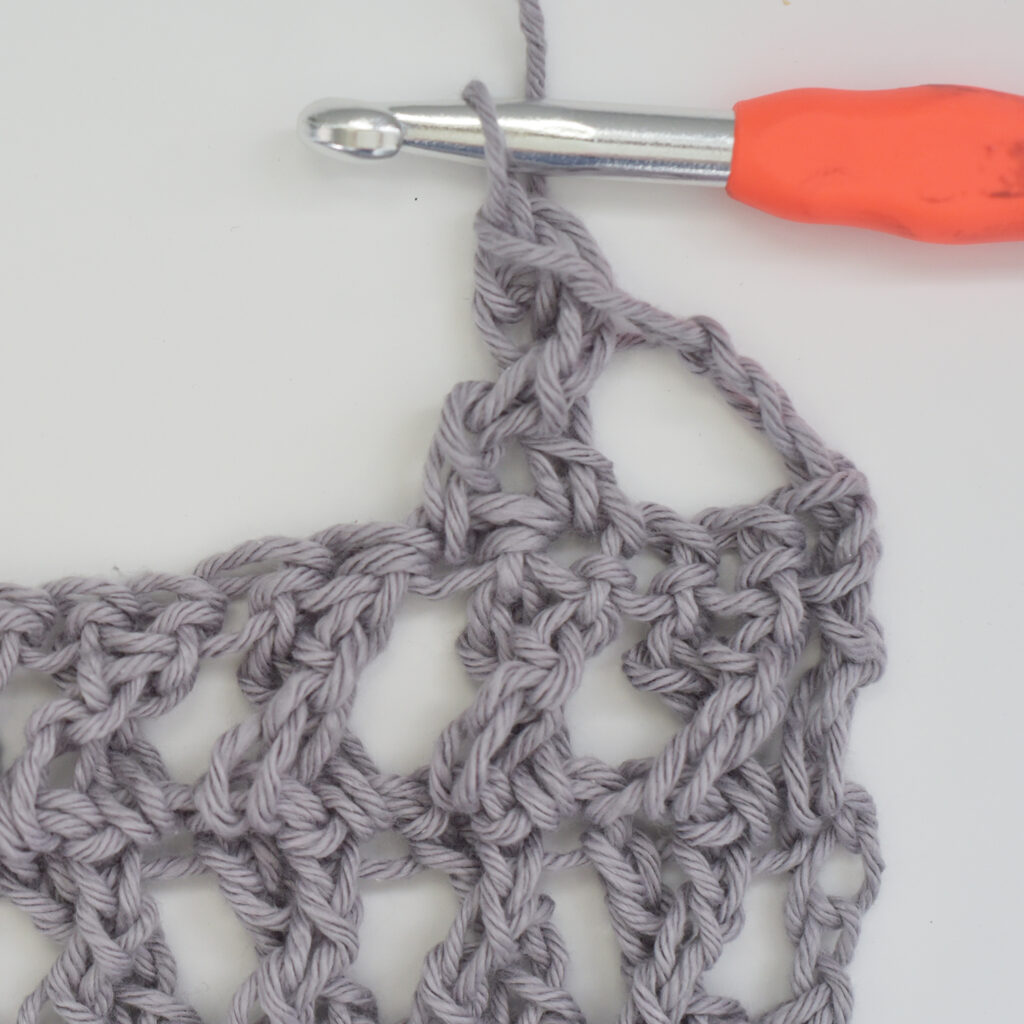
We’ll be using mainly one stitch for this whole pattern, the treble crochet (also known as the triple crochet)! When you skip one space, work a treble crochet in the next stitch, then work another treble crochet in the skipped stitch, you get the Crossed Treble Crochet! This creates an X and gives the project lots of beautiful, fun texture! Let’s go into more detail on how to work these stitches:
Treble (or Triple) Crochet (TR)
Yarn over twice, insert hook into stitch, pull up a loop, yarn over and pull through 2 loops (x3)
Crossed Treble Crochet (XTR)
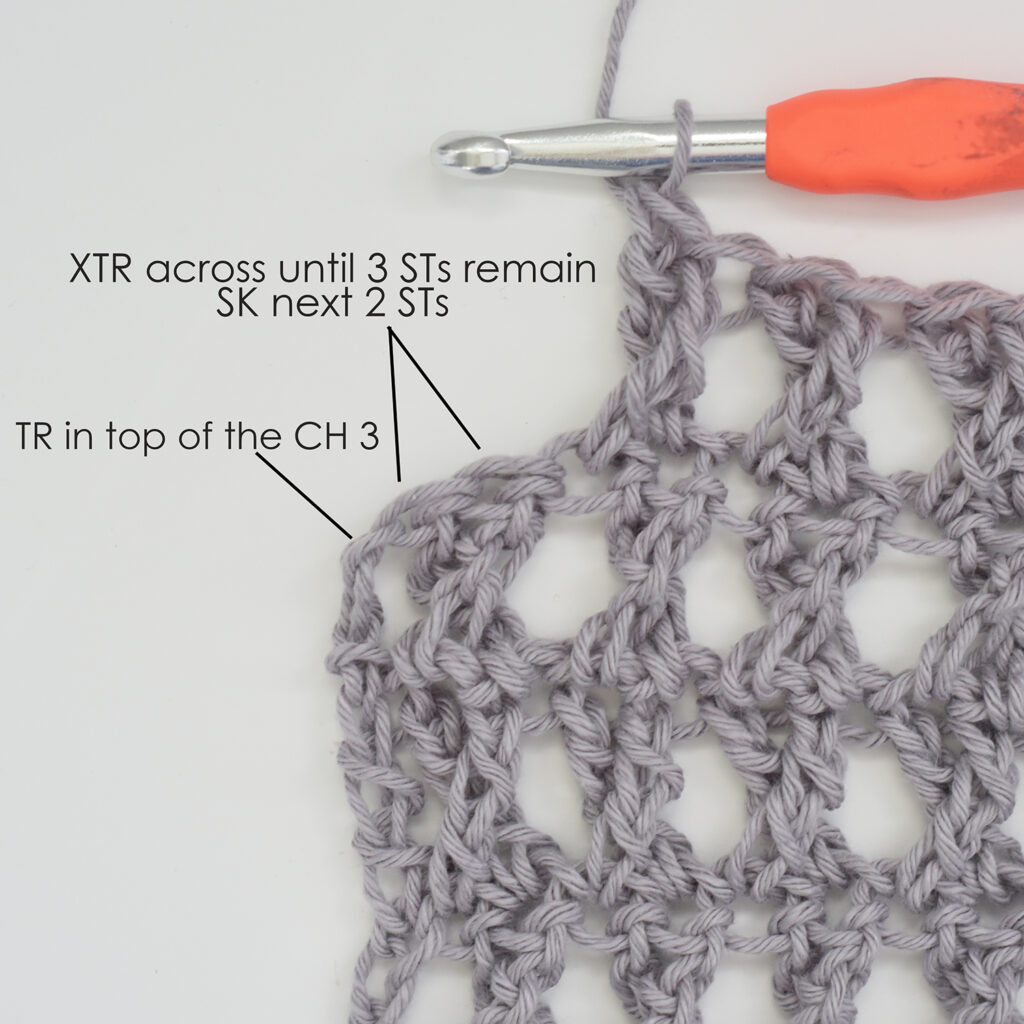
SK next unworked stitch, TR in next ST. Working behind the TR you just made, TR in the skipped stitch behind it. At the end of the row, work the last TR into the top of the CH 3.

When decreasing
SK 1st 2 STs, XTR across until 3 STs remain. SK next 2 STs, TR in last ST

Sizes
The Crossroads Vest has about 0-2” positive ease. Measurements below are when the garment is not stretched. Keep in mind the garment will be very stretchy.
The instructions will make the vest approximately mid-thigh length. The length can be customized by repeating Row 2 as many or as few times. The decrease rows will start about mid-way up the back, so work as many rows before that to get the length you desire.
Crossroads Vest Size Chart
| Sizes (Bust) | Vest Width (circumference) | Vest Length | Yardage (approx.) |
| XS (28”-30”) | 15” (30”) | 26.5” | 420 |
| S (32”-34”) | 17” (34”) | 26.5” | 475 |
| M (36”-38”) | 18.5” (37”) | 26.5” | 500 |
| L (40”-42”) | 20.5” (41.5) | 27.5” | 575 |
| XL (44”-46”) | 22.5” (45”) | 27.5” | 620 |
| 2 XL (48”-50”) | 24.5” (49”) | 29” | 700 |
| 3 XL (52”-54”) | 26.5” (53”) | 29” | 750 |
| 4 XL (56”-58”) | 28” (56.5”) | 30’ | 800 |
| 5 XL (60”-62”) | 30” (60”) | 30” | 850 |
To ensure proper sizing make a gauge swatch (instructions below) and adjust your hook size up or down to match the gauge!
Difficulty
Easy
Gauge Swatch
For the most accurate measurement do not stretch your swatch when measuring and only measure the XTR stitches and from row 2 up (not the FSC).
Row 1: FSC 18
Rows 2-8: CH 3 & turn. XTR across until 1 ST remains. TR in last ST. (18)
17 stitches by 7 rows = 8”by 8” square.
Adjust hook size up or down to meet gauge.
Notes
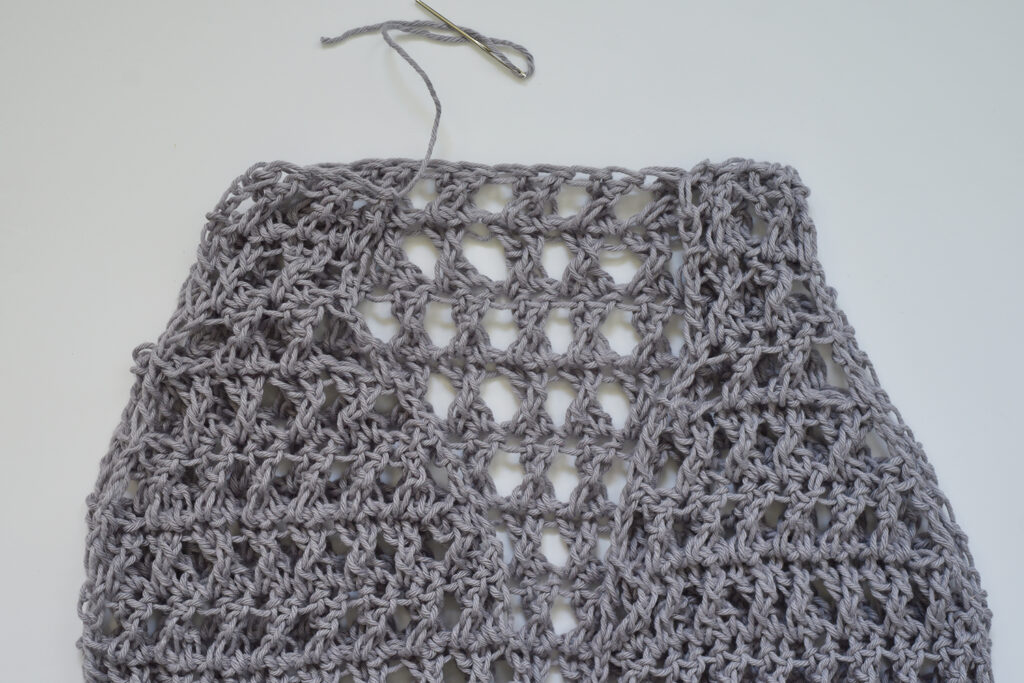
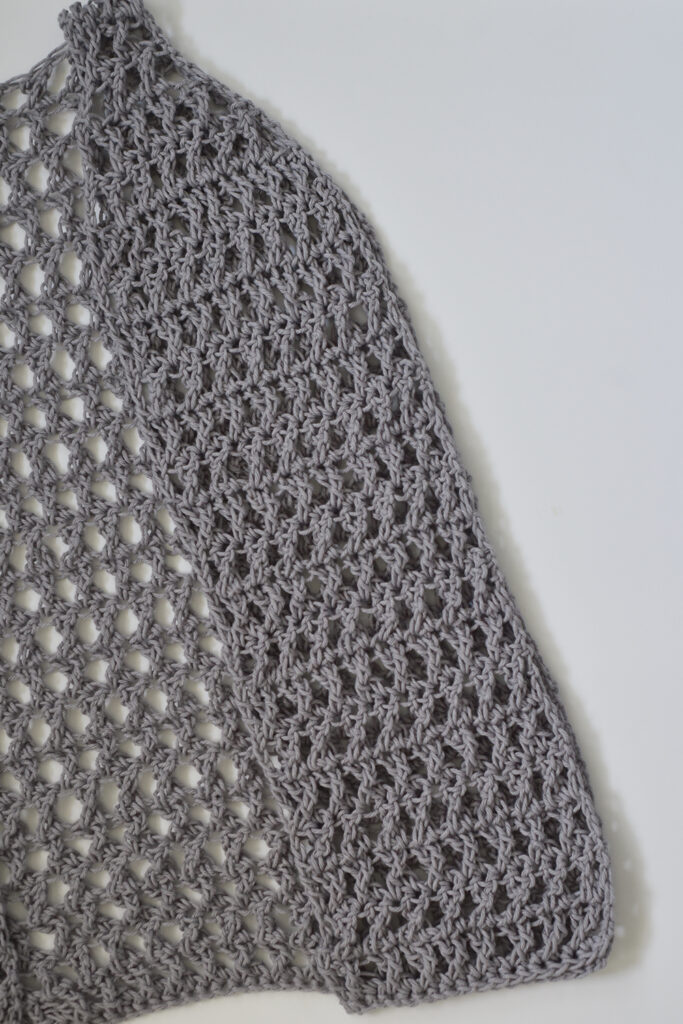
- This vest is worked from the bottom up in 3 separate panels that are sewn together at the shoulders and on the sides.
- The CH 3 at the beginning of each row DOES count as a stitch. Skip the stitch directly below it as it counts as the 1st ST with the CH 3. At the end of the row, work the last TR into the top of the CH 3.
- The number in parenthesis at the end of each row represents the total number of stitches to be worked in that row. Numbers are in order by size starting with the smallest size.
Supplies
- Medium (4) Weight Yarn
- I used Circulo Natural Cotton Maxcolor
- Hook: 9.00 mm (M)
- Yarn Needle
- Scissors
Abbreviations (US Terms)
ST(s) – Stitch(es)
CH – Chain
FSC – Single Crochet
TR – Treble Crochet (also known as Triple Crochet)
XTR – Crossed Treble Crochet
Crossroads Vest Pattern
Back Panel (make one)
Row 1: FSC (32, 36, 40, 44, 48, 52, 56, 60, 64)
Rows 2-18: CH 3 & turn. XTR across until 1 ST remains. TR in the last ST. (32, 36, 40, 44, 48, 52, 56, 60, 64)
Row 19: CH 3 & turn. SK 1st 2 STs, XTR across until 3 STs remain. SK next 2 STS, TR in last ST. (28, 32, 36, 40, 44, 48, 52, 56, 60)
Row 20: CH 3 & turn. SK 1st 2 STs, XTR across until 3 STs remain. SK next 2 STS, TR in last ST. (24, 28, 32, 36, 40, 44, 48, 52, 56)
Row 21: CH 3 & turn. SK 1st 2 STs, XTR across until 3 STs remain. SK next 2 STS, TR in last ST. (20, 24, 28, 32, 36, 40, 44, 48, 52)
Row 22: CH 3 & turn. SK 1st 2 STs, XTR across until 3 STs remain. SK next 2 STS, TR in last ST. (16, 20, 24, 28, 32, 36, 40, 44, 48)
Row 23: CH 3 & turn. SK 1st 2 STs, XTR across until 3 STs remain. SK next 2 STS, TR in last ST. (12, 16, 20, 24, 28, 32, 36, 40, 44)
XS, S, M – Tie off yarn and weave in ends. Move onto front panels. Other sizes move onto next row.
Row 24: CH 3 & turn. SK 1st 2 STs, XTR across until 3 STs remain. SK next 2 STS, TR in last ST. (20, 24, 28, 32, 36, 40)
L, XL – Tie off yarn and weave in ends. Move onto front panels. Other sizes move onto next row.
Row 25: CH 3 & turn. SK 1st 2 STs, XTR across until 3 STs remain. SK next 2 STS, TR in last ST. (24, 28, 32, 36)
2X, 3X – Tie off yarn and weave in ends. Move onto front panels. Other sizes move onto next row.
Row 26: CH 3 & turn. SK 1st 2 STs, XTR across until 3 STs remain. SK next 2 STS, TR in last ST. (28, 32)
4 X, 5X – Tie off yarn and weave in ends. Move onto front panels.
Front Panels (make two)
Row 1: FSC (16, 18, 20, 22, 24, 26, 28, 30, 32)
Rows 2-18: CH 3 & turn. XTR across until 1 ST remains. TR in the last ST. (16, 18, 20, 22, 24, 26, 28, 30, 32)
Row 19: CH 3 & turn. SK 1st 2 STs, XTR across until 3 STs remain. SK next 2 STS, TR in last ST. (12, 14, 16, 18, 20, 22, 24, 26, 28)
Row 20: CH 3 & turn. SK 1st 2 STs, XTR across until 3 STs remain. SK next 2 STS, TR in last ST. (8, 10, 12, 14, 16, 18, 20, 22, 24)
Row 21: CH 3 & turn. SK 1st 2 STs, XTR across until 3 STs remain. SK next 2 STS, TR in last ST. (4, 6, 8, 10, 12, 14, 16, 18, 20)
*Instructions are split up for each size for rows 22 and on. Be sure to follow only the directions directly under your size.
XS, S
Rows 22-23: CH 3 & turn. XTR across until 1 ST remains. TR in the last ST. (4, 6)
Tie off yarn leaving a 10” long tail. Make a total of two front panels then move onto Assembling.
M
Row 22: CH 3 & turn. SK 1st 2 STs, XTR across until 1 ST remains. TR in last ST. (6)
Row 23: CH 3 & turn. XTR across until 1 ST remains. TR in the last ST. (6)
Tie off yarn leaving a 10” long tail. Make a total of two front panels then move onto Assembling.
L, XL
Row 22: CH 3 & turn. SK 1st 2 stitches, XTR across until 3 STs remain. SK next 2 STS, TR in last ST. (6, 8)
Rows 23-24: CH 3 & turn. XTR across until 1 ST remains. TR in the last ST. (6,8)
Tie off yarn leaving a 12” long tail. Make a total of two front panels then move onto Assembling.
2X
Row 22: CH 3 & turn. SK 1st 2 STs, XTR across until 3 STs remain. SK next 2 STS, TR in last ST. (10)
Row 23: CH 3 & turn. SK 1st 2 STs, XTR across until 1 ST remains. TR in last ST. (8)
Rows 24-25: CH 3 & turn. XTR across until 1 ST remains. TR in the last ST. (8)
Tie off yarn leaving a 12” long tail. Make a total of two front panels then move onto Assembling.
3X, 4X
Row 22: CH 3 & turn. SK 1st 2 STs, XTR across until 3 STs remain. SK next 2 STS, TR in last ST. (12, 14)
Row 23: CH 3 & turn. SK 1st 2 STs, XTR across until 3 STs remain. SK next 2 STS, TR in last ST. (8, 10)
Rows 24-(25, 26): CH 3 & turn. XTR across until 1 ST remains. TR in the last ST. (8, 10)
Tie off yarn leaving a 12” long tail. Make a total of two front panels then move onto Assembling.
5 XL
Row 22: CH 3 & turn. SK 1st 2 STs, XTR across until 3 STs remain. SK next 2 STS, TR in last ST. (16)
Row 23: CH 3 & turn. SK 1st 2 STs, XTR across until 3 STs remain. SK next 2 STS, TR in last ST. (12)
Row 24: CH 3 & turn. SK 1st 2 STs, XTR across until 1 ST remains. TR in last ST. (10)
Rows 25-26: CH 3 & turn. XTR across until 1 ST remains. TR in the last ST. (10)
Tie off yarn leaving a 12” long tail. Make a total of two front panels then move onto Assembling.
Assembling
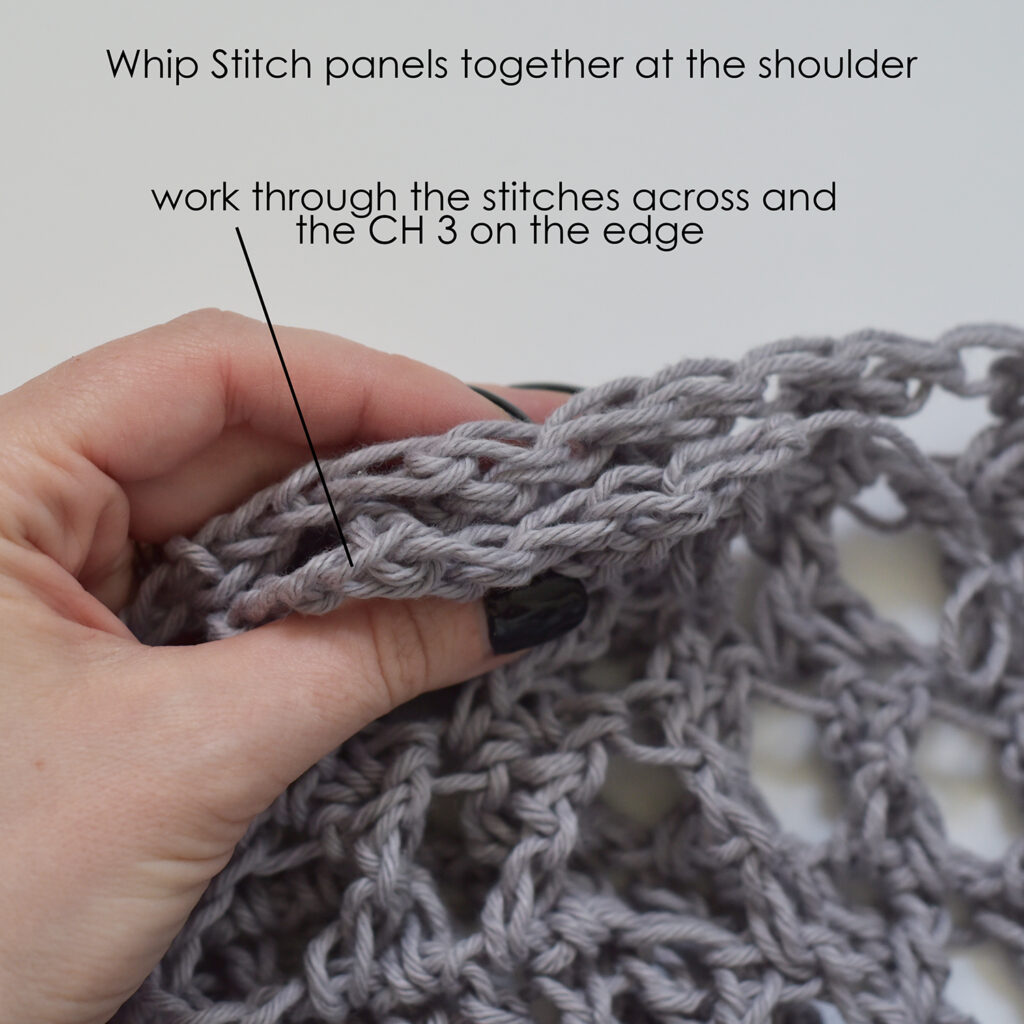
Shoulder Seams
Lay the back panel down with the right side facing up and the wrong side facing down (odd numbered rows were worked on the right side / even numbered rows were worked on the wrong).
Place front panels on top of the back panel with the right sides facing down and the wrong sides facing up. Line the shoulder straps up with the top edges of the back panel.
With your yarn needle and the 10-12” tails you left, whip stitch the panels together across the top. Be sure to work into the top of the CH 3 in the corners so there is no gap left between the panels. Secure at the end with a few knots. Weave in ends.
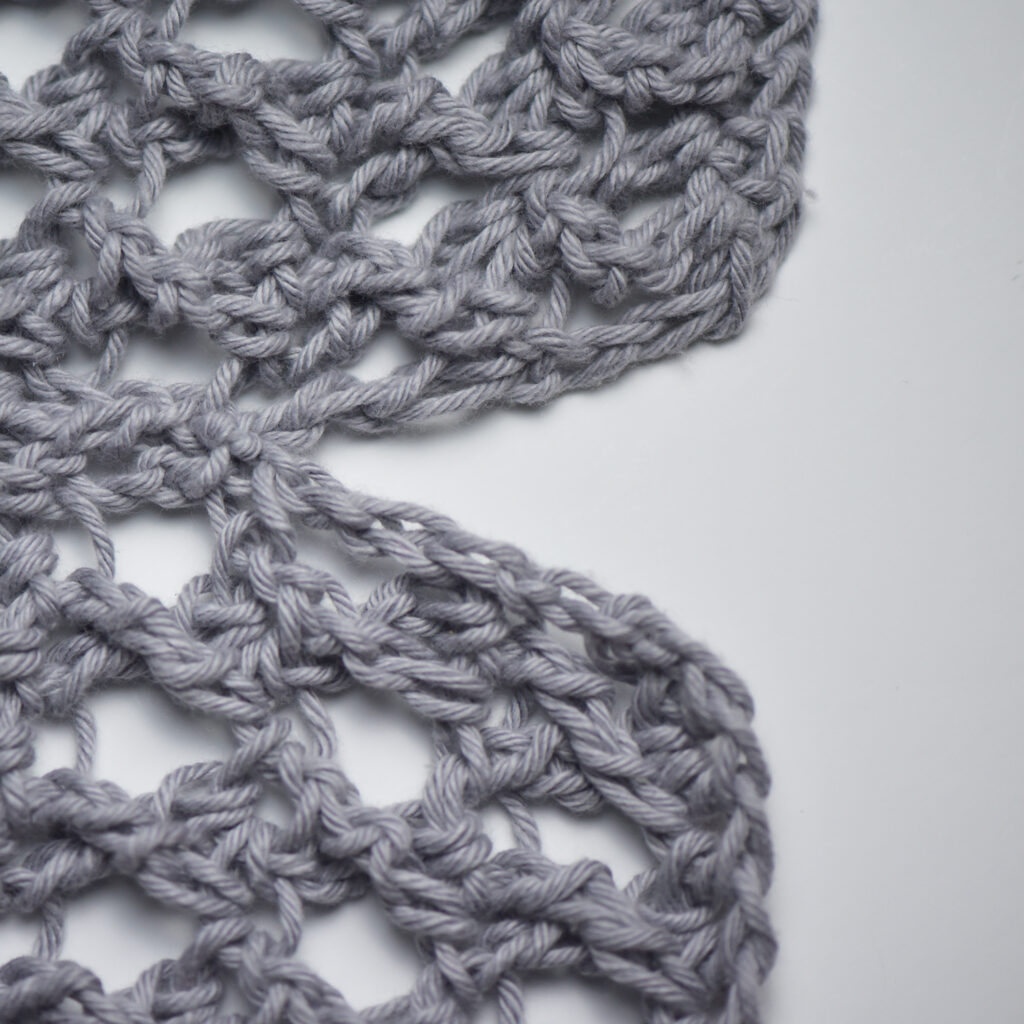
Side seams
*I started to seam my vest at Row 4 so there was a 2” split at the bottom on the sides. Feel free to start seaming wherever you want to make a larger split or no split at all)
Cut a new strand of yarn 2x the length of your vest. Attach the yarn at Row 4 and whip stitch the panels together up until the top of Row 16 or until the arm hole is your desired size. Be sure you’re working into the corresponding stitches on the back panel, so the panels are in line with each other. Repeat on other side. Secure with a few knots and weave in ends.

And you’re all done!
I hope you enjoyed the Crossroads Vest crochet pattern! Be sure to tag @theturtletrunk on Instagram so I can see your finished creation!
You are free to sell the items you make with this crochet pattern, and I’d love if you could please link back to this page. You do not have permission to republish or distribute this pattern in any way or claim it as your own. Do not use my photos in your sale listings or for any other purposes. Thank you.
This page includes affiliate links. If you make a purchase from these links, I may make a small commission at no cost to you! Thank you for your support!