
Mother’s Day Pillow Crochet Pattern
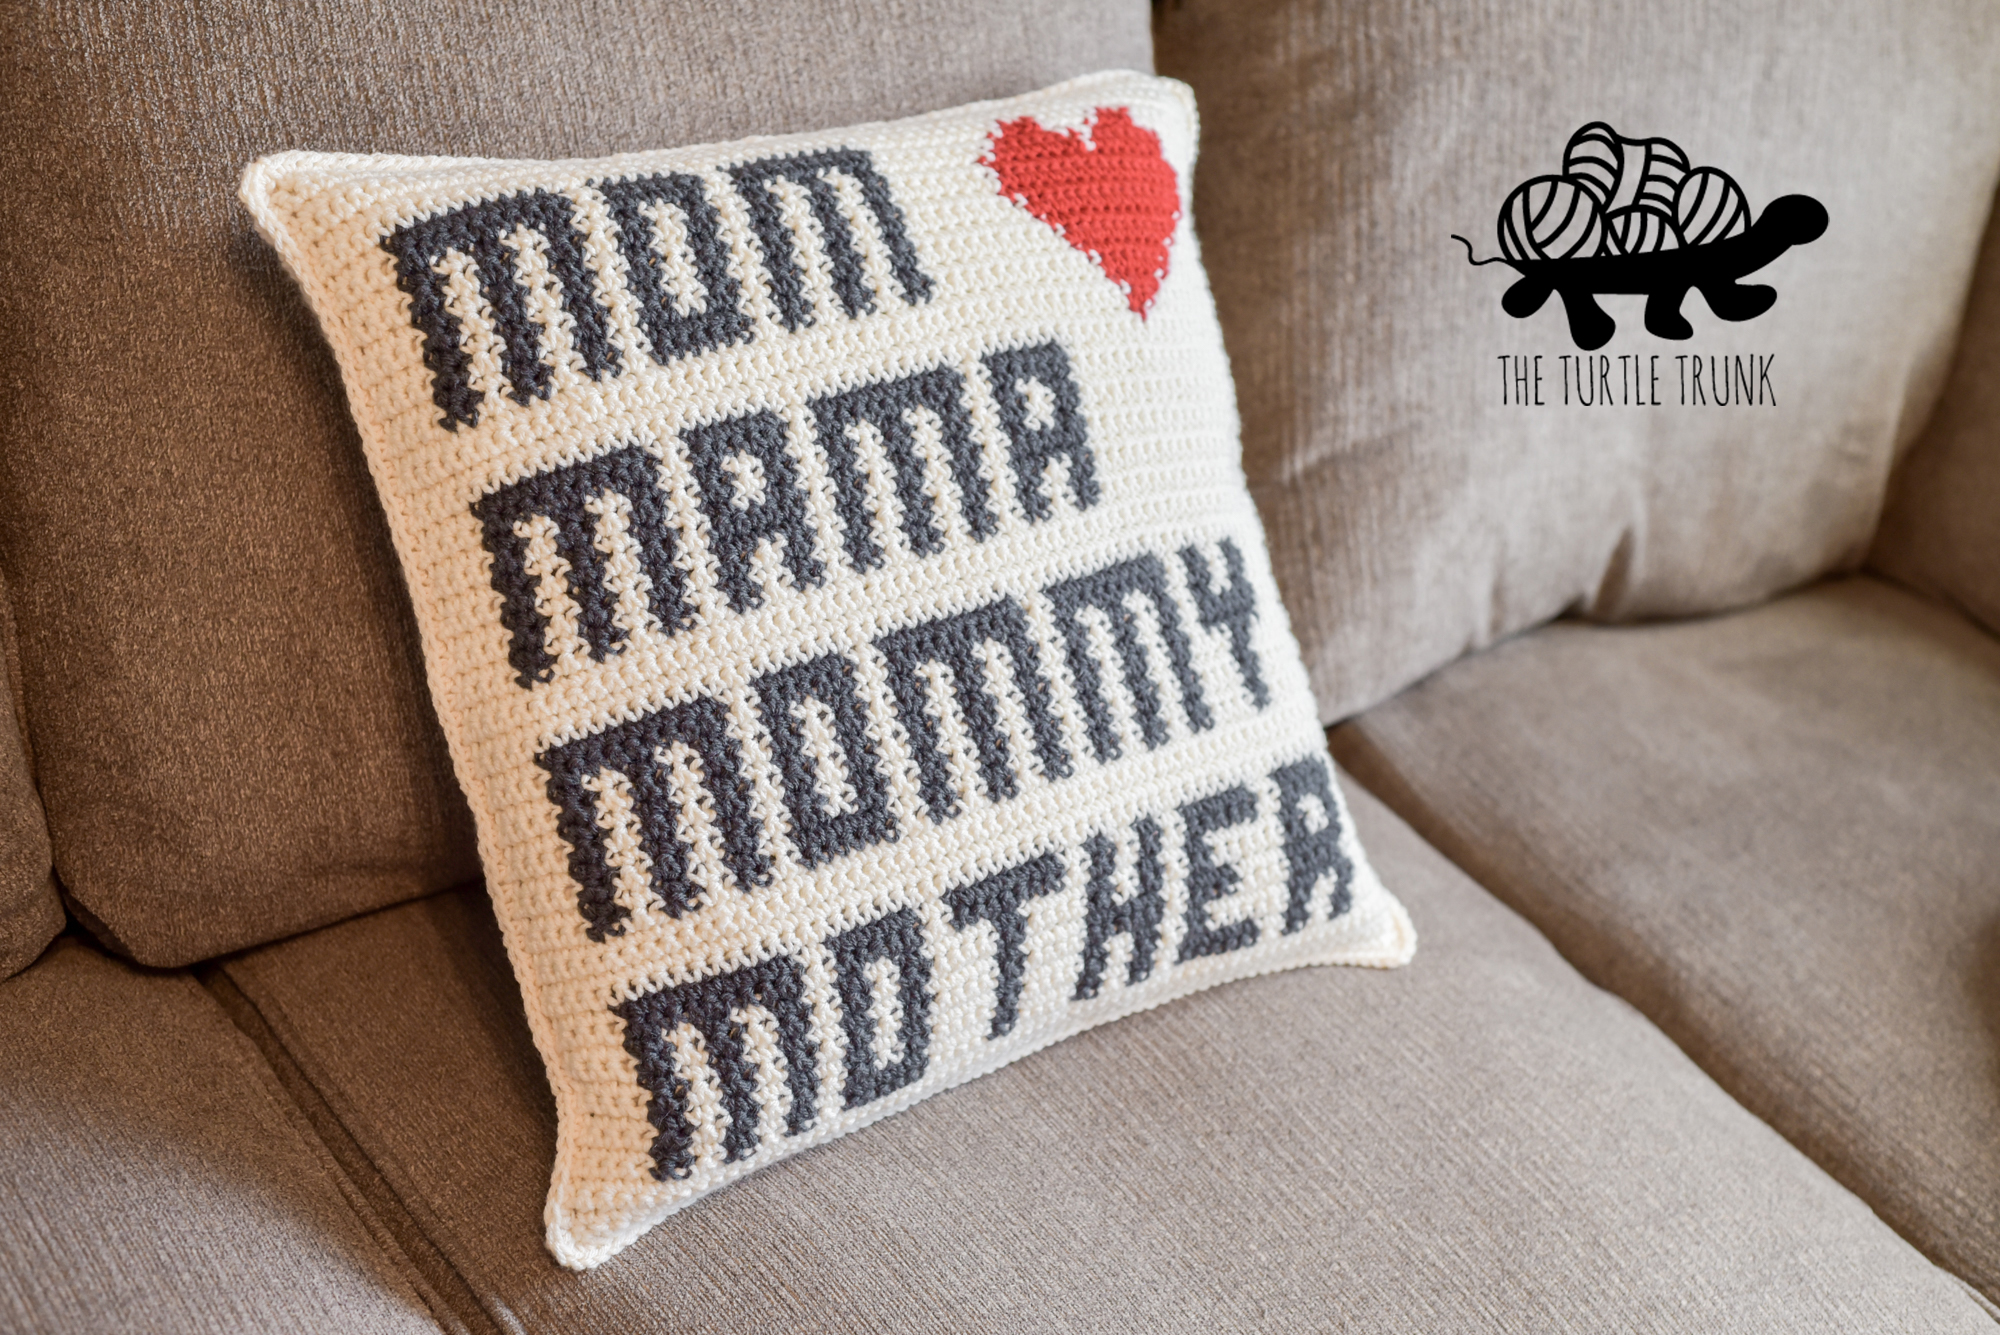
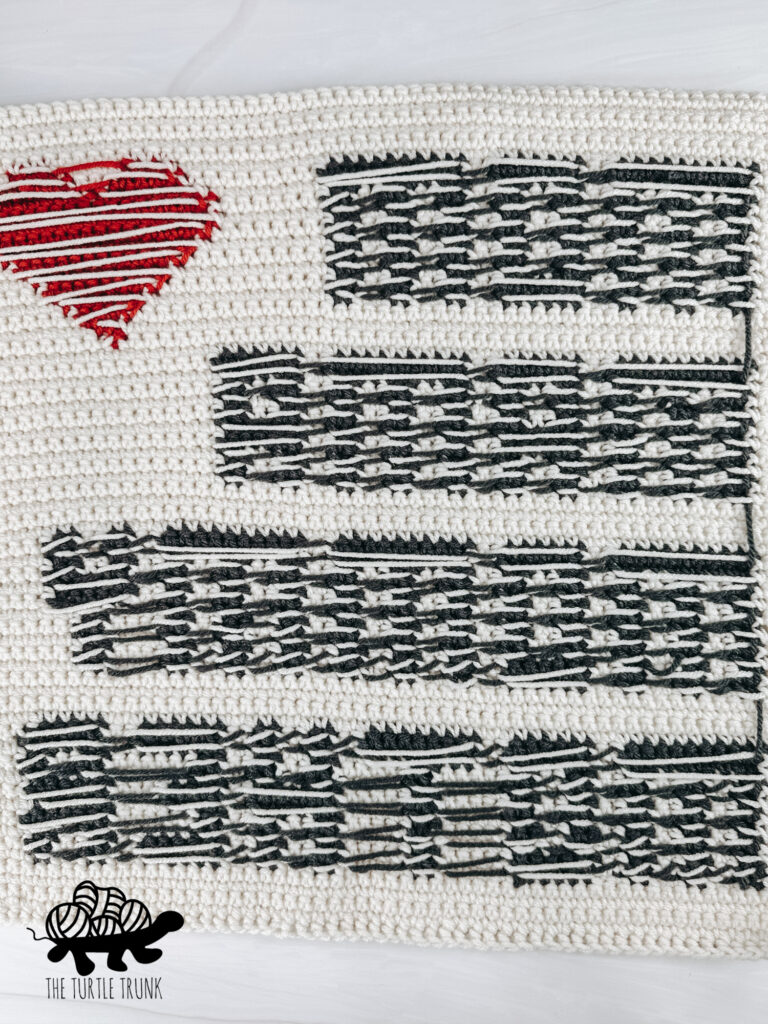
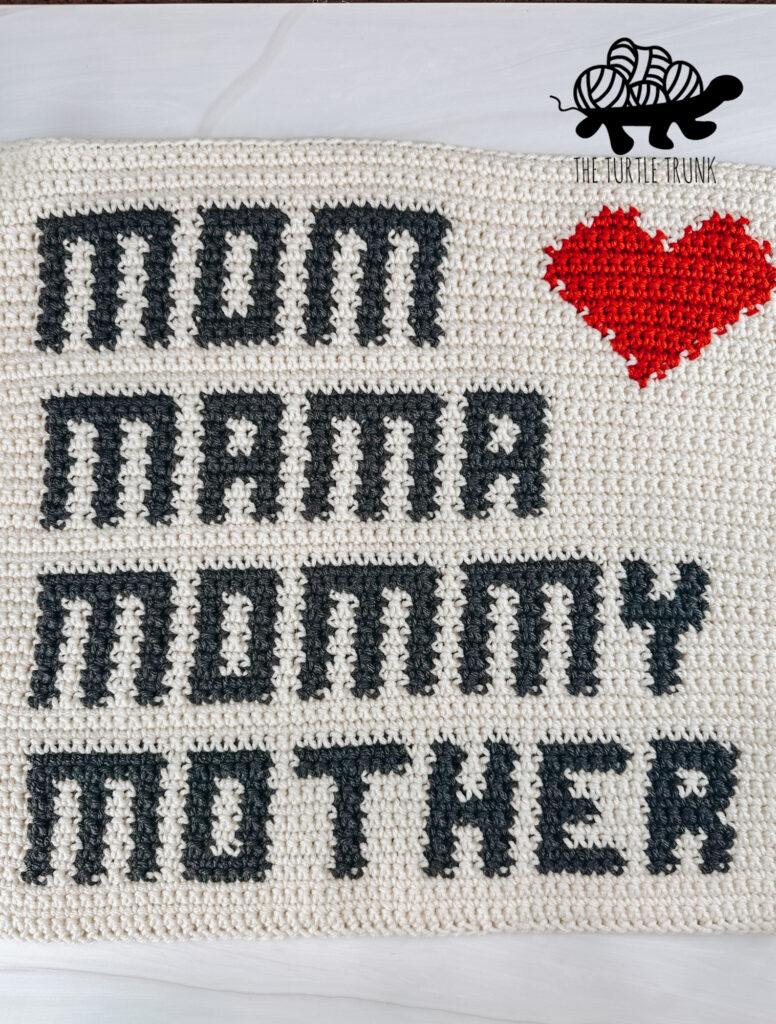
The Mother’s Day Pillow crochet pattern is the perfect handmade gift for any mom! This crochet pillow uses color work to create a fun and beautiful design that’s easy to make! The pattern uses only one stitch and can be made into a pillow or even a wall hanging!
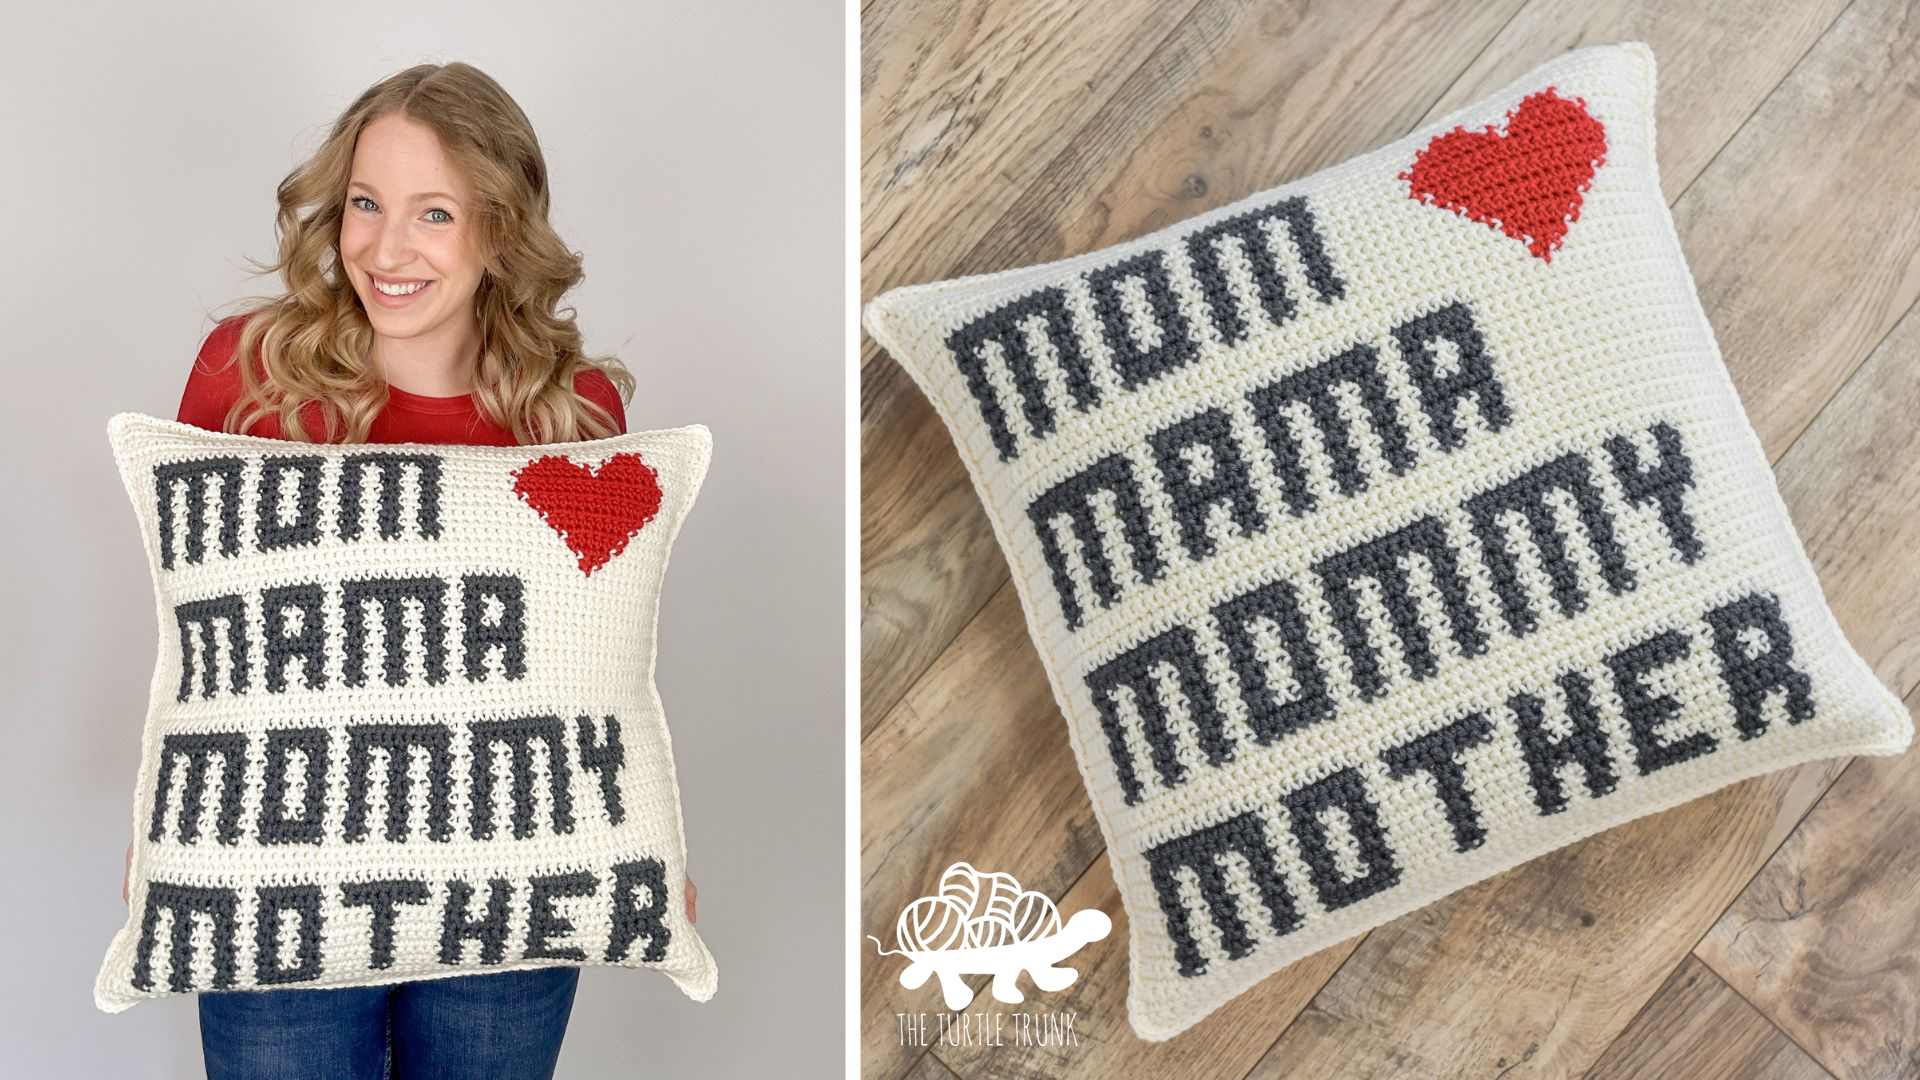
The Mother’s Day Pillow crochet pattern is the perfect gift for any mom! Make for Mother’s Day or any holiday, and give mom a beautiful handmade gift she’ll cherish forever!
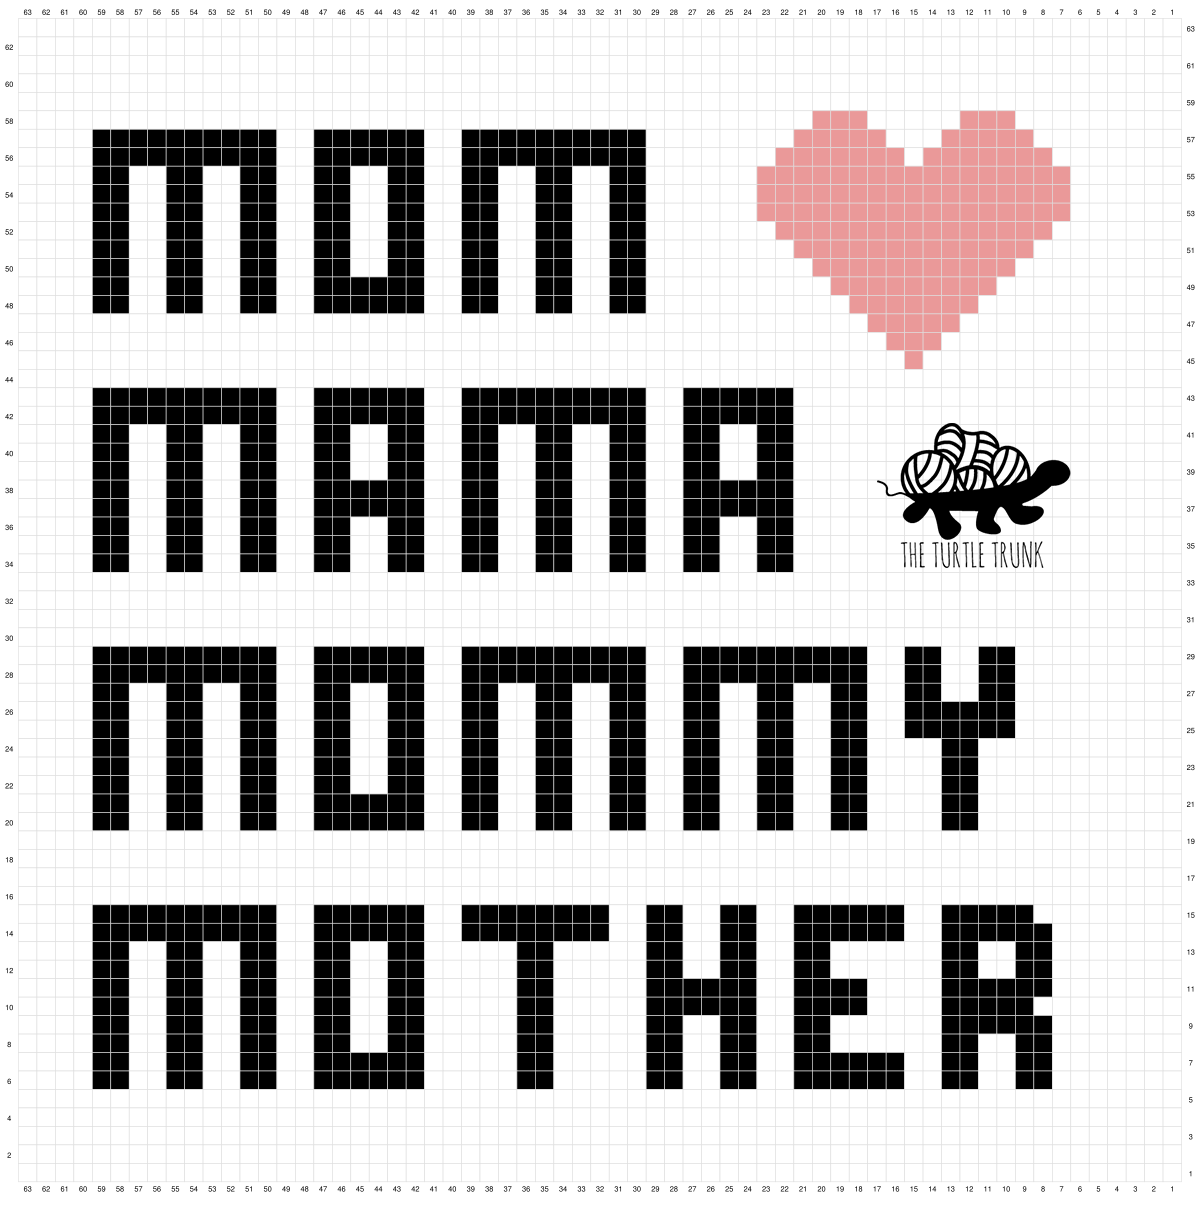
This crochet pillow uses only one basic crochet stitch and color work to create it’s design. The instructions include both a graph and written instructions so you can follow along with whatever method suits you best!
Continue reading to learn more about this design and yarn suggestions or scroll down for the free crochet pattern! There’s even a funny bonus graph at the end so be sure to check it out!
Follow along with the ad free & printable pdf pattern from Etsy and Ravelry!
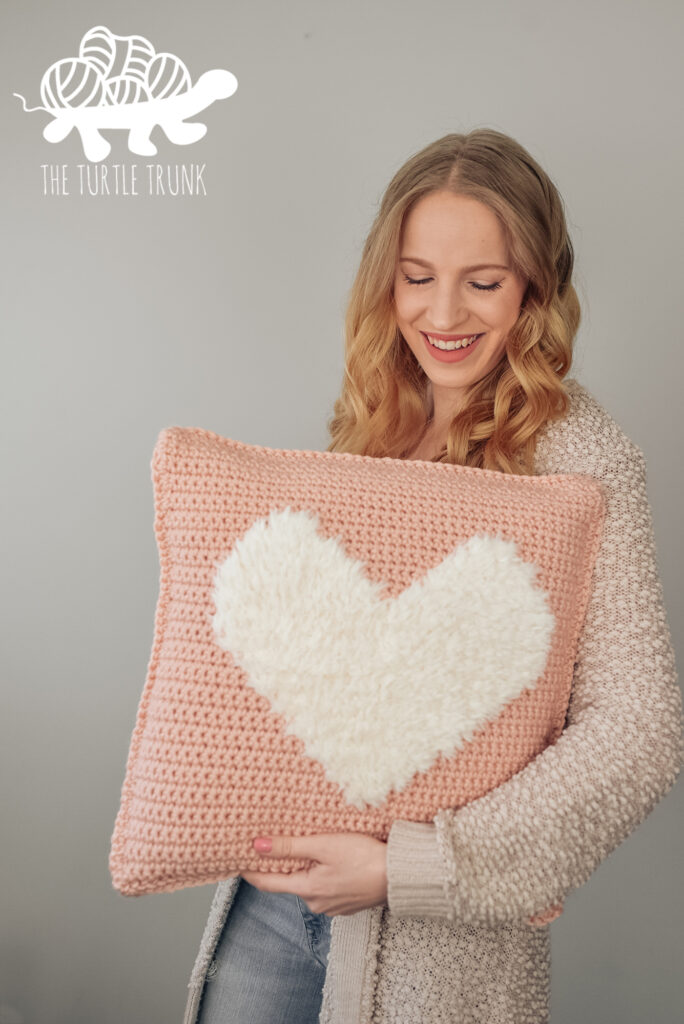
Check out these other home decor crochet patterns, like the Bulky Love to Cuddle Pillow and the Love to Cuddle Blanket.
Not ready to make just yet? save this pattern to pinterest!
Follow along with the video tutorial on YouTube!
Inspiration
I’ve been wanting to make a Mother’s Day Pillow for a few years now but could never decide on a design! I was playing around with different color work ideas and came up with this one and I loved it!
All moms are familiar with their kids constantly calling on them and using all the variations of the word “Mom” to get our attention! I thought this design would be heartfelt but also a little silly. It’s a pillow design that subtle and simple enough to fit in any room but it’s also unique and fun!
Yarn
The Mother’s Day Pillow uses medium (4) weight yarn and consists of 2 square panels. I used Red Heart Super Saver but feel free to use your favorite worsted yarn! Other yarns I think would work great are Lion Brand Yarn Color Theory, Lion Brand Yarn Basic Stitch, and Joann’s Big Twist Value.
Be sure to use contrasting colors so that you’re able to read the words and see the heart clearly. You can also use multiple colors for the words, for example you could make each word a different color, like rainbow or ombre, or use your mom’s favorite colors!

Changing Color + Floating Yarn
You will change color on the last SC before a new color starts. Start you last SC as usual, before the final pull through, drop the current color and pick up the new color. Finish the stitch by pulling through the 2 loops on your hook with the new color. The next SC you work will be the first of the new color. Be sure your tail ends are all on the WS of your project.
Since this is a one-sided project, you can float your nonworking yarn behind and carry it over when needed. This lessens the number of loose ends you will have and makes color changes quick and easy. Be sure to keep the float loose when you carry it over, so it doesn’t cinch your panel.
Make it a wall hanging instead
You can use this pattern to make a wall hanging too! Just make the front panel and attach it to a dowel or stick (I would suggest one that is at least 20” long). You can subtract 300 yards from Color A if making a wall hanging.
DIFFICULTY
Advanced Beginner
GAUGE
14 STs x 14 Rows = 4” x 4” in SC
Adjust hook size up or down to meet gauge.
NOTES
- This pattern includes both written instructions and a graph. You can follow along with one or both.
- At the end of each row CH 1 & turn.
- The graph is included in a separate PDF.
- Written Instructions: each row will have an arrow beside it telling you which direction that row will be worked. When working on the right side (RS) you will see ‘<’. When working on the wrong side (WS) you will see ‘>’. Make sure all loose ends are on the wrong side.
- From row 2 on, only SC stitches are used. This pattern is written in simplified terms, so each row will tell you the color to use and the number of stitches for that color. Ex. A26, B1, A26, means: SC 26 using color A, then 1 SC using color B, then SC 26 using color A again.
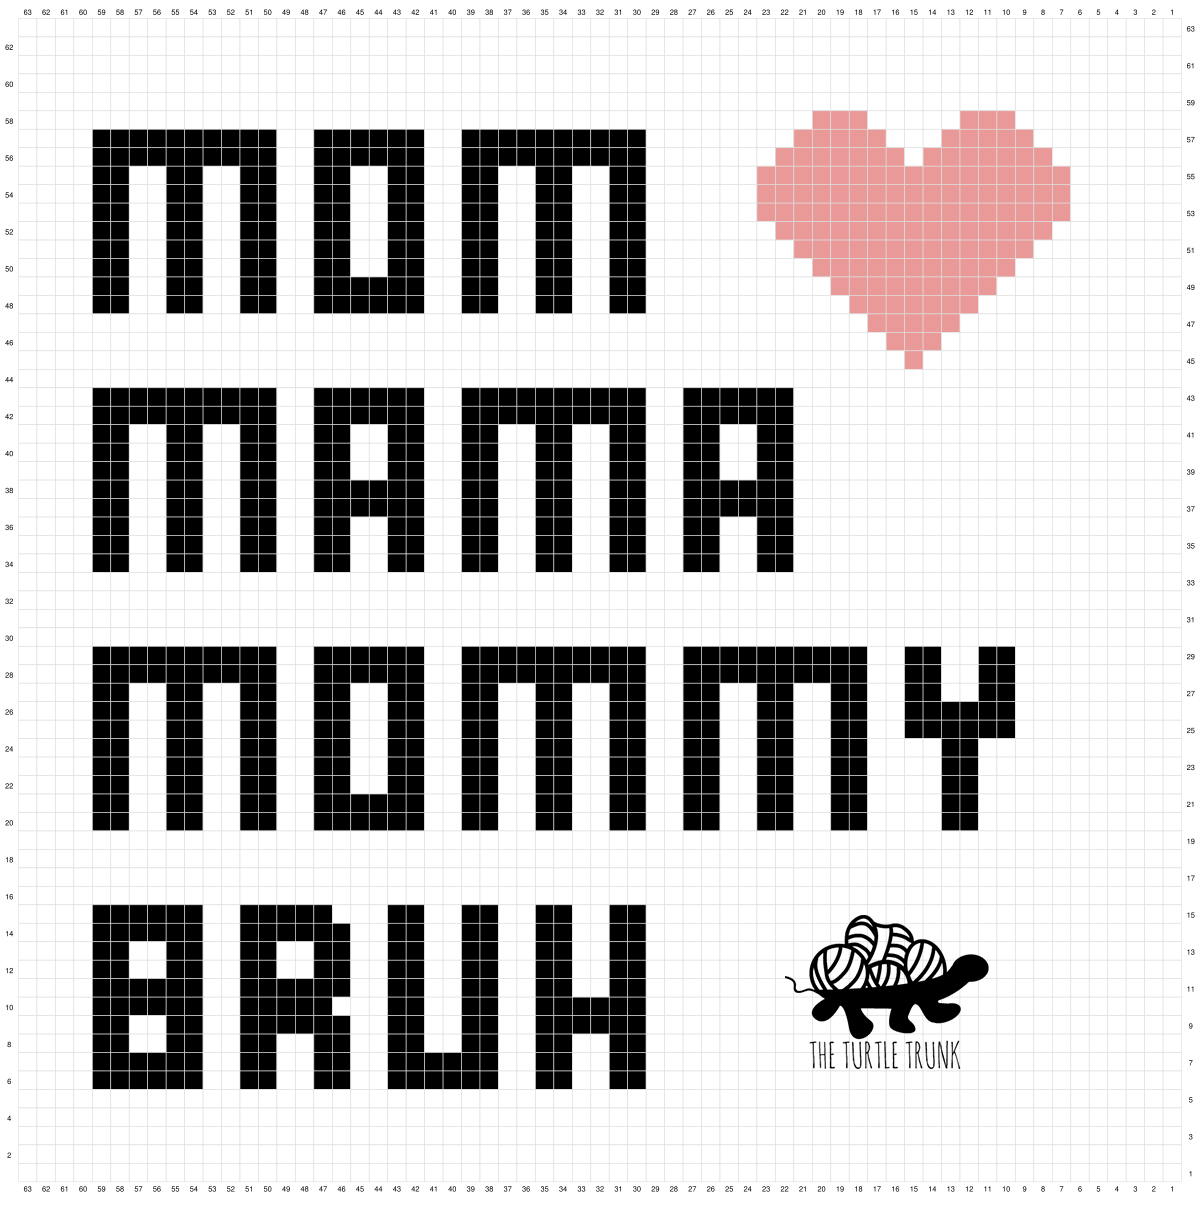
- Graph: each square on the graph represents one SC.
- The numbers on the side of the graph represent the row number. You will be working on the right side of the panel when crocheting the odd numbered rows and wrong side of the panel when crocheting the even numbered rows.
Supplies
- Medium (4) weight yarn in 3 colors (I used Red Heart Super Saver)
- Color A (Aran) (background + border) – 532 yards / 487 meters
- Color B (Charcoal) (words) – 68 yards / 63 meters
- Color C (Cherry Red) (heart) – 5 yards / 4.5 meters
- 5.00mm (H) hook
- 18″ x 18″ Pillow Insert
- Yarn Needle
- Scissors
ABBREVIATIONS (US TERMS)
ST(s) – Stitch(es)
SL ST – Slip Stitch
CH – Chain
SC – Single Crochet
FSC- Foundation Single Crochet
RS – Right Side
WS – Wrong Side
Mother’s Day Pillow Pattern
Back Panel
With Color A
Rows 2 – 63: SC in each ST across. CH 1 & turn. (63)
Tie off yarn, set aside, and move onto the front panel.
Front Panel
Starting with Color A
< Row 1 [RS]: FSC 63 (or CH 64, SC in 2nd CH from hook and SC in each CH across). CH 1 & turn. (63)
Rows 2 – 5: A63
> Row 6 [WS]: A4, B2, A2, B2, A2, B2, A2, B6, A5, B2, A5, B2, A2, B2, A2, B6, A2, B2, A2, B2, A7
< Row 7 [RS]: A7, B2, A2, B2, A2, B6, A2, B2, A2, B2, A5, B2, A5, B6, A2, B2, A2, B2, A2, B2, A4
> Row 8 [WS]: A4, B2, A2, B2, A2, B2, A2, B2, A2, B2, A5, B2, A5, B2, A2, B2, A2, B2, A6, B2, A2, B2, A7
< Row 9 [RS]: A7, B6, A6, B2, A2, B2, A2, B2, A5, B2, A5, B2, A2, B2, A2, B2, A2, B2, A2, B2, A4
> Row 10 [WS]: A4, B2, A2, B2, A2, B2, A2, B2, A2, B2, A5, B2, A5, B6, A2, B4, A4, B5, A8
< Row 11 [RS]: A7, B6, A4, B4, A2, B6, A5, B2, A5, B2, A2, B2, A2, B2, A2, B2, A2, B2, A4
> Row 12 [WS]: A4, B2, A2, B2, A2, B2, A2, B2, A2, B2, A5, B2, A5, B2, A2, B2, A2, B2, A6, B2, A2, B2, A7
< Row 13 [RS]: A7, B2, A2, B2, A6, B2, A2, B2, A2, B2, A5, B2, A5, B2, A2, B2, A2, B2, A2, B2, A2, B2, A4
> Row 14 [WS]: A4, B10, A2, B6, A2, B8, A2, B2, A2, B2, A2, B6, A2, B6, A7
< Row 15 [RS]: A8, B5, A2, B6, A2, B2, A2, B2, A2, B8, A2, B6, A2, B10, A4
Rows 16 – 19: A63
> Row 20 [WS]: A4, B2, A2, B2, A2, B2, A2, B6, A2, B2, A2, B2, A2, B2, A2, B2, A2, B2, A2, B2, A4, B2, A11
< Row 21 [RS]: A11, B2, A4, B2, A2, B2, A2, B2, A2, B2, A2, B2, A2, B2, A2, B6, A2, B2, A2, B2, A2, B2, A4
> Row 22 [WS]: A4, B2, A2, B2, A2, B2, A2, B2, A2, B2, A2, B2, A2, B2, A2, B2, A2, B2, A2, B2, A2, B2, A4, B2, A11
< Row 23 [RS]: A11, B2, A4, B2, A2, B2, A2, B2, A2, B2, A2, B2, A2, B2, A2, B2, A2, B2, A2, B2, A2, B2, A2, B2, A4
> Row 24 [WS]: A4, B2, A2, B2, A2, B2, A2, B2, A2, B2, A2, B2, A2, B2, A2, B2, A2, B2, A2, B2, A2, B2, A4, B2, A11
< Row 25 [RS]: A9, B6, A2, B2, A2, B2, A2, B2, A2, B2, A2, B2, A2, B2, A2, B2, A2, B2, A2, B2, A2, B2, A2, B2, A4
> Row 26 [WS]: A4, B2, A2, B2, A2, B2, A2, B2, A2, B2, A2, B2, A2, B2, A2, B2, A2, B2, A2, B2, A2, B2, A2, B6, A9
< Row 27 [RS]: A9, B2, A2, B2, A2, B2, A2, B2, A2, B2, A2, B2, A2, B2, A2, B2, A2, B2, A2, B2, A2, B2, A2, B2, A2, B2, A4
> Row 28 [WS]: A4, B10, A2, B6, A2, B10, A2, B10, A2, B2, A2, B2, A9
< Row 29 [RS]: A9, B2, A2, B2, A2, B10, A2, B10, A2, B6, A2, B10, A4
Rows 30 – 33: A63
> Row 34 [WS]: A4, B2, A2, B2, A2, B2, A2, B2, A2, B2, A2, B2, A2, B2, A2, B2, A2, B2, A2, B2, A21
< Row 35 [RS]: A21, B2, A2, B2, A2, B2, A2, B2, A2, B2, A2, B2, A2, B2, A2, B2, A2, B2, A2, B2, A4
> Row 36 [WS]: A4, B2, A2, B2, A2, B2, A2, B2, A2, B2, A2, B2, A2, B2, A2, B2, A2, B2, A2, B2, A21
< Row 37 [RS]: A21, B6, A2, B2, A2, B2, A2, B2, A2, B6, A2, B2, A2, B2, A2, B2, A4
> Row 38 [WS]: A4, B2, A2, B2, A2, B2, A2, B6, A2, B2, A2, B2, A2, B2, A2, B6, A21
< Row 39 [RS]: A21, B2, A2, B2, A2, B2, A2, B2, A2, B2, A2, B2, A2, B2, A2, B2, A2, B2, A2, B2, A4
> Row 40 [WS]: A4, B2, A2, B2, A2, B2, A2, B2, A2, B2, A2, B2, A2, B2, A2, B2, A2, B2, A2, B2, A21
< Row 41 [RS]: A21, B2, A2, B2, A2, B2, A2, B2, A2, B2, A2, B2, A2, B2, A2, B2, A2, B2, A2, B2, A4
> Row 42 [WS]: A4, B10, A2, B6, A2, B10, A2, B6, A21
< Row 43 [RS]: A21, B6, A2, B10, A2, B6, A2, B10, A4
> Row 44 [WS]: A63
> Row 45 [WS]: A14, C1, A48
< Row 46 [RS]: A47, C3, A13
> Row 47 [WS]: A12, C5, A46
> Row 48 [WS]: A4, B2, A2, B2, A2, B2, A2, B6, A2, B2, A2, B2, A2, B2, A11, C7, A11
< Row 49 [RS]: A10, C9, A10, B2, A2, B2, A2, B2, A2, B6, A2, B2, A2, B2, A2, B2, A4
> Row 50 [WS]: A4, B2, A2, B2, A2, B2, A2, B2, A2, B2, A2, B2, A2, B2, A2, B2, A9, C11, A9
< Row 51 [RS]: A8, C13, A8, B2, A2, B2, A2, B2, A2, B2, A2, B2, A2, B2, A2, B2, A2, B2, A4
> Row 52 [WS]: A4, B2, A2, B2, A2, B2, A2, B2, A2, B2, A2, B2, A2, B2, A2, B2, A7, C15, A7
< Row 53 [RS]: A6, C17, A6, B2, A2, B2, A2, B2, A2, B2, A2, B2, A2, B2, A2, B2, A2, B2, A4
> Row 54 [WS]: A4, B2, A2, B2, A2, B2, A2, B2, A2, B2, A2, B2, A2, B2, A2, B2, A6, C17, A6
< Row 55 [RS]: A6, C17, A6, B2, A2, B2, A2, B2, A2, B2, A2, B2, A2, B2, A2, B2, A2, B2, A4
> Row 56 [WS]: A4, B10, A2, B6, A2, B10, A7, C7, A1, C7, A7
< Row 57 [RS]: A8, C5, A3, C5, A8, B10, A2, B6, A2, B10, A4
> Row 58 [WS]: A43, C3, A5, C3, A9
At the end of Row 58, leave Color A yarn attached and cut off Color B + C.
Rows 59 – 63: A63
Do not tie off Color A yarn.
Assembling + Border
Lay out the back panel with the right side facing down and the wrong side facing up. Lay the front panel on top with the right side facing up.
With your Color A yarn still attached and working through both the front and back panels together, SC x3 in the same ST as the last SC. Working down the left side of the panels, SC in each row, SC x3 in the corner, SC in each ST across the bottom, SC x3 in the corner, SC in each row up, then SC x3 in the corner.
Place your pillow insert between the panels. SC in each ST across the top. When you reach the 1st corner again, SL ST into the 1st SC of the border. Tie off yarn and weave in ends.
And you’re all done!
Thank you for trying out my Mother’s Day Pillow crochet pattern! Show off your finished creation by tagging @theturtletrunk on Facebook and Instagram!
Bonus Graph
When I initially shared this Mother’s Day Pillow design I got so many comments suggesting adding”BRUH” to the end for all the boy moms out there. This is such a fun and funny idea I just had to make a bonus graph for those who wanted it. Enjoy! And if you do make this pattern with the word BRUH please tag me in your photos on Instagram (@theturtletrunk) so I can see it!!!
You are free to sell the items you make with this pattern, and I’d love if you could please link back to this page. You do not have permission to republish or distribute this pattern in any way or claim it as your own. Do not use my photos in your sale listings or for any other purposes. Thank you.
This page includes affiliate links. If you make a purchase from these links, I may make a small commission at no cost to you! Thank you for your support!
