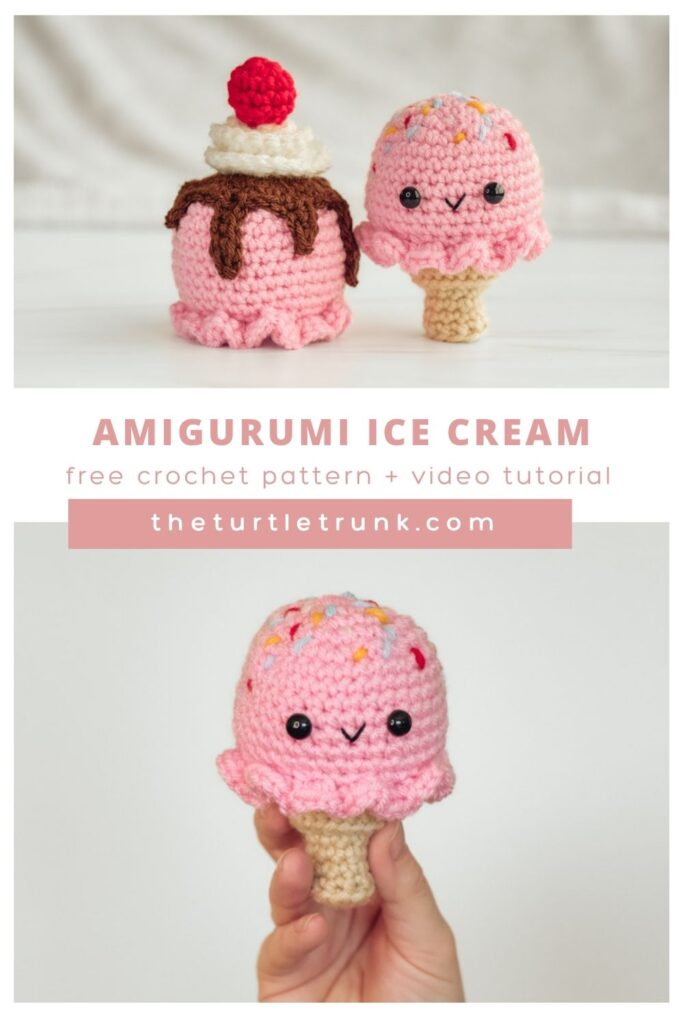
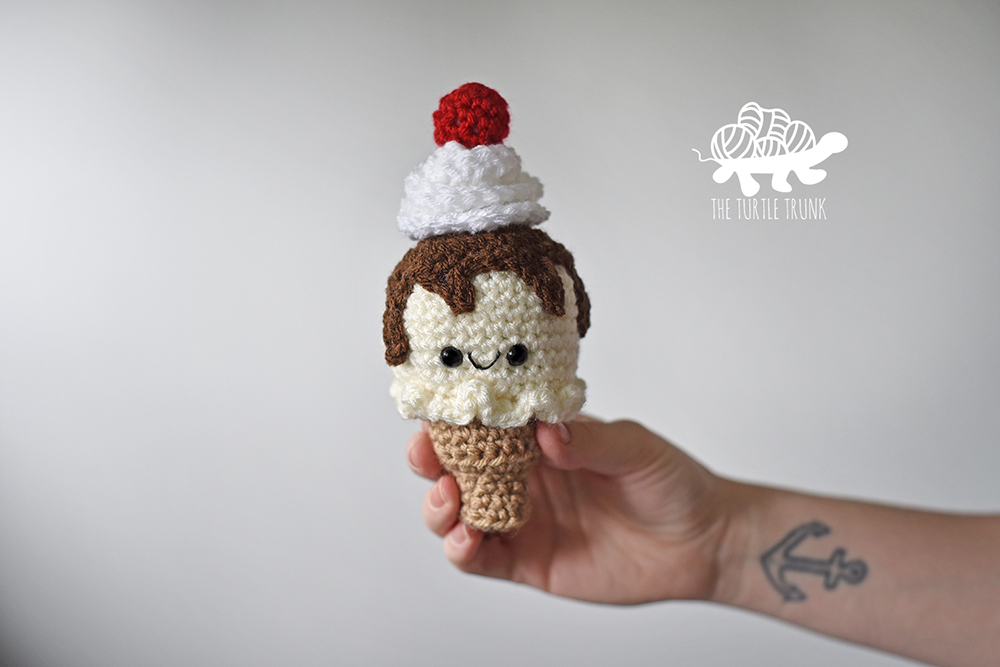
Ice Cream Crochet Pattern
This amigurumi ice cream pattern is perfect for kids toys and pet toys! Use any colors to create your favorite ice cream flavors and add any toppings you want! Add a face or a cone and customize it how you like!

How CUTE is this amigurumi ice cream?!
I originally designed and published this pattern in June of 2019! This was before I even had a blog so the pattern has since only been available for purchase from my Etsy and Ravelry shops. UNTIL NOW!

I am so excited to share that I have just updated this pattern and have added a video tutorial and it’s now available here on my blog for FREE!
The pattern instructions have stayed the same as the original so no worries if you’re been following along with the old pattern!
I hope you enjoy this adorable pattern! It’s perfect for kids toys or even cat toys!
You can easily customize your ice creams by using different colors for different flavors, add a cone or make it a sundae, add a face, or add any toppings!
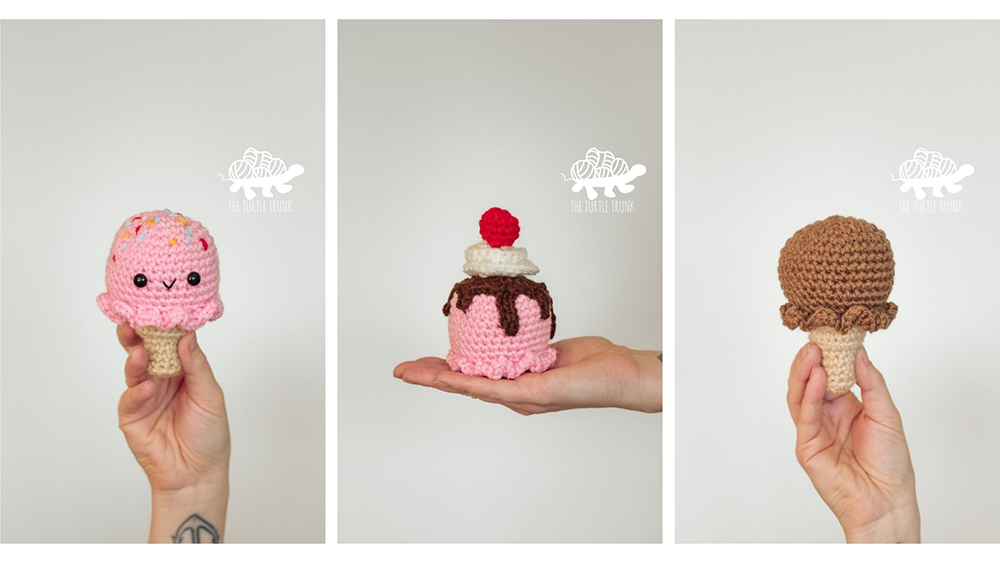
The pattern includes instructions for a scoop of ice cream, a cone, how to add a face and sprinkles, chocolate sauce, whipped cream, and a cherry. Feel free to add as many or few of these pieces as you’d like!

Check out these fun crochet patterns for summer!

FOLLOW ALONG WITH THE AD FREE & PRINTABLE PDF FROM
ETSY AND RAVELRY!
Not ready to make just yet?
Save this pattern to Pinterest!
Follow along with the video tutorial on YouTube!
Yarn
For this pattern we’ll be using medium 4 weight yarn. I used Red Heart Super Saver. Use any colors you’d like to create any flavor of ice cream. This pattern is great for using up any scrap yarn you have laying around because it uses so little yarn!
Here are all the different colors of Red Heart Super Saver I used for my pink ice creams. Click the links to find these yarns on Amazon:
- Pink Ice Cream – Petal Pink
- Cone – Buff
- Chocolate Sauce – Coffee
- Whipped Cream – White
- Cherry – Cherry Red
Difficulty
Advanced Beginner
Finished Size
Scoop of Ice Cream – 2.5″ x 3″
With Cone – 4″ x 3″
Notes
- The ice cream, sauce, and cherry are all worked in the round and are NOT joined at the end of the rounds. Use a stitch marker to keep proper stitch count.
- The cone is woked in joined rounds. Join with a slip stitch to the top of the first stitch and chain 1. The CH 1 does not count as a stitch. Work the first stitch of the round into the same stitch you joined to.
- The number in (parentheses) at the end of each round/row represents the number of stitches to be worked that round/row.
- Instructions between *asterisks* are to be repeated until the end of the round/row.
- SC x# means to work 1 SC in each of that number of stitches across. # SC means to work that number of SC all into the same stitch.
- Customize your ice cream by using different colors and adding different toppings! You can also make it with or without the cone!
- See the video tutorial for assistance.
supplies
- Medium 4 weight yarn
- Ice Cream Scoop
- Pink (Petal Pink): 20 yards
- Cone
- Light Brown (Buff): 8 yards
- Chocolate Sauce
- Dark Brown (Coffee): 6 yards
- Whipped Cream
- White: 4 yards
- Cherry
- Red (Cherry Red): 2 yards
- Ice Cream Scoop
- 4.00mm (G) crochet hook
- Yarn Needle
- Scissors
- Fiber Fil
- Stitch Marker
- 2 – 9mm Safety Eyes
- Black Embroidery Thread
Abbreviations (us terms)
CH(s) – Chain(s)
ST(s) – Stitch(es)
SL ST – Slip Stitch
SC – Single Crochet
SC2TOG – Single Crochet 2 Together
DC – Double Crochet
BLO – Back Loop Only
Ice Cream Pattern
Note: if adding the cone, make first then set aside, as you will attach it to the ice cream later. If not making the cone, then start with the ice cream instructions.
Cone
Magic Circle, CH 1.
Round 1: SC x5 inside the circle. Join & CH 1. (5)
Round 2: 2 SC in each ST around. Join & CH 1. (10)
Round 3: SC BLO in each ST around. Join & CH 1. (10)
Rounds 4-6: SC in each ST around. Join & CH 1. (10)
Round 7: 2 SC in each ST around. Join & CH 1. (20)
Round 8: SC BLO in each ST around. Join & CH 1. (20)
Rounds 9 & 10: SC in each ST around. Join & CH 1. (20)
Cut off yarn. Weave in end. Set aside and move onto Ice Cream.
Ice Cream
Magic Circle, CH 1.
Round 1: SC x7 inside the circle. (7)
Round 2: 2 SC in each ST around. (14)
Round 3: *SC, 2 SC*. (21)
Round 4: *SC x2, 2 SC*. (28)
Round 5: *SC x3, 2 SC*. (35)
Rounds 6-12: SC in each ST around. (35)
Round 13: *SC x3, SC2TOG*. (28)
Optional: add safety eyes between rounds 9 & 10 and 6 STs apart. With black embroidery thread, place a “V” smile centered between the eyes and 1 ST down.
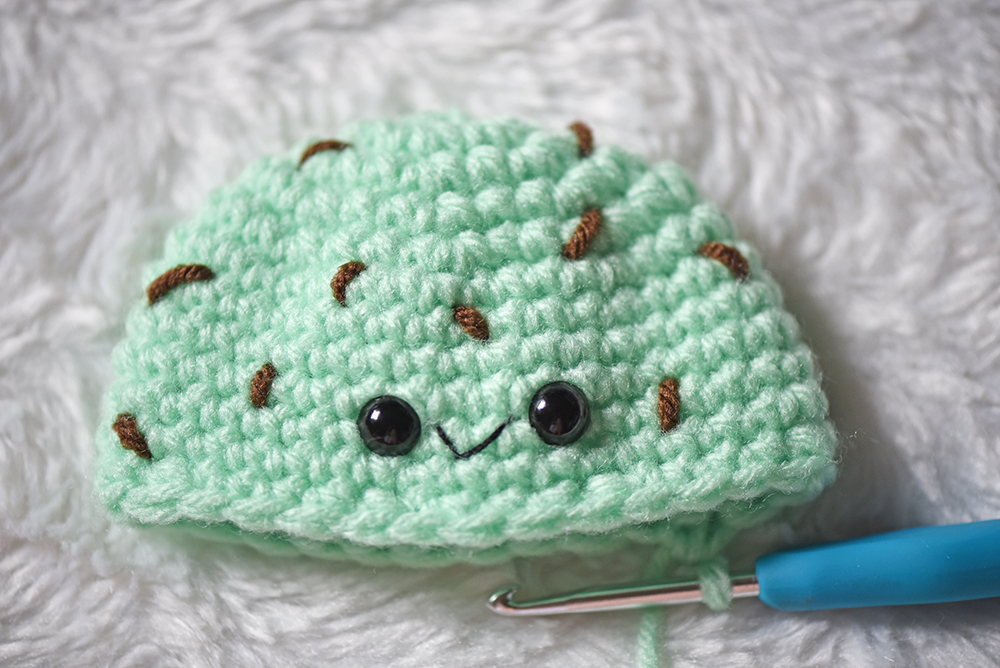
Optional: add sprinkles. With yarn needle and your desired color of yarn, weave the strand around the top and sides of your ice cream, working around 1 ST at a time. Secure yarn on the inside.
Round 14: *SC BLO x2, SC2TOG BLO*. (21)
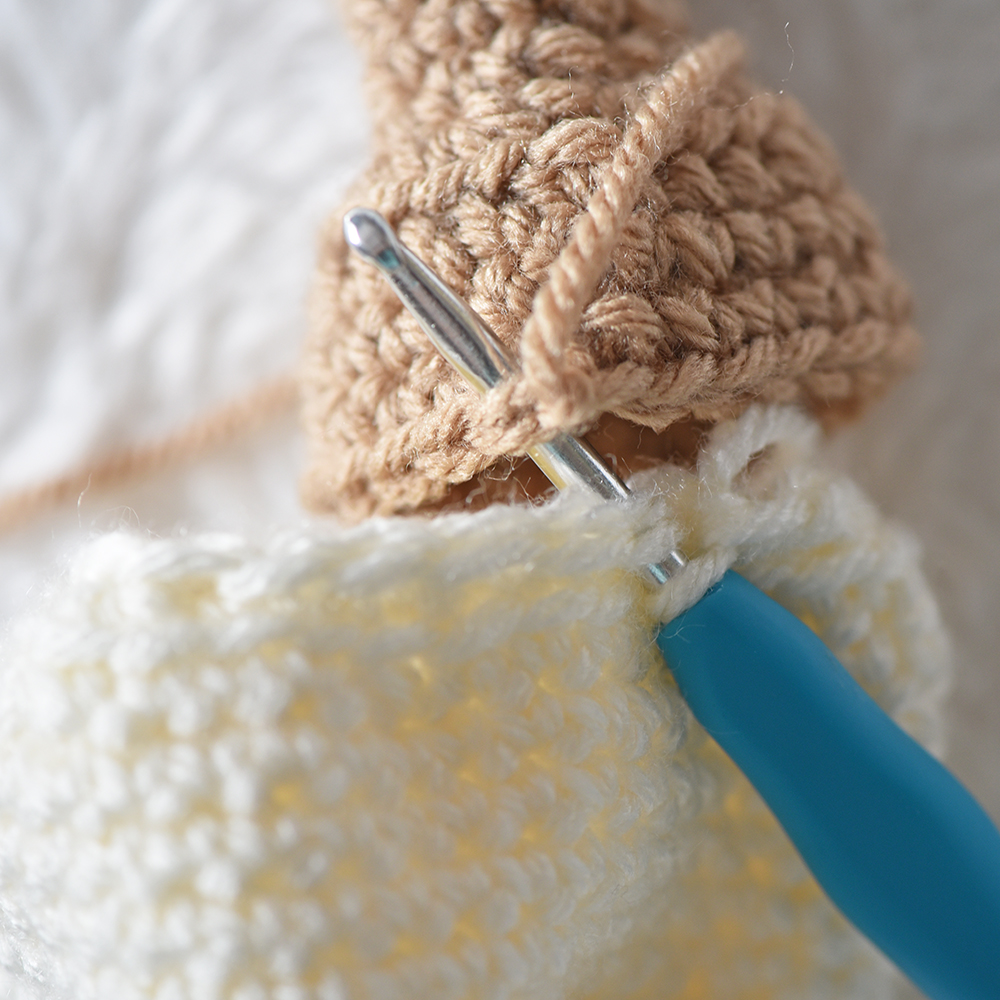
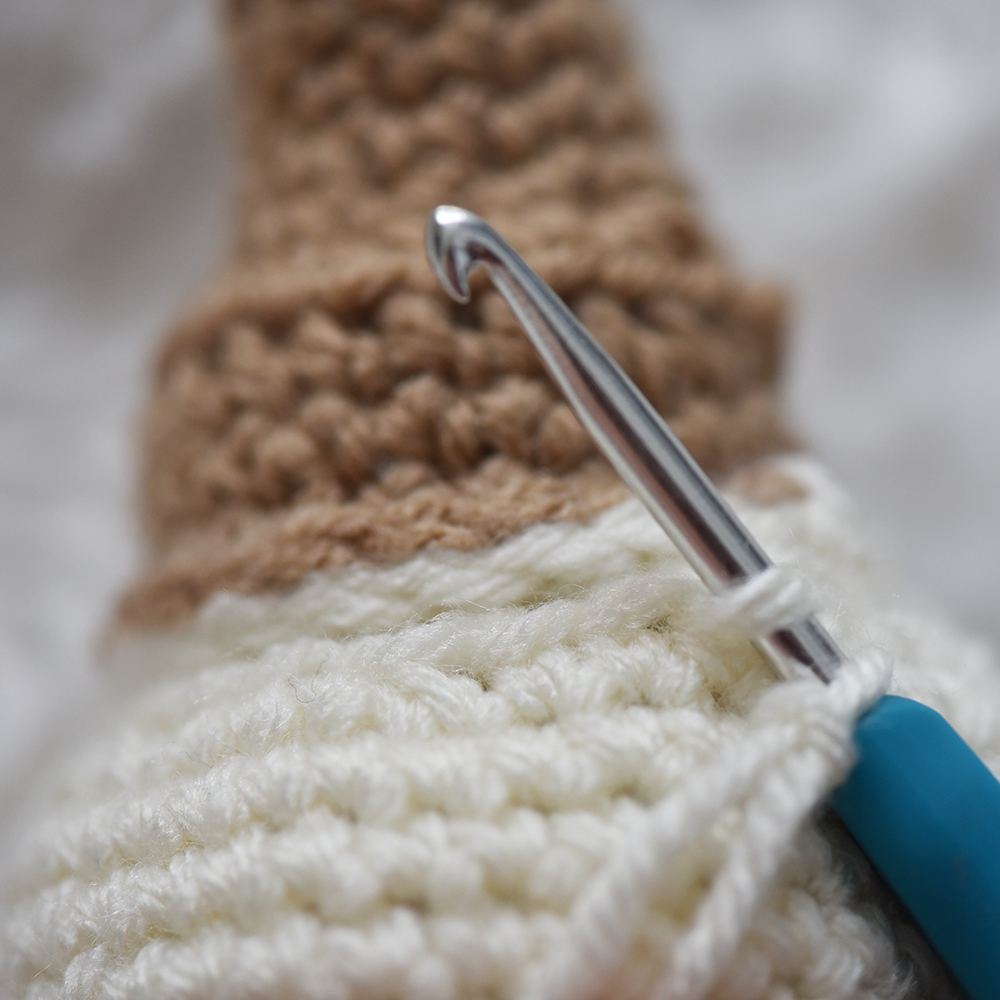
Attaching Cone & Ice Cream
SL ST the ice cream and cone together. Insert your hook into the 1st ST of the next round of the ice cream and in the last ST from the last round of the cone. SL ST the 2 together. Repeat around and stuff with fiber fil as you go, filling both the cone and the ice cream. Note that the ice cream has 1 more ST than the cone, so just work an extra SL ST into the last ST of the cone.
Cut off yarn and weave in ends. Move onto the Ruffles.
No Cone
Stuff with fiber fil.
Round 15: *SC, SC2TOG*. (14)
Round 16: SC2TOG x7. (7)
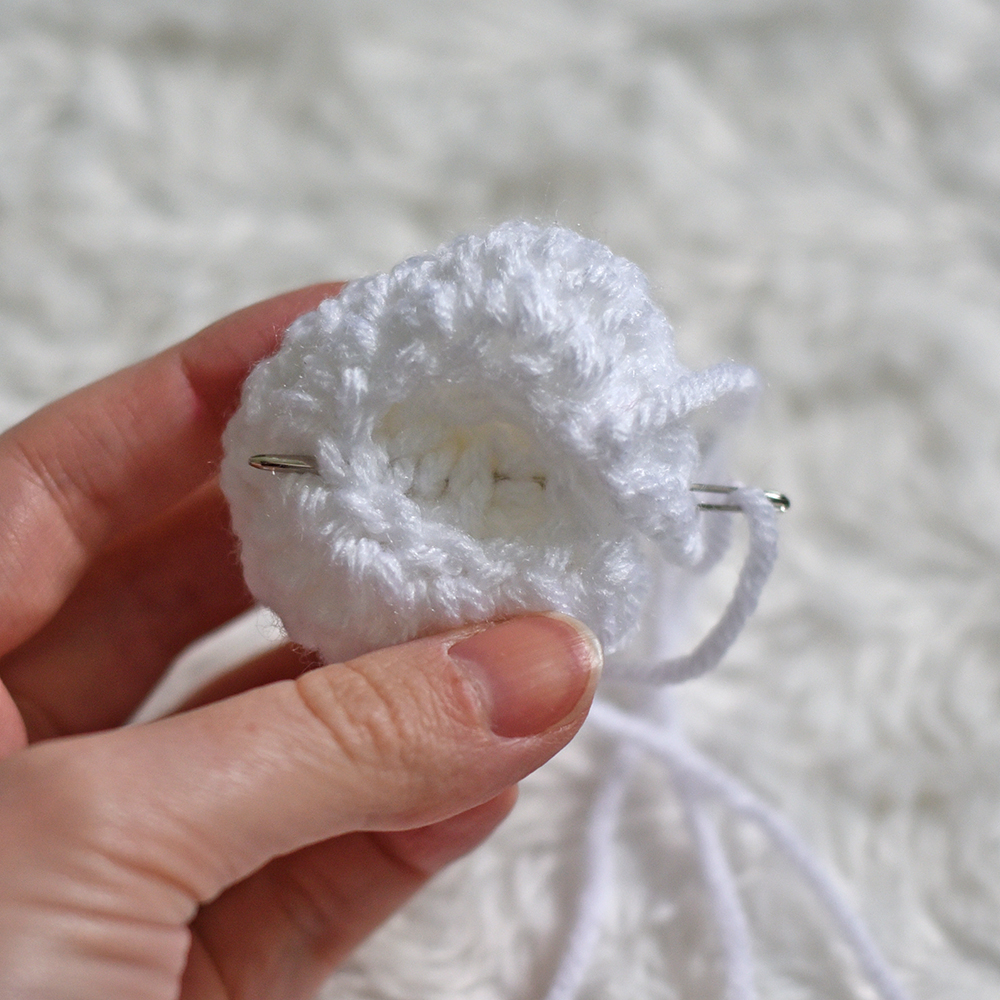
Cut off yarn leaving a 6″ long tail. Weave tail end through the last 7 STs and pull tight to close hole. Secure with a few knots and weave in end. Move onto Ruffles.
Ruffles
Attach ice cream color to the front loops left behind from Round 14. CH 1 and work 3 SC into each ST around. (84) Join to the top of the 1st SC. Cut off yarn and weave in ends.
Chocolate Sauce
Magic Circle, CH 1.
Round 1: SC x7 inside the circle. (7)
Round 2: 2 SC in each ST around. (14)
Round 3: *SC, 2 SC*. (21)
Round 4: *SC x2, 2 SC*. (28)
Creating the drips: Note that these can be made any length by adjusting the starting chain of each drip.
Round 5: CH 7, *SC in 2nd CH from hook and in each CH across. SL ST in next ST from round 4, SC x3.* CH 4, repeat **. CH 3, repeat**. CH 4, repeat **. CH5, repeat **. CH 6, repeat **. CH 4, repeat **. Cut off yarn leaving a 24″ long tail. Sew onto the top of ice cream.

Whipped Cream
CH 30
Row 1: DC in 3rd CH from hook. DC in same CH.
2 DC in each CH across. (56)
Cut off yarn leaving a 24″ long tail.
Roll up and use yarn needle to secure the layers together. Insert your needle across the bottom and to the other side, then repeat on the other side making a “t” shape.
Sew whipped cream to the top of the ice cream.

Cherry
Magic Circle, CH 1.
Round 1: SC x10 inside the circle. (10)
Rounds 2-4: SC in each ST around. (10)
Stuff with fiber fil.
Round 5: SC2TOG x5. (5)
Cut off yarn leaving a 6″ long tail. Weave tail end through last 5 STs. Pull tight to close the hole and secure with a few knots. Sew cherry to the top of the whipped cream or ice cream.
And you’re all done!
I hope you enjoyed my Ice Cream crochet pattern! Be sure to tag me @theturtletrunk in your photos on Instagram so I can see your finished creations!
You are free to sell the items you make with this pattern, and I’d love if you could please link back to this page. You do not have permission to republish or distribute this pattern in any way or claim it as your own. Do not use my photos in your sale listings or for any other purposes. Thank you.
This page includes affiliate links. If you make a purchase from these links, I may make a small commission at no cost to you! Thank you for your support!