
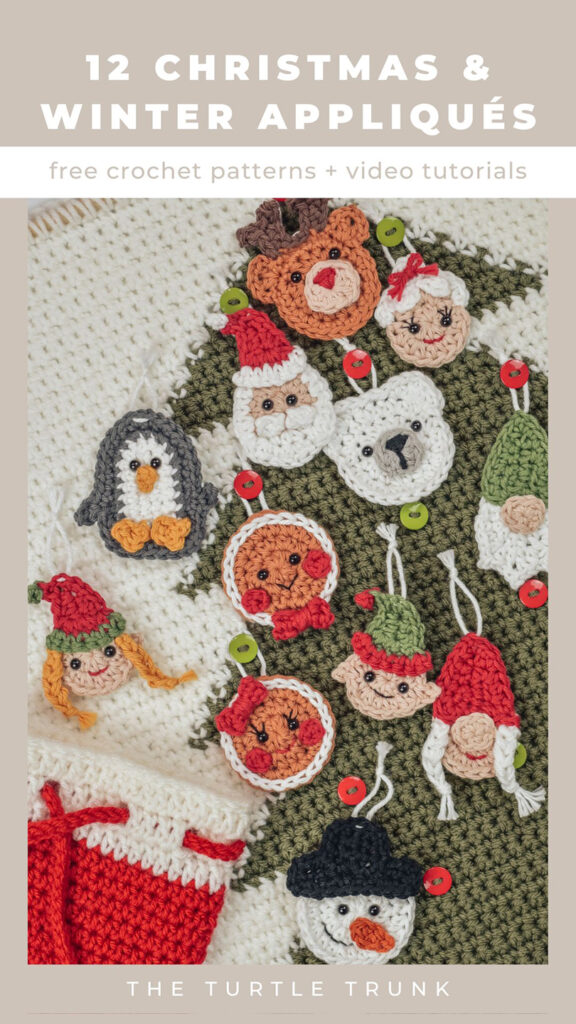
Crochet Advent Calendar – Winter & Christmas Appliqués Part 1
Crochet these cute, Winter & Christmas appliqués for your handmade Advent Calendar, to hang on the Christmas tree as ornaments, or sew them onto any project! In Part 1, you can find all the free crochet appliqué patterns for your favorite Christmas and Winter characters!
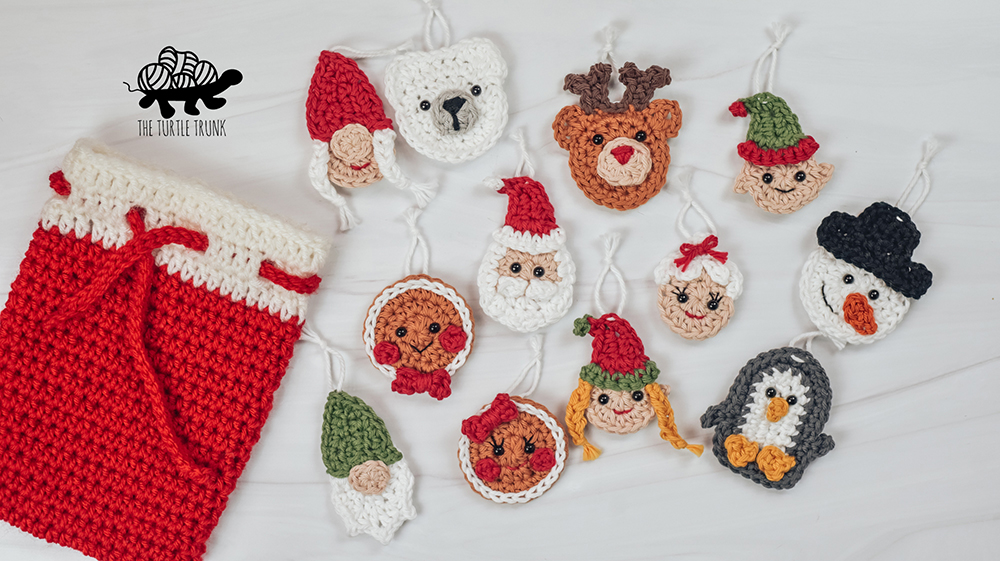
We are on Part 3 of 4 of the Advent Calendar Series! In today’s post I will be sharing 12 free Christmas and Winter themed crochet appliqué patterns! These 12 appliqués are all your favorite Christmas and Winter characters, including Santa and Mrs. Claus, Elves, Gnomes, Gingerbread Man and Woman, Reindeer, Snowman, Polar Bear, and Penguin.
Continue reading below to hear more about the Advent Calendar Series and to learn more about these winter & Christmas appliqués, then scroll down for all 12 of the free written crochet patterns!
Get the PDF Pattern Bundle that features all 27 crochet patterns for this Advent Calendar! The PDF Bundle includes the written patterns for the Tree Wall Hanging, 25 winter & Christmas appliqués, and the pouch/gift bag to hold the appliqués!
GET THE PDF PATTERN BUNDLE FROM ETSY!
GET THE PDF PATTERN BUNDLE FROM RAVELRY!
The Advent Calendar includes 27 crochet patterns! I will be sharing all of the free crochet patterns here on my blog and posting them in parts throughout this week (November 20-23)! Don’t want to wait? Get the PDF Pattern Bundle, which includes all 27 crochet patterns and is available now!
Once the free patterns for the Advent Calendar are posted, you can find them by clicking the links below:
- Advent Calendar – Tree Wall Hanging Crochet Pattern
- Advent Calendar – Pouch & Gift Bag Crochet Pattern
- Advent Calendar – Winter & Christmas Appliqué Crochet Patterns Part 1
- Advent Calendar – Winter & Christmas Appliqué Crochet Patterns Part 2
Not ready to make just yet? Save this post to pinterest!
ADVENT CALENDAR INSPIRATION
I was inspired to crochet this Advent Calendar from the one my mom had made when I was a kid! She had sewn a tree wall hanging and stuck 25 little baggies on it with velcro. Inside the bags were little toys and characters and ornaments made from felt. Every December 1 she would hang it up and my sisters and I would take turns opening up one of the baggies, choosing one a day until Christmas. We looked forward to this every year and the excitement and anticipation we felt was incredible!
We each had our favorite pieces we had hoped to pick and felt pure joy with every new addition we got to stick on the tree. We looked forward to this every year throughout our childhood and it’s still one of my favorite Christmastime memories.
Since having my daughter, I have always wanted to make her an Advent Calendar, so that she could experience the same joy and happy memories that I had. So I designed this crochet Advent Calendar!
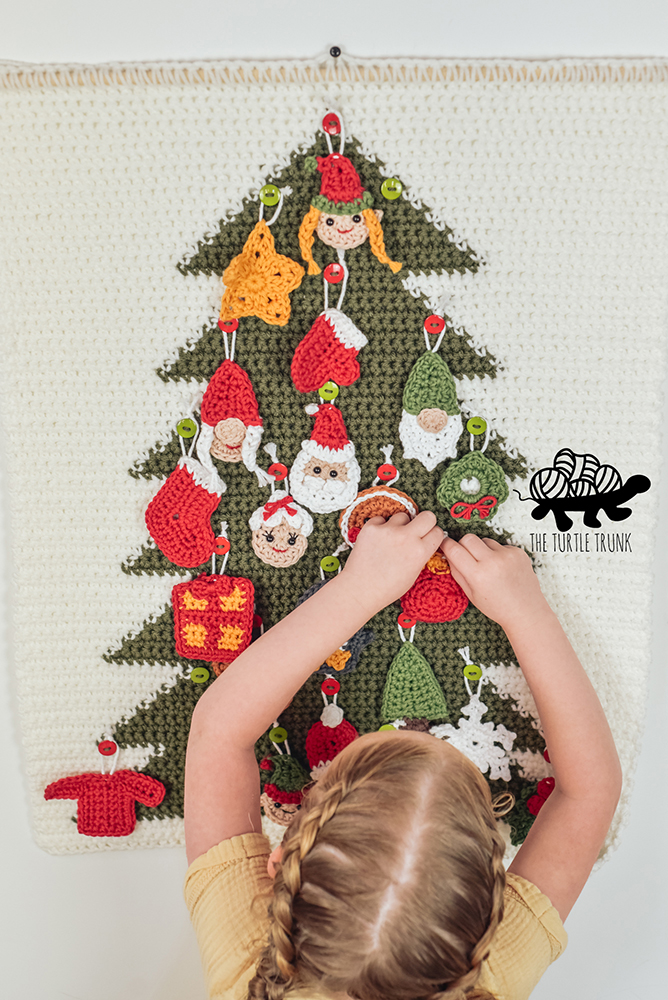
HOW TO USE THE ADVENT CALENDAR
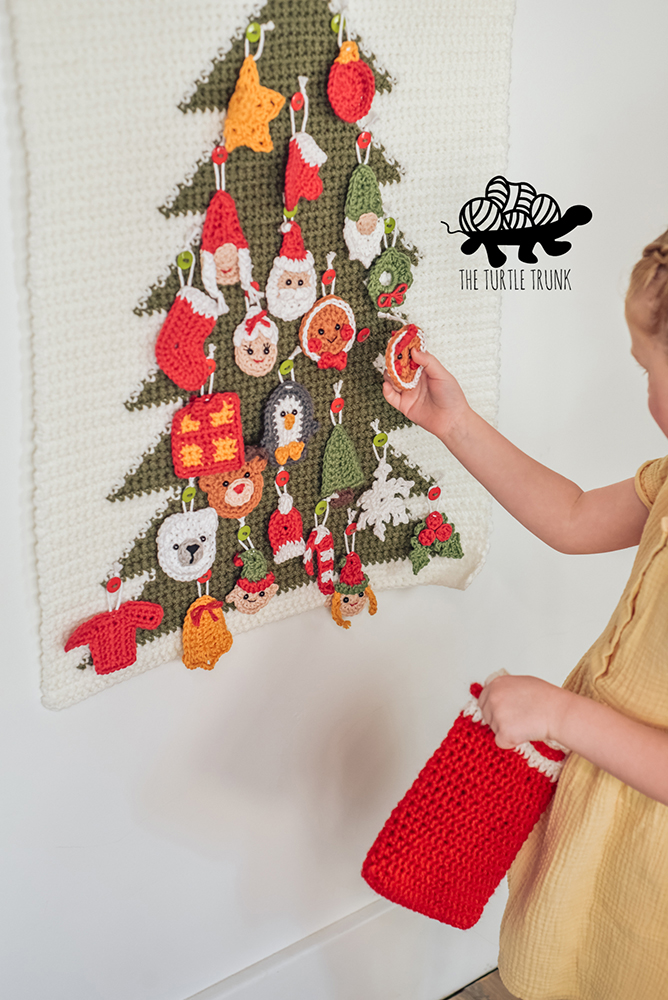
Hang up your tree wall hanging and place all 25 of the appliqués into the pouch. Starting on December 1, choose one appliqué and hang it on the tree. The last appliqué will be placed on December 25.
The intended purpose of the Advent Calendar is to be a countdown to Christmas, but it doesn’t have to be! Hang the tree wall hanging up any time and let your kids decorate it however they like as a fun winter and Christmas activity! Let them place, remove, change the decorations however they like, with no limits or countdowns.
You can also make and use the pieces of the Advent Calendar separately! Use the Tree Wall Hanging as a year round wall decoration, use the pouch for gifts, and sew the appliqués on other projects or to hang on your Christmas tree!
All the appliqués
In this post, Winter & Christmas Appliqués – Part 1, I will be sharing 12 out of the 25 appliqué patterns. This post will include all of the characters including: Santa and Mrs. Claus, Elves, Gnomes, Gingerbread Man and Woman, Reindeer, Snowman, Polar Bear, and Penguin.
Each pattern includes the written instructions and a link to the video tutorial. The supplies needed for all patterns is listed below but each individual pattern has a list of additional supplies (if applicable) and the yarn color and yardage needed.
Feel free to substitute any colors to make your characters look however you’d like! I used the color taper for all the skin tones but you can use any color, like peach, tan, dark brown, ect. I also used red and green for accent colors to match the traditional Christmas colors, but you can use more modern and trendy holiday colors like mint & pink, pink & blue, or any other colors you’d like.
For a lot of these character appliqués, I used safety eyes, which are round plastic pieces you poke through the stitches then secure on a backing so it doesn’t fall off. If you don’t want to use safety eyes you can also embroider on eyes with yarn or crochet/embroidery thread.
Difficulty
Advanced Beginner
Gauge
5 STs x 4 Rows = 1” x 1” in SC.
Adjust hook size up or down to reach gauge.
Notes
- The CH 1 or 2 at the beginning of each row/round does NOT count as a stitch. CH 1 or 2 within the rows/rounds do count as stitches.
- The number in parentheses at the end of the row/round represents the total number of stitches to be worked in that row/round.
- Stitches between *asterisk* are to be repeated until stated. Stitches between [brackets] are to be worked all into the same stitch.
- Add a hanging loop to each appliqué using a 2-3” strand of yarn, string, or ribbon if using for the advent calendar or as a decoration.
- Wet or steam block appliqués to flatten and relax stitches and to straighten edges.
ABBREVIATIONS (US TERMS)
ST(s) – Stitch(es)
SK – Skip
CH – Chain
SL ST – Slip Stitch
SC – Single Crochet
SC2TOG – Single Crochet Two Together
HDC – Half Double Crochet
DC – Double Crochet
Supplies
All the patterns use the supplies listed below.
See each pattern for yarn colors & yardage and any additional supplies needed:
- Medium (4) weight yarn (I used I Love This Cotton!)
- 3.75 mm (F) Crochet Hook
- Yarn Needle
- Scissors
Winter & Christmas Appliqué Patterns
Santa & Mrs. Claus Appliqués
Follow along with the video tutorial on YouTube!
Finished Sizes:
Santa 3” x 2”
Mrs. Claus – 2” x 2”
Yarn + Additional Supplies:
- Yarn: Taupe (5 yards), White (5 yards), Red (3 yards)
- Black & red embroidery thread for Mrs. Claus’s eyelashes & smile.
- 4 – 6mm black safety eyes
Santa Face/Head (make 1)
With taupe, Magic Circle, CH 1.
Round 1: HDC x 8 inside the circle. Join & CH 1. (8)
Round 2: 2 HDC in the 1st 5 STs, change to white, 2 HDC in next 3 STs. Join. CH 1 & turn. (16)
Round 3: *SC, [HDC, CH 1, HDC]* x3. *SC, 2 SC* x5. Join. Tie off yarn and weave in ends. (27)
Add safety eyes between rounds 1 & 2, about 3-4 STs apart.
Santa Hat (make 1)
With red, CH 5
Row 1: DC in 3rd CH from the hook, HDC, [SC x3, CH 3, SL ST in 2nd CH from hook, SC, SC in base], HDC, DC. (10) Do not tie off.
SC x 6 across the bottom of the hat, working 2 SC in the edge of the last DC, 2 SC in the center, and 2 SC in the edge of the CH 2 from the beginning of the pattern. Change to white. CH 1 & turn. (6)
Row 2: 2 SC, SC x4, 2 SC. (8) Tie off yarn.
Pom (with white): attach to the tip of the hat. CH 3. Join to the same space you attached to. Tie off yarn and weave in all ends. Sew hat to the top of Santa’s head.
Mrs. Claus Face/Head (make 1)
With taupe, Magic Circle, CH 1.
Round 1: HDC x 8 inside the circle. Join & CH 1. (8)
Round 2: 2 HDC in each ST around. Change to white. Join & CH 1. (16)
Round 3: SC, 2 SC, SC, [SL ST, CH 1, 2 HDC, CH 1, SL ST], SC, 2 SC, SC, SL ST. Tie off yarn. Weave in ends.
Add bow – cut a 6” long strand of red yarn. Pull it around the 2 HDC of Mrs. Claus’s bun. Tie into a bow and cut off excess yarn.
Santa’s Mustache & Mrs. Claus’s Bangs (make 4)
With white, CH 3
Row 1: SC in 2nd CH from hook, SL ST in last. Tie off yarn, leaving a 6” long tail.
Sew 2 to Santa’s face, above his beard. Sew 2 to Mrs. Claus’s forehead, under the hair line.
Add safety eyes between rounds 1 & 2, about 3-4 STs apart. Use black embroidery thread to sew on lashes and red thread to add a smile.
Elf boy & elf girl APPLIQUÉS
Follow along with the video tutorial on YouTube!
Finished Sizes: 2.5” x 2.5”
Yarn + Additional Supplies:
- Yarn: Taupe (6 yards), Red (2 yards), Green (2 yards), Yellow (1 yard)
- 5.00mm (H) crochet hook (for girl’s hair only)
- Black & red embroidery thread for smile.
- 4 – 6mm black safety eyes
Head/Face (make 2)
With taupe: Magic Circle, CH 1.
Round 1: HDC x8 inside the circle. Join & CH 1. (8)
Round 2: 2 HDC x3, *[HDC, CH 3, SL ST in 2nd CH from hook, SC in next CH, SC in same ST]*, 2 HDC x3. Repeat **. Join. (16)
Tie off yarn and weave in ends.
Hat (make 2)
With red (for girl) or green (for boy), CH 5
Row 1: DC in 3rd CH from the hook, HDC, [SC x3, CH 3, SL ST in 2nd CH from hook, SC, SC in base], HDC, DC. (10) Do not tie off.
SC x 6 across the bottom of the hat, working 2 SC in the edge of the last DC, 2 SC in the center, and 2 SC in the edge of the CH 2 from the beginning of the pattern. Change to green (for girl) or red (for boy). CH 1 & turn. (6)
Row 2: 2 SC, SC x4, 2 SC. (8) Tie off yarn.
Pom (with green for girl or red for boy):
Attach yarn to the tip of the hat. CH 3. Join to the same space you attached to. Tie off yarn and weave in all ends.
Sew the boy’s hat on the top of his head. Do not sew on the girl’s hat until her hair is attached.
Girl’s Hair (make 2)
With yellow and 5mm (H) crochet hook:
Cut 24” long strand of yarn. Fold in half and treat as one strand. CH 6. Tie off yarn.
Sew each piece on the side of her head, just above the ear. Sew the hat on top of the head, covering the top of the hair.
Place eyes on both elves, between rounds 1 & 2 and about 4 STs apart. Embroider on smile with red thread for girl and black thread for boy.
gnome man & gnome woman appliqués
Follow along with the video tutorial on YouTube!
Finished Sizes: 3” x 2”
Yarn + Additional Supplies:
- Yarn: Taupe (6 yards), Green (2 yards), Red (2 yards)
- Red embroidery thread for smile.
Hats (make 2)
With green (for man) and red (for woman), CH 5.
Row 1: HDC in 2nd CH from hook, HDC, SC, [SC x2, CH 2, SC x2], SC, HDC x2. CH 1 & turn. (12)
Row 2: HDC x 3, SC x 2, [SC, CH 2, SC] in the CH space, SC x 2, HDC x 3. Working across the bottom, 5 SC across. Join. Tie off yarn, leaving long tail for sewing. Set aside.
Nose (make 2)
With taupe, Magic Circle, CH 1.
Round 1: HDC, SC x 3, HDC, SC x 3. Join. (8) Tie off yarn, leaving long tail for sewing. Set aside.
Gnome Man Head/Beard
With white, Magic Circle, CH 1.
Round 1: HDC x8 inside the circle. Join & CH 1. (8)
Round 2: 2 HDC in each ST around. Join & CH 1. (16)
Round 3: SC x2, [HDC, CH 2, SL ST in 2nd CH from hook, HDC], [DC, CH 2, SL ST in 2nd CH from hook, DC], [HDC, CH 2, SL ST in 2nd CH from hook, HDC], SC x2, SL ST. Tie off and weave in ends.
Sew the hat on the head, just above halfway. Sew on the nose in the middle of the head, overlapping the hat.
Gnome Woman Head
With taupe, Magic Circle, CH 1.
Round 1: HDC x8 in the side circle. Join & CH 1. (8)
Round 2: 2 HDC in each ST around. Join. (16) Tie off yarn and weave in ends. Do not sew on hat until hair is done.
Gnome Woman Hair (make 2)
With white yarn and 5mm (H) crochet hook:
Cut 24” long strand of yarn. Fold in half and treat as one strand. CH 6. Tie off yarn.
Sew each piece to the side of her head and sew the hat on top. Sew on the nose in the middle of the head, overlapping the hat.
Embroider on smile.
Gingerbread Man & Woman Appliqués
Follow along with the video tutorial on YouTube!
Finished Sizes: 2.5” x 2.5”
Yarn + Additional Supplies:
- Yarn: Medium Brown (10 yards), White (2 yards), Red (2 yards)
- Black & red embroidery thread for eyelashes & smile.
- 4 – 6mm black safety eyes
Face/Head (make 2)
With medium brown, Magic Circle, CH 1.
Round 1: HDC x8 inside the circle. Join & CH 1. (8)
Round 2: 2 HDC in each ST around. Join & CH 1. (16)
Round 3: *HDC, 2 HDC* around. Join. (24) Tie off yarn and weave in ends.
Icing, with white: Join to the top of one of the STs of round 3. Surface SL ST in each ST around. Tie off yarn and weave in ends.
Bows (make 2)
With red, CH 5.
Row 1: Starting in 2nd CH from hook, SC x4. CH 1 & turn. (4)
Row 2: SC x 4. Tie off yarn and weave in ends.
With a 6” long strand of red yarn, tightly wrap around the center of the bow. Secure on back with a few knots.
Attach one bow to the bottom of the Gingerbread man and the other to the top of the Gingerbread Woman.
Cheeks (make 4)
With red, CH 2.
[2 SC, SL ST] in the 2nd CH from the hook. Tie off yarn, leaving a long tail. Using the long tail, sew 2 cheeks on each character’s face, between rounds 2 & 3.
Place eyes between rounds 1 & 2, about 4 STs apart. With black thread, embroider eyelashes on the Gingerbread Woman.
Embroider on smile with black/red thread.
Snowman Appliqué
Follow along with the video tutorial on YouTube!
Finished Size: 3” x 3”
Yarn + Additional Supplies:
- Yarn: White (5 yards), Black (3 yards), Orange (1 yard)
- 2 – 6mm black safety eyes
- Black embroidery thread for smile
Head
With white, Magic Circle, CH 1.
Round 1: HDC x8 inside the circle. Join & CH 1. (8)
Round 2: 2 HDC in each ST around. Join & CH 1. (16)
Round 3: *HDC, 2 HDC* around. Join. (24)
Tie off yarn and weave in ends.
Hat
With black, CH 4.
Row 1: Starting in 2nd CH from the hook, SC x3. CH 1 & turn. (3)
Row 2: SC x3. CH 1 & turn. (3)
Row 3: SC x3. CH 4. SC in 2nd CH from hook and in next 2 CHs, SC x 3 down the left side. CH 4, SC in 2nd CH from hook and in next CH, SC2TOG in the next CH and ST. Do not tie off. Move onto border.
Border: SC in next ST, in the corner [SC, CH 1, SC], SC in each ST across the top, in the corner [SC, CH 1, SC], SC in next ST, SC2TOG. SC in the next ST. In the next 2 STs [SC, CH 1, SC]. SC in the next 7 STs, [SC, CH 1, SC] in next 2 STs, SL ST. Tie off yarn, leaving long tail for sewing. Sew hat on head.
Nose
With orange, CH 4.
Row 1: HDC in 2nd CH from hook, SC, SL ST. Tie off yarn, leaving long tail for sewing. Sew onto the middle of the face.
Place safety eyes between rounds 2 & 3 and 4 STs apart. Embroider on smile.
Reindeer Appliqué
Finished Size: 3” x 3”
Yarn + Additional Supplies:
- Yarn: Medium Brown (5 yards), Dark Brown (2 yards), Taupe (1 yard), Red (12”)
- 2 – 6mm black safety eyes
Head
With medium brown, Magic Circle, CH 1.
Round 1: HDC x8 inside the circle. Join & CH 1. (8)
Round 2: 2 HDC in each ST around. Join & CH 1. (16)
Round 3: *SC, 2 SC* around. Join & CH 2. (24)
Round 4: [DC, CH 2, DC, CH 2], SL ST x7. CH 2 [DC, CH 2, DC CH 2] SL ST. Tie off and weave in ends.
Antlers
With dark brown, Attach to the 1st ST to the left of the right ear. *CH 5, SC in the 2nd CH from the hook, SL ST in the next CH, CH 3, SC in the 2nd CH from the hook, SL ST in the next CH, SC in next 2 CHs*. SL ST x3 across the top of the head. Repeat ** SL ST in the last ST before the left ear. Tie off yarn and weave in ends.
Snout
With taupe, Magic Circle, CH 1.
Round 1: HDC x10 inside the circle. Join. Tie off yarn leaving long tail. Sew onto the center of the head. Embroider nose with red yarn.
Place safety eyes between rounds 2 & 3 and 4 STs apart.
Polar Bear Appliqué
Follow Along with the video tutorial on YouTube!
Finished Size: 2.5” x 2.5”
Yarn + Additional Supplies:
- Yarn: White (5 yards), Light Grey (1 yard), Black (12”)
- 2 – 6mm black safety eyes
Head
With white, Magic Circle, CH 1.
Round 1: HDC x8 inside the circle. Join & CH 1. (8)
Round 2: 2 HDC in each ST around. Join & CH 1. (16)
Round 3: *HDC, 2 HDC* around. Join & CH 1. (24)
Round 4: [SC, HDC], 2 DC, [HDC, SC], SL ST x3, [SC, HDC], 2 DC, [HDC, SC], SL ST. Tie off yarn and weave in ends. (15)
Snout
With light grey, Magic Circle, CH 1.
Round 1: HDC x8 inside the circle. Tie off and sew onto the polar bears face. Embroider on nose with black yarn.
Place safety eyes between rounds 2 & 3 and 6 STs apart.
Penguin Appliqué
Finished Size: 3” x 2.5”
Yarn + Additional Supplies:
- Yarn: White (3 yards), Dark Grey (3 yards), Yellow (1 yard)
- 2 – 6mm black safety eyes
With white, CH 7.
Row 1: Starting in 2nd CH from hook, SC x5, 4 SC. Working on opposite side of foundation chain, SC x5. CH 1 & turn. (14)
Row 2: SC x5, 2 SC x4, SC x5. Change to dark grey on last ST. CH 1 & turn. (18)
Row 3: SC x5, *2 SC, SC* x4, SC x5. Now working across the bottom of the penguin and starting in the same ST as last SC, SC x6 across the bottom. Do not join. (28)
Row 4: Starting in same ST as last SC, SC x3, CH 3, SC in 2nd CH from hook and next CH, SL ST into the same ST you worked the CH from, SC x 6, 2 SC, SC, 2 SC, SC x 7, CH 3, SC in 2nd CH from hook and next CH, SL ST into the same ST you worked the CH from, SC x2, 2 SC in the next ST on the bottom, SC x4, 2 SC. SL ST in next.
Beak
With yellow, CH 2.
Row 1: SC in 2nd CH from hook. Tie off yarn. Sew onto penguin.
Feet (make 2)
With yellow, CH 2.
Row 1: [HDC, SL ST] x 3 in the 2nd CH from hook. Tie off yarn and sew onto the bottom of the penguin.
Place safety eyes above the beak and 4 STs apart.
And you’re all done!
Be sure to check out the rest of the patterns in the Advent Calendar Series!
- Advent Calendar – Tree Wall Hanging Crochet Pattern
- Advent Calendar – Pouch & Gift Bag Crochet Pattern
- Advent Calendar – Winter & Christmas Appliqué Crochet Patterns Part 1
- Advent Calendar – Winter & Christmas Appliqué Crochet Patterns Part 2
You are free to sell the items you make with this pattern, and I’d love if you could please link back to this page. You do not have permission to republish or distribute this pattern in any way or claim it as your own. Do not use my photos in your sale listings or for any other purposes. Thank you
This page includes affiliate links. If you make a purchase from these links, I may make a small commission at no cost to you! Thank you for your support!
