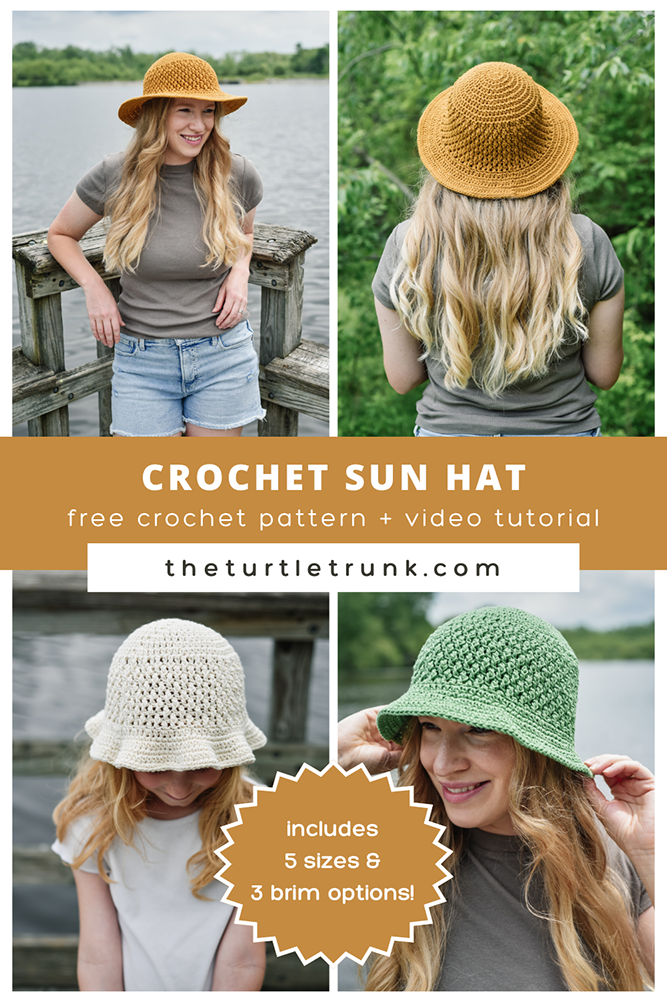
Country Cottage Sun Hat Crochet Pattern
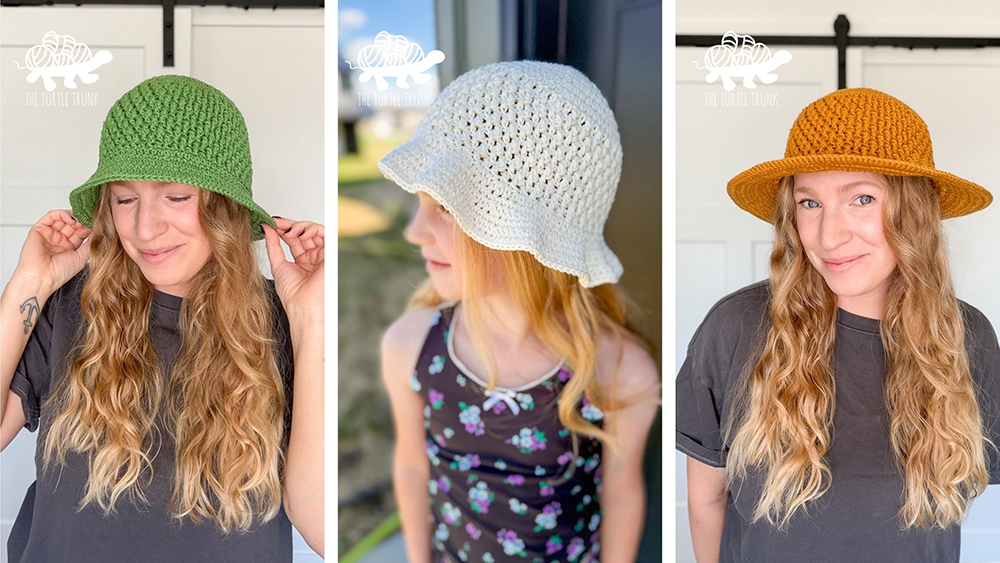
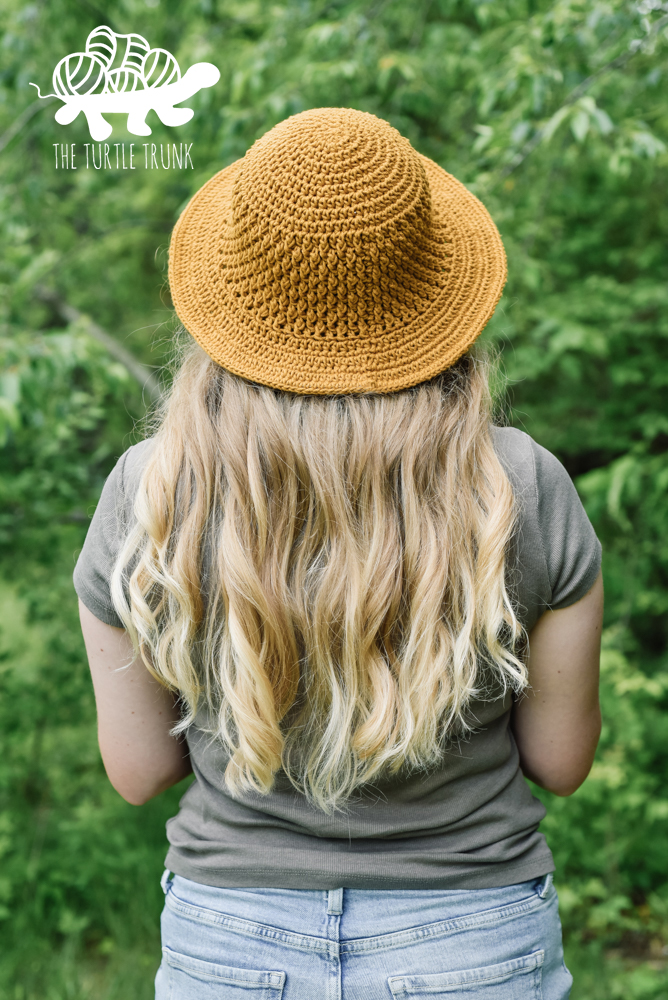
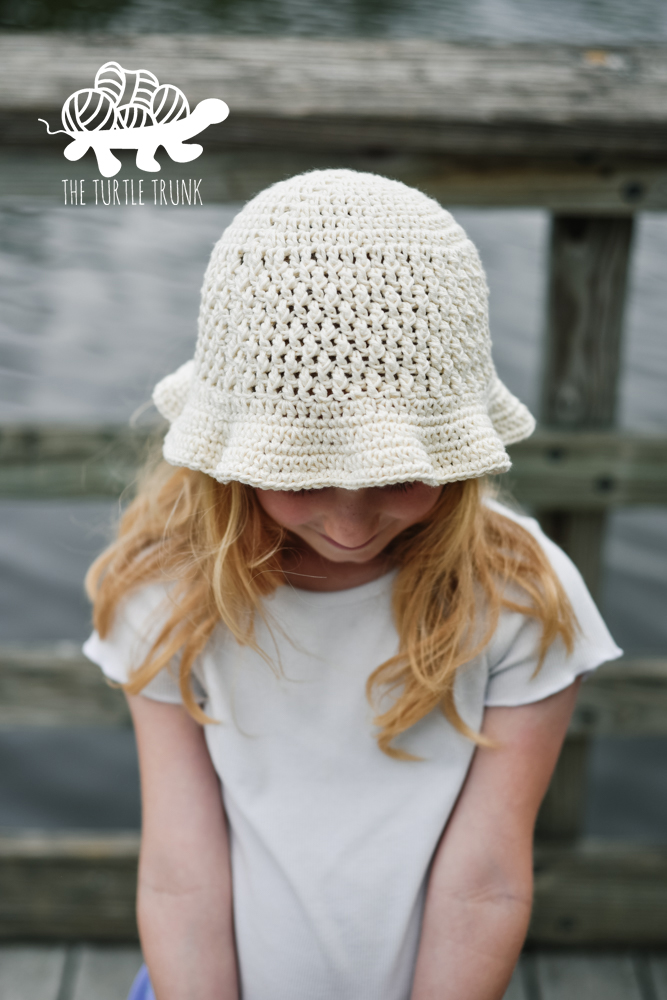
The Country Cottage Sun Hat is a fun and easy crochet pattern that’s perfect for summer! It includes 5 sizes for babies, kids, and adults! Choose from 3 brim options: a bucket styled brim, riffled brim, or wide brim! This crochet hat features fun, textured stitches, and it works up quickly!
I love a quick and easy, crochet accessory!
And that’s just what the Country Cottage Sun Hat is!
It’s perfect for sunny days and includes multiple sizes and styles, so you can make it just right for you!
The pattern includes 5 sizes: baby, toddler, child, teen/adult small, and adult large.
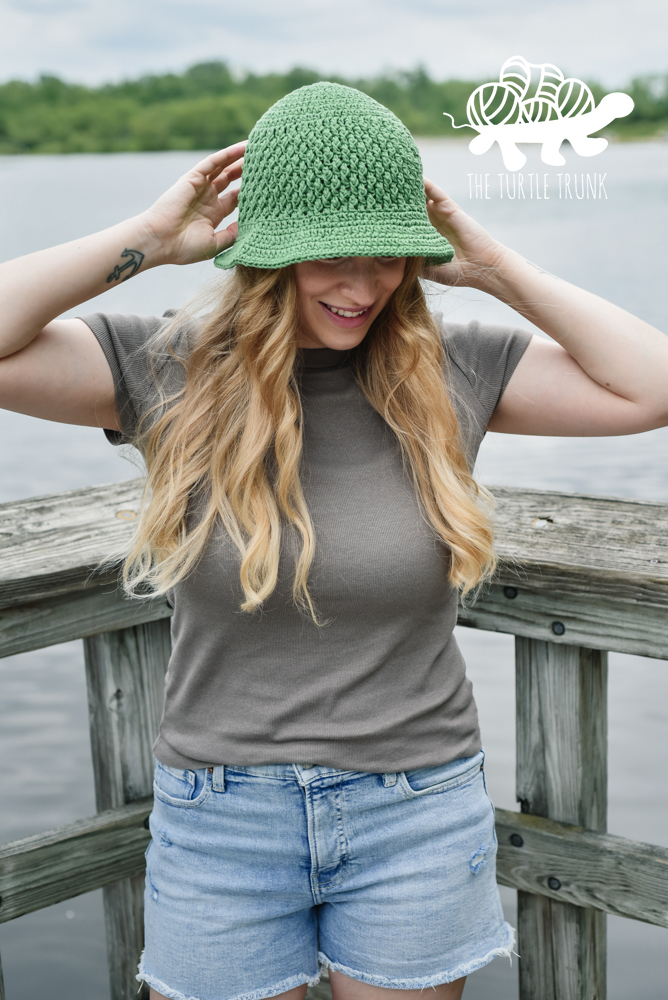
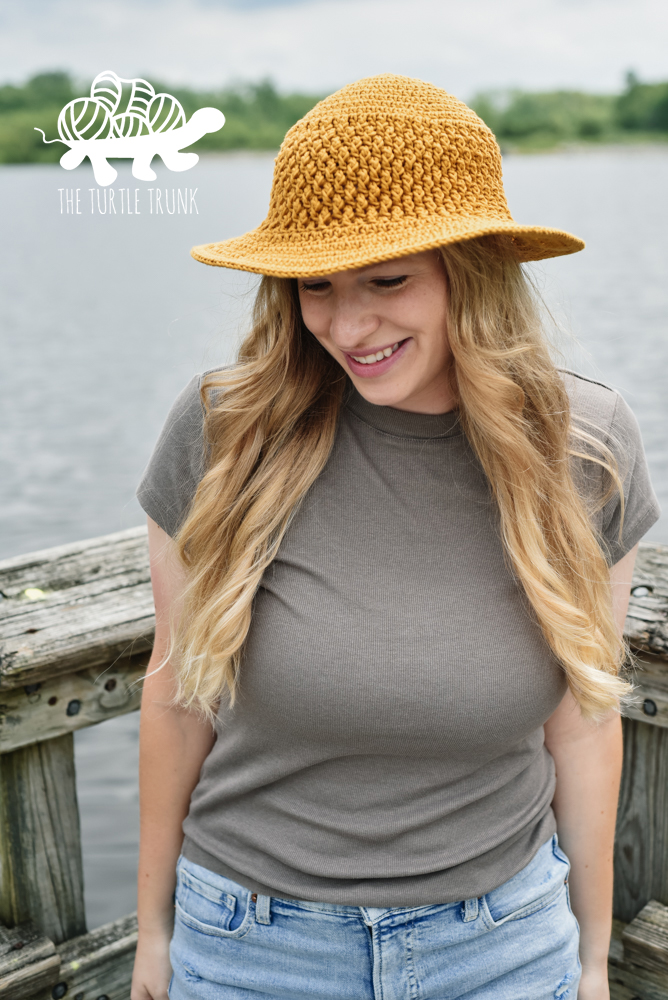
It also includes 3 brim options: standard (bucket hat style), ruffled, and wide (using hat wire).
This pattern works up quick and easy!
Keep reading below to learn more about this pattern or scroll to the bottom for the free written pattern and video tutorial. You can also grab the ad-free, printable, PDF pattern on Etsy and Ravelry!
FOLLOW ALONG WITH THE AD FREE & PRINTABLE PDF PATTERN
FROM ETSY AND RAVELRY!
Quick heads up! This page includes affiliate links. If you make a purchase from these links, I may make a small commission at no extra cost to you! You can read more about my disclosure policy HERE. Thank you for your support!
Not ready to make just yet?
Save this pattern to Pinterest!
Follow along with the video tutorial on YouTube!
Country Cottage Collection
If you enjoy this sun hat pattern and the crochet stitches it uses, then be sure to check out all the other patterns in my Country Cottage Collection!
I have over 10 other patterns in this collection including wearable accessories and home decor!
I’m always adding more Country Cottage patterns every year, so if there’s a specific pattern you’d like to see, let me know!
It’s one of my most popular collections because the stitches look intricate but are super easy to make! They give your piece a gorgeous texture and look too!
Best yarn for a crochet sun hat
I used WeCrochet / KnitPicks Dishie yarn for my Country Cottage Sun Hats.
Dishie is a 100% cotton yarn and it comes in a variety of beautiful colors.
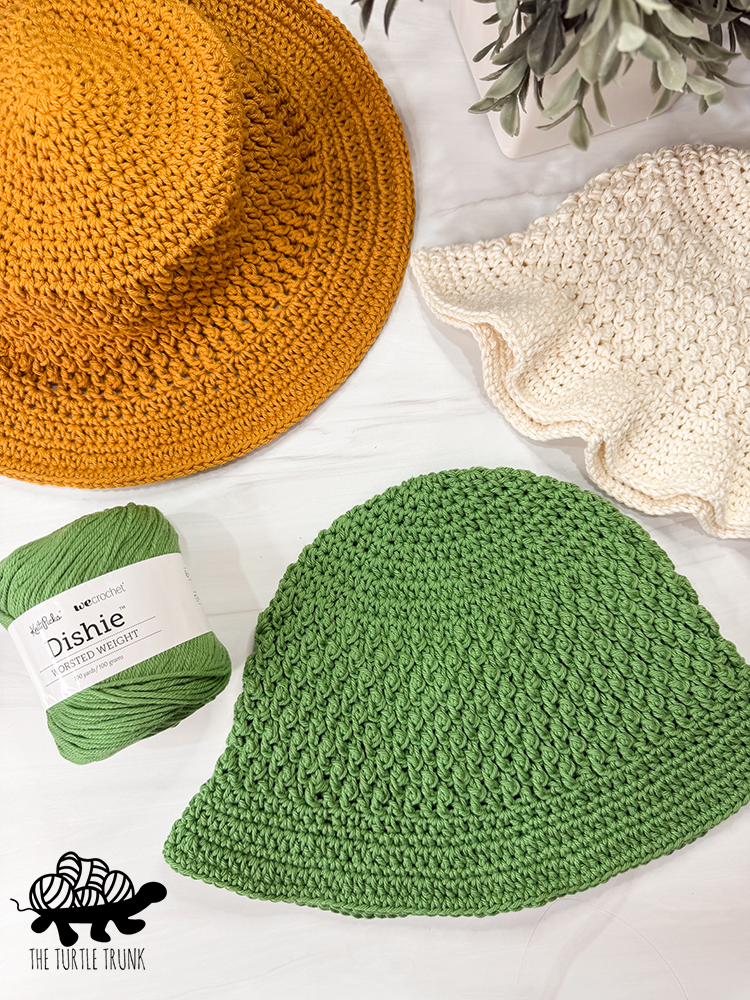
It’s my favorite cotton yarn! It soft but durable, it doesn’t pill, and it holds its shape well.
I used the colors Butterscotch (yellow), Jade (green), and Swan (white).
Feel free to use your favorite medium 4 weight yarn though! I like using cotton yarn for this sun hat because it’s durable, machine washable, and sturdy enough to hold a good shape. You can use a different fiber if you prefer though!
Here are some other yarns my testers used and that worked well:
- Loops & Threads Classic Cotton
- Premier Home Cotton
- I Love This Cotton
- Premier Basic Worsted
- Sugar n’ Cream
Sizes
This pattern includes 5 sizes: baby, toddler, child, teen / adult small, and adult large.
See the size chart below to find the best size for you. This hat does stretch a bit so it’s made a bit small than the head size.
It’s always best to make the gauge swatch (found below in the notes) to ensure proper sizing!
| Sizes (Head Circumference) | Hat Circumference | Hat Height (Not including brim) | Yardage (standard / ruffled & wide brim) |
| Baby 0-12m (13-15″) | 13″ | 5″ | 90 / 100 yards |
| Toddler 1-3yrs (16-17″) | 15″ | 5.5″ | 140 / 150 yards |
| Child 3-10yrs (18-20″) | 17″ | 6″ | 165 / 175 yards |
| Teen/Adult Small (20-22″) | 19″ | 7″ | 190 / 201 yards |
| Adult Large (22-23″) | 21″ | 7.5″ | 215 / 230 yards |
Brim Options
This pattern includes 3 brim options: standard, ruffled, and wide. All of the brim options can be customized to be any length/width by continuing to increase the brim rounds until your desired length is reached.
The standard brim is a bucket styled brim, which has a slight angle downward.
The ruffled brim is wavier, it’s super cute for kids or for adults who like whimsey!
The wide brim is worked the same as the ruffled brim but you add hat wire to make it sturdy and straight! You can also bend and mold the wire to make any style you’d like!
I got the hat wire for the wide brimmed hat from Judith M Millinery Supply House. It is a white rayon covered wire in the size #19. You need about 1 yard of wire per hat. I would order a bit extra just in case. I cut my wire longer than I needed then trimmed it at the end.
If using the hat wire, you will also need a metal joiner to join the ends. I also got those from Judith M Millinery Supply House. Place both ends of the wire in the joiner, then use pliers to squeeze and close the joiner around the ends.
Difficulty
Advanced Beginner
Gauge
15 STs x 10 Rows = 4″ x 4″ in HDC
Adjust hook size to meet gauge.
notes
- CH 1 or 2 at the beginning of each round does not count as a ST.
- At the end of each round, join with a SL ST to the top of the 1st ST of the round. Work your 1st ST of the new round into the same ST you joined to.
- The Round and ST numbers are in order by size from smallest to largest.
- Instructions between *asterisks* are to be repeated until the end of the round.
- ST x# means to work 1 ST into that # STs across. # ST means to work that # of STs all into the same ST. Example: HDC x3 means to work 1 HDC into each of the next 3 STs. 2 HDC means to work 2 HDC (an increase) into the same ST.
Supplies
- Medium (4) weight yarn (see yardage above in size chart)
- I used KnitPicks / WeCrochet Dishie in Butterscotch, Swan, and Jade.
- 4.00mm (G) crochet hook
- Yarn needle
- Scissors
- Optional: hat wire and metal joiner
abbreviations (us terms)
CH(s) – Chain(s)
ST(s) – Stitch(es)
SL ST – Slip Stitch
SC – Single Crochet
HDC – Half Double Crochet
DC – Double Crochet
FPDC – Front Post Double Crochet
special stitches
Front Post Double Crochet
Yarn over, insert your hook behind the post of the next ST (going in from the front, wrap around the back, and up through to the front again). Yarn over and pull up a loop, yarn over and pull through 2 loops, yarn over and pull through last 2 loops.
The rounds using the FPDC will alternate with DC being worked into the FPDC from the previous round and FPDC being worked around the DC from the previous round.
Country Cottage Sun Hat Pattern
Magic Circle, CH 1.
Round 1: HDC x8 inside circle. Join & CH 1. (8)
Round 2: *2 HDC*. Join & CH 1. (16)
Round 3: *HDC, 2 HDC*. Join & CH 1. (24)
Round 4: *2 HDC, HDC x2*. Join & CH 1. (32)
Round 5: *HDC x3, 2 HDC*. Join & CH 1. (40)
Round 6: *2 HDC, HDC x4*. Join & CH 1. (48)
Baby size CH 2 instead of 1 & move onto to Body.
Round 7: *HDC x5, 2 HDC*. Join & CH 1. (56)
Toddler size CH 2 instead of 1 & move onto to Body.
Round 8: *2 HDC, HDC x6.* Join & CH 1. (64)
Child size CH 2 instead of 1 & move onto to Body.
Round 9: *HDC x7, 2 HDC*. Join & CH 1. (72)
Teen/Adult Small size CH 2 instead of 1 & move onto Body.
Round 10: *2 HDC, HDC x8*. Join & CH 2. (80)
Adult Large move onto Body.
Body
Round (7, 8, 9, 10, 11): DC in each ST around. Join & CH 2. (48, 56, 64, 72, 80)
Round (8, 9, 10, 11, 12): *DC, FPDC*. Join & CH 2. (48, 56, 64, 72, 80)
Round (9, 10, 11, 12, 13): *FPDC, DC*. Join & CH 2. (48, 56, 64, 72, 80)
Rounds (10, 11, 12, 13, 14) – (14, 16, 18, 19, 20): Repeat the last 2 rounds until desired hat height is reached (around the top of the ear). CH 1 instead of 2 at the end of the final round. (48, 56, 64, 72, 80)
Note: Some sizes end on an odd numbered round and others on an even numbered round. It does not matter which round you end on.
Move onto Brim.
Standard Brim
Feel free to work more rounds for a longer brim. Continue the pattern of an increase round followed by a SC round until desired length is reached.
Round 1: *HDC x3, 2 HDC*. Join & CH 1. (60, 70, 80, 90, 100)
Round 2: SC in each ST around. Join & CH 1. (60, 70, 80, 90, 100)
Round 3: *2 HDC, HDC x4*. Join & CH 1. (72, 84, 96, 108, 120)
Round 4: SC in each ST around. Join & CH 1. (72, 84, 96, 108, 120)
Baby size end here. Cut yarn and weave in ends.
Round 5: *HDC x5, 2 HDC*. Join & CH 1. (98, 112, 126, 140)
Round 6: SC in each ST around. Join. (98, 112, 126, 140)
Cut yarn and weave in ends.
Ruffled Brim
Feel free to work more rounds for a longer brim. Continue the pattern of an increase round followed by a SC round until desired length is reached.
Round 1: *HDC, 2 HDC*. Join & CH 1. (72, 84, 96, 108, 120)
Round 2: SC in each ST around. Join & CH 1. (72, 84, 96, 108, 120)
Round 3: *2 HDC, HDC x2*. Join & CH 1. (96, 112, 128, 144, 160)
Round 4: SC in each ST around. Join & CH 1. (96, 112, 128, 144, 160)
Baby size end here. Cut yarn and weave in ends.
Round 5: *HDC x3, 2 HDC*. Join & CH 1. (140, 160, 180, 200)
Round 6: SC in each ST around. Join. (140, 160, 180, 200)
Cut yarn and weave in ends.
Wide Brim
Feel free to work more rounds for a longer brim. Continue the pattern of an increase round followed by a SC round until desired length is reached. Work the last round of SC around the wire.
Round 1: *HDC, 2 HDC*. Join & CH 1. (72, 84, 96, 106, 120)
Round 2: SC in each ST around. Join & CH 1. (72, 84, 96, 106, 120)
Round 3: *2 HDC, HDC x2*. Join & CH 1. (96, 112, 128, 144, 160)
Baby size: work the next round around the wire. See “Adding the Wire” instructions below.
Round 4: SC in each ST around. Join & CH 1. (96, 112, 128, 144, 160)
Baby size end here. Cut yarn and weave in ends.
Round 5: *HDC x3, 2 HDC*. Join & CH 1. (140, 160, 180, 200)
Work the next round around the wire. See “Adding the Wire” instructions below.
Round 6: SC in each ST around. Join. (140, 160, 180, 200)
Cut yarn and weave in ends.
Adding the Wire
See video tutorial for assistance.
We will add the wire on the last SC round of the brim.
Cut your wire so it is at least 1-2″ longer than the circumference of your brim. Keep in mind that the brim will stretch so cut the wire longer than you need and you can trim it at the end for the perfect fit.
Start your final round and work each SC ST around the wire.
When you reach the end of the round (before joining), trim your wire until the ends meet, place your metal joiner between the 2 ends, and squish the ends of the metal joiner to secure the ends of the wire.
Finish the round by joining with a SL ST to the 1st ST of the round.
Cut off yarn and weave in ends.
And you’re all done!
I hope you enjoyed the Country Cottage Sun Hat crochet pattern!
I can’t wait to see your finished creations, so be sure to tag @theturtletrunk on Instagram!
You are free to sell the items you make with this crochet pattern, and I’d love if you could please link back to this page. You do not have permission to republish or distribute this pattern in any way or claim it as your own. Do not use my photos in your sale listings or for any other purposes. Thank you.
This page includes affiliate links. If you make a purchase from these links, I may make a small commission at no cost to you! Thank you for your support!